Kita harus mempertimbangkan untuk menginstal ProxySQL pada node klien untuk manajemen beban kerja yang efisien di seluruh cluster tanpa perubahan apa pun pada aplikasi yang menghasilkan kueri. Ini adalah solusi ketersediaan tinggi yang direkomendasikan untuk Percona XtraDB Cluster.
Beberapa fitur populer ProxySQL adalah:
- Kinerja tinggi
- Manajemen beban kerja yang efisien
- Tembolok kueri
- Perutean kueri
- Mendukung failover
- Konfigurasi lanjutan dengan 0 waktu henti
- Proxy lapisan aplikasi
- Cross-platform
- Dukungan topologi lanjutan
- Firewall
Spesifikasi Lingkungan:
192.168.56.115
sen
Persyaratan sebelumnya:
Kita perlu membuka port di bawah ini di semua server
firewall-cmd --zone=public --add-service=mysql --permanent

firewall-cmd --zone=public --add-port=3306/tcp --permanent
firewall-cmd --zone=public --add-port=4567/tcp --permanent
firewall-cmd --zone=public --add-port=4568/tcp --permanent
firewall-cmd --zone=public --add-port=4444/tcp --permanent
firewall-cmd --zone=public --add-port=4567/udp --permanent
Izinkan port layanan ProxySQL 6033/tcp (kebalikan dari port default MySQL 3306) di Linux Firewall.
firewall-cmd --permanent --add-port=6033/tcp

firewall-cmd --reload
Memasang ProxySQL Load Balancer untuk Percona XtraDB Cluster di CentOS 7
ProxySQL v2 secara native mendukung Percona XtraDB Cluster, Untuk menginstal ProxySql, instal dari repositori percona
sudo yum install proxysql2
Untuk terhubung ke antarmuka admin ProxySQL, Anda memerlukan klien MySQL.
yum install Percona-XtraDB-Cluster-client-57
Sekarang mulai layanan proxysql
[example@sqldat.com ~]# systemctl start proxysql.service
Untuk memeriksa port pada node cluster gunakan query di bawah ini.
mysql -uroot -p -e "SHOW GLOBAL VARIABLES LIKE 'PORT'";
Sekarang sambungkan ke panel admin ProxySQL dan konfigurasikan penyeimbang beban.
mysql -u admin -p123 -h 127.0.0.1 -P6032 --prompt='ProxySQL> '

INSERT INTO mysql_servers(hostgroup_id, hostname, port) VALUES (0,'192.168.56.110',3306);
INSERT INTO mysql_servers(hostgroup_id, hostname, port) VALUES (0,'192.168.56.113',3306);
INSERT INTO mysql_servers(hostgroup_id, hostname, port) VALUES (0,'192.168.56.114',3306);

ProxySQL> SELECT * FROM mysql_servers;
+--------------+----------------+------+-----------+--------+--------+-------------+-----------------+---------------------+---------+----------------+---------+
| hostgroup_id | hostname | port | gtid_port | status | weight | compression | max_connections | max_replication_lag | use_ssl | max_latency_ms | comment |
+--------------+----------------+------+-----------+--------+--------+-------------+-----------------+---------------------+---------+----------------+---------+
| 0 | 192.168.56.110 | 3306 | 0 | ONLINE | 1 | 0 | 1000 | 0 | 0 | 0 | |
| 0 | 192.168.56.113 | 3306 | 0 | ONLINE | 1 | 0 | 1000 | 0 | 0 | 0 | |
| 0 | 192.168.56.114 | 3306 | 0 | ONLINE | 1 | 0 | 1000 | 0 | 0 | 0 | |
+--------------+----------------+------+-----------+--------+--------+-------------+-----------------+---------------------+---------+----------------+---------+
3 rows in set (0.00 sec)
Konfigurasikan Pemantauan Node ProxySQL:
Login ke instance database MySQL dan jalankan perintah berikut untuk membuat pengguna pemantauan dengan hak istimewa USAGE
pada setiap NODE percona:
CREATE USER 'proxysql'@'%' IDENTIFIED BY 'ProxySQL';
GRANT USAGE ON *.* TO 'proxysql'@'%';

mysql> CREATE USER 'proxysql'@'%' IDENTIFIED BY 'ProxySQL';
Query OK, 0 rows affected (0.01 sec)

mysql> GRANT USAGE ON *.* TO 'proxysql'@'%';
Query OK, 0 rows affected (0.02 sec)

UPDATE global_variables SET variable_value='proxysql' WHERE variable_name='mysql-monitor_username';

UPDATE global_variables SET variable_value='ProxySQL' WHERE variable_name='mysql-monitor_password';

LOAD MYSQL VARIABLES TO RUNTIME;

SAVE MYSQL VARIABLES TO DISK;

ProxySQL> UPDATE global_variables SET variable_value='proxysql' WHERE variable_name='mysql-monitor_username';
Query OK, 1 row affected (0.01 sec)

ProxySQL> UPDATE global_variables SET variable_value='ProxySQL' WHERE variable_name='mysql-monitor_password';
Query OK, 1 row affected (0.00 sec)

ProxySQL> LOAD MYSQL VARIABLES TO RUNTIME;
Query OK, 0 rows affected (0.00 sec)

ProxySQL> SAVE MYSQL VARIABLES TO DISK;
Query OK, 136 rows affected (0.01 sec)

ProxySQL> LOAD MYSQL SERVERS TO RUNTIME;
Query OK, 0 rows affected (0.01 sec)
Membuat Pengguna Klien ProxySQL
Provide read/write access to the cluster for ProxySQL, add this user on one of the Percona XtraDB Cluster nodes:

CREATE USER 'lbuser'@'192.168.56.115' IDENTIFIED BY 'lbpass';

GRANT ALL ON *.* TO 'lbuser'@'192.168.56.115';
Membuat Pengguna Klien ProxySQL:
ProxySQL> INSERT INTO mysql_users (username,password) VALUES ('lbuser','lbpass');
Query OK, 1 row affected (0.00 sec)
ProxySQL> LOAD MYSQL USERS TO RUNTIME;
Query OK, 0 rows affected (0.00 sec)
ProxySQL> SAVE MYSQL USERS TO DISK;
Query OK, 0 rows affected (0.02 sec)
konfirmasi bahwa pengguna telah diatur dengan benar, Anda dapat mencoba masuk:
[example@sqldat.com ~]# mysql -u lbuser -plbpass -h 127.0.0.1 -P 6033
mysql: [Warning] Using a password on the command line interface can be insecure.
Welcome to the MySQL monitor. Commands end with ; or \g.
Your MySQL connection id is 4
Server version: 5.5.30 (ProxySQL)

Copyright (c) 2009-2019 Percona LLC and/or its affiliates
Copyright (c) 2000, 2019, Oracle and/or its affiliates. All rights reserved.

Oracle is a registered trademark of Oracle Corporation and/or its
affiliates. Other names may be trademarks of their respective
owners.
Type 'help;' or '\h' for help. Type '\c' to clear the current input statement.
mysql>
Mari kita lihat node mana yang akan dihubungkan oleh klien kita dari cluster.
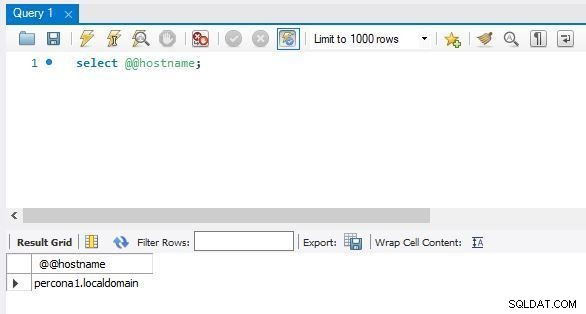
[example@sqldat.com ~]# mysql -u lbuser -plbpass -h 127.0.0.1 -P 6033 -e "select @@hostname;";
mysql: [Warning] Using a password on the command line interface can be insecure.
+----------------------+
| @@hostname |
+----------------------+
| percona3.localdomain |
+----------------------+
Anda dapat melihat server proxy terhubung ke percona3
Saya mencoba dari sesi Putty lain kemudian terhubung ke percona2:
[example@sqldat.com ~]# mysql -u lbuser -plbpass -h 127.0.0.1 -P 6033 -e "select @@hostname;";
mysql: [Warning] Using a password on the command line interface can be insecure.
+----------------------+
| @@hostname |
+----------------------+
| percona2.localdomain |
+----------------------+
Setelah beberapa sesi beberapa kali terhubung ke percona1:
[example@sqldat.com ~]# mysql -u lbuser -plbpass -h 127.0.0.1 -P 6033 -e "select @@hostname;";
mysql: [Warning] Using a password on the command line interface can be insecure.
+----------------------+
| @@hostname |
+----------------------+
| percona1.localdomain |
+----------------------+
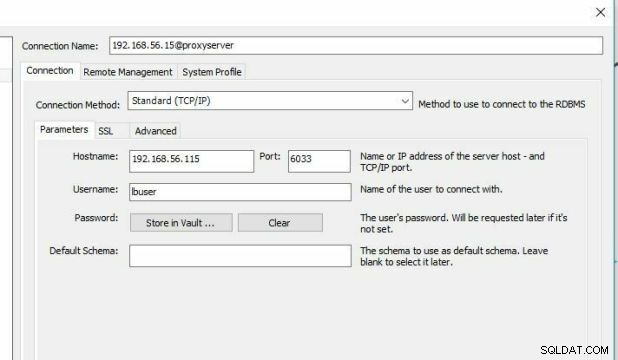
Menghubungkan dari MySQL Workbench:
Di bawah ini adalah konfigurasi sesi saya di meja kerja MySQL:
Saya Mencoba melihat Node mana yang akan terhubung dari MySQL Workbench
Kegagalan:
Sekarang kita akan memeriksa bagaimana ini akan melakukan failover
[example@sqldat.com mysql]# service mysql stop
Redirecting to /bin/systemctl stop mysql.service

ProxySQL> select hostgroup_id,hostname,port,status from runtime_mysql_servers;
+--------------+----------------+------+---------+
| hostgroup_id | hostname | port | status |
+--------------+----------------+------+---------+
| 0 | 192.168.56.110 | 3306 | ONLINE |
| 0 | 192.168.56.114 | 3306 | SHUNNED |
| 0 | 192.168.56.113 | 3306 | ONLINE |
+--------------+----------------+------+---------+
3 rows in set (0.01 sec)
Sekarang mari mulai mysql pada node 3 lagi dan periksa status cluster lagi dari server proxy
[example@sqldat.com mysql]#systemctl start mysql.service

ProxySQL> SELECT hostgroup_id hg,count(status) cnt from main.runtime_mysql_servers WHERE status = "ONLINE" GROUP BY hg having cnt ;
+----+-----+
| hg | cnt |
+----+-----+
| 0 | 3 |
+----+-----+
1 row in set (0.00 sec)

ProxySQL> select hostgroup_id,hostname,port,status from runtime_mysql_servers;
+--------------+----------------+------+--------+
| hostgroup_id | hostname | port | status |
+--------------+----------------+------+--------+
| 0 | 192.168.56.110 | 3306 | ONLINE |
| 0 | 192.168.56.114 | 3306 | ONLINE |
| 0 | 192.168.56.113 | 3306 | ONLINE |
+--------------+----------------+------+--------+
3 rows in set (0.00 sec)
CATATAN: Jika Anda melihat status node sebagai DIHAPUS lalu coba sambungkan beberapa kali agar klien mendapatkan status terbaru dari kluster karena runtime_mysql_servers menyimpan status terbaru dari node saat terakhir kali mencoba terhubung.
Menguji Cluster dengan sysbench:
yum install sysbench
sysbench memerlukan kredensial pengguna klien ProxySQL yang Anda buat (lbuser/lbpass) dalam Membuat Pengguna Klien ProxySQL.
sysbench /usr/share/sysbench/oltp_read_only.lua --threads=4 --mysql-host=127.0.0.1
--mysql-user=lbuser --mysql-password=lbpass --mysql-port=6033 --tables=10 --table-size=10000 prepare

sysbench /usr/share/sysbench/oltp_read_only.lua --threads=4 --events=0 --time=300 --mysql-host=27.0.0.1
--mysql-user=lbuser --mysql-password=lbpass --mysql-port=6033 --tables=10
--table-size=10000 --range_selects=off --db-ps-mode=disable --report-interval=1 run
Untuk melihat jumlah perintah yang dijalankan pada cluster:
proxysql> SELECT * FROM stats_mysql_commands_counters;