Membangun aplikasi yang menggunakan database SQL adalah tugas pemrograman yang cukup umum. Basis data SQL ada di mana-mana dan memiliki dukungan hebat di Python. Dalam pemrograman GUI, PyQt menyediakan dukungan database SQL yang kuat dan lintas platform yang memungkinkan Anda membuat, menghubungkan, dan mengelola database Anda secara konsisten.
Dukungan SQL PyQt terintegrasi penuh dengan arsitektur Model-View untuk membantu Anda dalam proses membangun aplikasi database.
Dalam tutorial ini, Anda akan mempelajari cara:
- Gunakan dukungan SQL PyQt untuk terhubung ke database dengan andal
- Jalankan kueri SQL pada database menggunakan PyQt
- Gunakan Arsitektur Tampilan Model PyQt dalam aplikasi basis data
- Tampilkan dan edit data menggunakan widget PyQt yang berbeda
Contoh dalam tutorial ini memerlukan pengetahuan dasar tentang bahasa SQL, terutama sistem manajemen database SQLite. Beberapa pengetahuan sebelumnya tentang pemrograman GUI dengan Python dan PyQt juga akan membantu.
Bonus Gratis: 5 Thoughts On Python Mastery, kursus gratis untuk developer Python yang menunjukkan peta jalan dan pola pikir yang Anda perlukan untuk meningkatkan keterampilan Python Anda.
Menghubungkan PyQt ke Database SQL
Menghubungkan aplikasi ke database relasional dan membuat aplikasi membuat, membaca, memperbarui, dan menghapus data yang disimpan dalam database itu adalah tugas umum dalam pemrograman. Basis data relasional umumnya diatur ke dalam satu set tabel , atau hubungan . Baris tertentu dalam tabel disebut sebagai catatan atau tupel , dan kolom disebut sebagai atribut .
Catatan: Istilah bidang biasanya digunakan untuk mengidentifikasi satu bagian data yang disimpan dalam sel dari catatan yang diberikan dalam sebuah tabel. Di sisi lain, istilah nama bidang digunakan untuk mengidentifikasi nama kolom.
Setiap kolom menyimpan jenis informasi tertentu, seperti nama, tanggal, atau nomor. Setiap baris mewakili satu set data yang terkait erat, dan setiap baris memiliki struktur umum yang sama. Misalnya, dalam database yang menyimpan data tentang karyawan di perusahaan, baris tertentu mewakili karyawan individu.
Sebagian besar sistem basis data relasional menggunakan SQL (bahasa kueri terstruktur) untuk kueri, manipulasi, dan pemeliharaan data yang disimpan dalam basis data. SQL adalah bahasa pemrograman deklaratif dan khusus domain yang dirancang khusus untuk berkomunikasi dengan database.
Sistem database relasional dan SQL banyak digunakan saat ini. Anda akan menemukan beberapa sistem manajemen basis data yang berbeda, seperti SQLite, PostgreSQL, MySQL, MariaDB, dan banyak lainnya. Anda dapat menghubungkan Python ke salah satu sistem database ini menggunakan pustaka Python SQL khusus.
Catatan: Meskipun dukungan SQL bawaan PyQt adalah opsi yang lebih disukai untuk mengelola database SQL di PyQt, Anda juga dapat menggunakan perpustakaan lain untuk menangani koneksi database. Beberapa dari library ini termasuk SQLAlchemy, pandas, SQLite, dan sebagainya.
Namun, menggunakan perpustakaan yang berbeda untuk mengelola database Anda memiliki beberapa kelemahan. Anda tidak akan dapat memanfaatkan integrasi antara kelas SQL PyQt dan arsitektur Model-View. Selain itu, Anda akan menambahkan dependensi ekstra ke aplikasi Anda.
Ketika datang ke pemrograman GUI dengan Python dan PyQt, PyQt menyediakan serangkaian kelas yang kuat untuk bekerja dengan database SQL. Kumpulan kelas ini akan menjadi sekutu terbaik Anda saat Anda perlu menghubungkan aplikasi Anda ke database SQL.
Catatan: Sayangnya, dokumentasi resmi PyQt5 memiliki beberapa bagian yang tidak lengkap. Untuk mengatasinya, Anda dapat melihat dokumentasi PyQt4, dokumentasi Qt For Python, atau dokumentasi Qt asli. Dalam tutorial ini, beberapa tautan membawa Anda ke dokumentasi Qt asli, yang merupakan sumber informasi yang lebih baik dalam banyak kasus.
Dalam tutorial ini, Anda akan mempelajari dasar-dasar cara menggunakan dukungan SQL PyQt untuk membuat aplikasi GUI yang berinteraksi secara andal dengan database relasional untuk membaca, menulis, menghapus, dan menampilkan data.
Membuat Koneksi Basis Data
Menghubungkan aplikasi Anda ke database SQL fisik merupakan langkah penting dalam proses pengembangan aplikasi database dengan PyQt. Untuk melakukan langkah ini dengan sukses, Anda memerlukan beberapa informasi umum tentang bagaimana database Anda diatur.
Misalnya, Anda perlu mengetahui sistem manajemen basis data yang digunakan untuk membangun basis data Anda, dan Anda mungkin juga perlu memiliki nama pengguna, kata sandi, nama host, dan sebagainya.
Dalam tutorial ini, Anda akan menggunakan SQLite 3, yang merupakan sistem database yang telah teruji dengan dukungan di semua platform dan persyaratan konfigurasi minimal. SQLite memungkinkan Anda untuk membaca dan menulis langsung ke database di disk lokal Anda tanpa memerlukan proses server terpisah. Itu menjadikannya pilihan yang mudah digunakan untuk mempelajari pengembangan aplikasi basis data.
Keuntungan lain menggunakan SQLite adalah library ini disertakan bersama Python dan juga dengan PyQt, jadi Anda tidak perlu menginstal apa pun untuk mulai bekerja dengannya.
Di PyQt, Anda dapat membuat koneksi database dengan menggunakan QSqlDatabase kelas. Kelas ini mewakili koneksi dan menyediakan antarmuka untuk mengakses database. Untuk membuat koneksi, cukup panggil .addDatabase() di QSqlDatabase . Metode statis ini menggunakan driver SQL dan nama koneksi opsional sebagai argumen dan mengembalikan koneksi database:
QSqlDatabase.addDatabase(
    driver, connectionName=QSqlDatabase.defaultConnection
)
Argumen pertama, driver , adalah argumen wajib yang menyimpan string yang berisi nama driver SQL yang didukung PyQt. Argumen kedua, connectionName , adalah argumen opsional yang menyimpan string dengan nama koneksi. connectionName default ke QSqlDatabase.defaultConnection , yang biasanya menyimpan string "qt_sql_default_connection" .
Jika Anda sudah memiliki koneksi bernama connectionName , maka koneksi tersebut dihapus dan diganti dengan koneksi baru, dan .addDatabase() mengembalikan koneksi database yang baru ditambahkan kembali ke pemanggil.
Panggilan ke .addDatabase() menambahkan koneksi database ke daftar koneksi yang tersedia. Daftar ini adalah registrasi global yang PyQt pertahankan di belakang layar untuk melacak koneksi yang tersedia dalam aplikasi. Mendaftarkan koneksi Anda dengan connectionName yang bermakna akan memungkinkan Anda untuk mengelola beberapa koneksi dalam aplikasi database.
Setelah Anda membuat koneksi, Anda mungkin perlu mengatur beberapa atribut di dalamnya. Kumpulan atribut spesifik akan bergantung pada driver yang Anda gunakan. Secara umum, Anda perlu menyetel atribut seperti nama database, nama pengguna, dan sandi untuk mengakses database.
Berikut ringkasan metode penyetel yang dapat Anda gunakan untuk menyetel atribut atau properti koneksi database yang lebih umum digunakan:
| Metode | Deskripsi |
|---|---|
.setDatabaseName(name) | Menyetel nama database menjadi name , yang merupakan string yang mewakili nama database yang valid |
.setHostName(host) | Menyetel nama host menjadi host , yang merupakan string yang mewakili nama host yang valid |
.setUserName(username) | Menyetel nama pengguna menjadi username , yang merupakan string yang mewakili nama pengguna yang valid |
.setPassword(password) | Menyetel sandi menjadi password , yang merupakan string yang mewakili kata sandi yang valid |
Perhatikan bahwa kata sandi yang Anda berikan sebagai argumen ke .setPassword() disimpan dalam teks biasa dan dapat diambil nanti dengan memanggil .password() . Ini adalah risiko keamanan yang serius bahwa Anda harus menghindari memperkenalkan dalam aplikasi database Anda. Anda akan mempelajari pendekatan yang lebih aman di bagian Membuka Koneksi Database nanti dalam tutorial ini.
Untuk membuat koneksi ke database SQLite menggunakan QSqlDatabase , buka sesi interaktif Python dan ketik kode berikut:
>>> from PyQt5.QtSql import QSqlDatabase

>>> con = QSqlDatabase.addDatabase("QSQLITE")
>>> con.setDatabaseName("contacts.sqlite")

>>> con
<PyQt5.QtSql.QSqlDatabase object at 0x7f0facec0c10>

>>> con.databaseName()
'contacts.sqlite'

>>> con.connectionName()
'qt_sql_default_connection'
Kode ini akan membuat objek koneksi database menggunakan "QSQLITE" sebagai driver koneksi dan "contacts.sqlite" sebagai nama database koneksi. Karena Anda tidak memberikan nama koneksi ke .addDatabase() , yang baru dibuat menjadi koneksi default Anda, yang namanya "qt_sql_default_connection" .
Dalam kasus database SQLite, nama database biasanya adalah nama file atau jalur yang menyertakan nama file database. Anda juga dapat menggunakan nama khusus ":memory:" untuk database dalam memori.
Menangani Banyak Koneksi
Mungkin ada situasi di mana Anda perlu menggunakan beberapa koneksi ke satu database. Misalnya, Anda mungkin ingin mencatat interaksi pengguna dengan database menggunakan koneksi khusus untuk setiap pengguna.
Dalam situasi lain, Anda mungkin perlu menghubungkan aplikasi Anda ke beberapa database. Misalnya, Anda mungkin ingin terhubung ke beberapa database jarak jauh untuk mengumpulkan data guna mengisi atau memperbarui database lokal.
Untuk menangani situasi ini, Anda dapat memberikan nama khusus untuk koneksi Anda yang berbeda dan merujuk setiap koneksi dengan namanya. Jika Anda ingin memberi nama koneksi database Anda, teruskan nama itu sebagai argumen kedua ke .addDatabase() :
>>> from PyQt5.QtSql import QSqlDatabase

>>> # First connection
>>> con1 = QSqlDatabase.addDatabase("QSQLITE", "con1")
>>> con1.setDatabaseName("contacts.sqlite")

>>> # Second connection
>>> con2 = QSqlDatabase.addDatabase("QSQLITE", "con2")
>>> con2.setDatabaseName("contacts.sqlite")

>>> con1
<PyQt5.QtSql.QSqlDatabase object at 0x7f367f5fbf90>
>>> con2
<PyQt5.QtSql.QSqlDatabase object at 0x7f3686dd7510>

>>> con1.databaseName()
'contacts.sqlite'
>>> con2.databaseName()
'contacts.sqlite'

>>> con1.connectionName()
'con1'
>>> con2.connectionName()
'con2'
Di sini, Anda membuat dua koneksi berbeda ke database yang sama, contacts.sqlite . Setiap koneksi memiliki nama koneksinya sendiri. Anda dapat menggunakan nama koneksi untuk mendapatkan referensi ke koneksi tertentu kapan saja nanti dalam kode Anda sesuai dengan kebutuhan Anda. Untuk melakukan ini, Anda dapat memanggil .database() dengan nama koneksi:
>>> from PyQt5.QtSql import QSqlDatabase

>>> db = QSqlDatabase.database("con1", open=False)

>>> db.databaseName()
'contacts.sqlite'
>>> db.connectionName()
'con1'
Dalam contoh ini, Anda melihat bahwa .database() membutuhkan dua argumen:
connectionNamememegang nama koneksi yang perlu Anda gunakan. Jika Anda tidak memberikan nama koneksi, maka koneksi default akan digunakan.openmemegang nilai Boolean yang memberitahu.database()apakah Anda ingin membuka koneksi secara otomatis atau tidak. JikaopenadalahTrue(default) dan koneksi tidak terbuka, maka koneksi dibuka secara otomatis.
Nilai kembalian .database() adalah referensi ke objek koneksi yang disebut connectionName . Anda dapat menggunakan nama koneksi yang berbeda untuk mendapatkan referensi ke objek koneksi tertentu dan kemudian menggunakannya untuk mengelola database Anda.
Menggunakan SQL Divers yang Berbeda
Sejauh ini, Anda telah mempelajari cara membuat koneksi database menggunakan driver SQLite . Ini bukan satu-satunya driver yang tersedia di PyQt. Pustaka menyediakan serangkaian driver SQL yang memungkinkan Anda menggunakan berbagai jenis sistem manajemen basis data sesuai dengan kebutuhan spesifik Anda:
| Nama Driver | Sistem Manajemen Basis Data |
|---|---|
| QDB2 | IBM Db2 (versi 7.1 ke atas) |
| QIBASE | Borland InterBase |
| QMYSQL/MARIADB | MySQL atau MariaDB (versi 5.0 ke atas) |
| QOCI | Antarmuka Panggilan Oracle |
| QODBC | Buka Konektivitas Database (ODBC) |
| QPSQL | PostgreSQL (versi 7.3 ke atas) |
| QSQLITE2 | SQLite 2 (usang sejak Qt 5.14) |
| QSQLITE | SQLite 3 |
| QTDS | Server Adaptif Sybase (usang sejak Qt 4.7) |
Kolom Nama Pengemudi menyimpan string pengenal yang harus Anda teruskan ke .addDatabase() sebagai argumen pertama untuk menggunakan driver terkait. Berbeda dengan driver SQLite, saat Anda menggunakan driver yang berbeda, Anda mungkin perlu menyetel beberapa atribut, seperti databaseName , hostName , userName , dan password , agar koneksi berfungsi dengan baik.
Driver database berasal dari QSqlDriver . Anda dapat membuat driver database Anda sendiri dengan mensubklasifikasikan QSqlDriver , tetapi topik itu melampaui cakupan tutorial ini. Jika Anda tertarik untuk membuat driver database Anda sendiri, lihat Cara Menulis Driver Database Anda sendiri untuk detail selengkapnya.
Membuka Koneksi Basis Data
Setelah Anda memiliki koneksi database, Anda perlu membuka koneksi tersebut untuk dapat berinteraksi dengan database Anda. Untuk melakukannya, Anda memanggil .open() pada objek koneksi. .open() memiliki dua variasi berikut:
.open()membuka koneksi database menggunakan nilai koneksi saat ini..open(username, password)membuka koneksi database menggunakanusernameyang disediakan danpassword.
Kedua variasi mengembalikan True jika koneksi berhasil. Jika tidak, mereka mengembalikan False . Jika koneksi tidak dapat dibuat, Anda dapat memanggil .lastError() untuk mendapatkan informasi tentang apa yang terjadi. Fungsi ini mengembalikan informasi tentang kesalahan terakhir yang dilaporkan oleh database.
Catatan: Seperti yang Anda pelajari sebelumnya, .setPassword(password) menyimpan kata sandi sebagai teks biasa, yang merupakan risiko keamanan. Sebaliknya, .open() tidak menyimpan kata sandi sama sekali. Ini melewati kata sandi langsung ke pengemudi saat membuka koneksi. Setelah itu, itu membuang kata sandi. Jadi, gunakan .open() mengelola kata sandi Anda adalah cara yang harus dilakukan jika Anda ingin mencegah masalah keamanan.
Berikut adalah contoh cara membuka koneksi database SQLite menggunakan variasi pertama .open() :
>>> from PyQt5.QtSql import QSqlDatabase

>>> # Create the connection
>>> con = QSqlDatabase.addDatabase("QSQLITE")
>>> con.setDatabaseName("contacts.sqlite")

>>> # Open the connection
>>> con.open()
True
>>> con.isOpen()
True
Pada contoh di atas, pertama-tama Anda membuat koneksi ke database SQLite Anda dan membuka koneksi tersebut menggunakan .open() . Sejak .open() mengembalikan True , koneksi berhasil. Pada titik ini, Anda dapat memeriksa koneksi menggunakan .isOpen() , yang mengembalikan True jika koneksi terbuka dan False sebaliknya.
Catatan: Jika Anda memanggil .open() pada koneksi yang menggunakan driver SQLite dan file database tidak ada, maka file database baru dan kosong akan dibuat secara otomatis.
Dalam aplikasi dunia nyata, Anda perlu memastikan bahwa Anda memiliki koneksi yang valid ke database Anda sebelum mencoba melakukan operasi apa pun pada data Anda. Jika tidak, aplikasi Anda dapat rusak dan gagal. Misalnya, bagaimana jika Anda tidak memiliki izin menulis untuk direktori tempat Anda mencoba membuat file database itu? Anda perlu memastikan bahwa Anda menangani kesalahan apa pun yang dapat terjadi saat membuka koneksi.
Cara umum untuk memanggil .open() adalah untuk membungkusnya dalam pernyataan bersyarat. Ini memungkinkan Anda untuk menangani kesalahan yang dapat terjadi saat membuka koneksi:
>>> import sys
>>> from PyQt5.QtSql import QSqlDatabase

>>> # Create the connection
>>> con = QSqlDatabase.addDatabase("QSQLITE")
>>> con.setDatabaseName("contacts.sqlite")

>>> # Open the connection and handle errors
>>> if not con.open():
...     print("Unable to connect to the database")
...     sys.exit(1)
Membungkus panggilan ke .open() dalam pernyataan bersyarat memungkinkan Anda untuk menangani kesalahan apa pun yang terjadi saat Anda membuka koneksi. Dengan cara ini, Anda dapat memberi tahu pengguna Anda tentang masalah apa pun sebelum aplikasi berjalan. Perhatikan bahwa aplikasi keluar dengan status keluar 1 , yang biasanya digunakan untuk menunjukkan kegagalan program.
Dalam contoh di atas, Anda menggunakan .open() dalam sesi interaktif, jadi Anda menggunakan print() untuk menyajikan pesan kesalahan kepada pengguna. Namun, dalam aplikasi GUI, alih-alih menggunakan print() , Anda biasanya menggunakan QMessageBox obyek. Dengan QMessageBox , Anda dapat membuat dialog kecil untuk menyajikan informasi kepada pengguna Anda.
Berikut adalah contoh aplikasi GUI yang menggambarkan cara menangani kesalahan koneksi:
 1import sys
 2
 3from PyQt5.QtSql import QSqlDatabase
 4from PyQt5.QtWidgets import QApplication, QMessageBox, QLabel
 5
 6# Create the connection
 7con = QSqlDatabase.addDatabase("QSQLITE")
 8con.setDatabaseName("/home/contacts.sqlite")
 9
10# Create the application
11app = QApplication(sys.argv)
12
13# Try to open the connection and handle possible errors
14if not con.open():
15    QMessageBox.critical(
16        None,
17        "App Name - Error!",
18        "Database Error: %s" % con.lastError().databaseText(),
19    )
20    sys.exit(1)
21
22# Create the application's window
23win = QLabel("Connection Successfully Opened!")
24win.setWindowTitle("App Name")
25win.resize(200, 100)
26win.show()
27sys.exit(app.exec_())
if pernyataan di baris 14 memeriksa apakah koneksi tidak berhasil. Jika /home/ direktori tidak ada atau jika Anda tidak memiliki izin untuk menulis di dalamnya, maka panggilan ke .open() gagal karena file database tidak dapat dibuat. Dalam situasi ini, alur eksekusi masukkan if blok kode pernyataan dan menampilkan pesan di layar.
Jika Anda mengubah jalur ke direktori lain tempat Anda dapat menulis, maka panggilan ke .open() akan berhasil dan Anda akan melihat jendela yang menampilkan pesan Connection Successfully Opened! Anda juga akan memiliki file database baru bernama contacts.sqlite di direktori yang dipilih.
Perhatikan bahwa Anda melewati None sebagai induk message pesan karena, pada saat menampilkan pesan, Anda belum membuat jendela, jadi Anda tidak memiliki induk yang layak untuk kotak pesan.
Menjalankan Kueri SQL Dengan PyQt
Dengan koneksi database yang berfungsi penuh, Anda siap untuk mulai bekerja dengan database Anda. Untuk melakukannya, Anda dapat menggunakan kueri SQL berbasis string dan QSqlQuery objek. QSqlQuery memungkinkan Anda untuk menjalankan segala jenis kueri SQL di database Anda. Dengan QSqlQuery , Anda dapat mengeksekusi pernyataan bahasa manipulasi data (DML), seperti SELECT , INSERT , UPDATE , dan DELETE , serta pernyataan bahasa definisi data (DDL), seperti CREATE TABLE dan seterusnya.
Konstruktor QSqlQuery memiliki beberapa variasi, tetapi dalam tutorial ini, Anda akan mempelajari dua di antaranya:
-
QSqlQuery(query, connection)membuat objek kueri menggunakanquerySQL berbasis string danconnectiondatabase . Jika Anda tidak menentukan koneksi, atau jika koneksi yang ditentukan tidak valid, maka koneksi database default akan digunakan. Jikaquerybukan string kosong, maka akan segera dieksekusi. -
QSqlQuery(connection)membuat objek kueri menggunakanconnection. Jikaconnectiontidak valid, maka koneksi default yang digunakan.
Anda juga dapat membuat QSqlQuery objek tanpa meneruskan argumen apa pun ke konstruktor. Dalam hal ini, kueri akan menggunakan koneksi database default, jika ada.
Untuk menjalankan kueri, Anda perlu memanggil .exec() pada objek kueri. Anda dapat menggunakan .exec() dalam dua cara berbeda:
-
.exec(query)mengeksekusi query SQL berbasis string yang terdapat dalamquery. Ini mengembalikanTruejika kueri berhasil dan sebaliknya mengembalikanFalse. -
.exec()mengeksekusi kueri SQL yang disiapkan sebelumnya. Ini mengembalikanTruejika kueri berhasil dan sebaliknya mengembalikanFalse.
Catatan: PyQt juga mengimplementasikan variasi QSqlQuery.exec() dengan nama .exec_() . Ini memberikan kompatibilitas mundur dengan versi Python yang lebih lama di mana exec adalah kata kunci dari bahasa tersebut.
Sekarang setelah Anda mengetahui dasar-dasar penggunaan QSqlQuery untuk membuat dan menjalankan kueri SQL, Anda siap mempelajari cara mempraktikkan pengetahuan Anda.
Mengeksekusi Kueri SQL Statis
Untuk mulai membuat dan menjalankan kueri dengan PyQt, Anda akan menjalankan editor kode atau IDE favorit Anda dan membuat skrip Python bernama queries.py . Simpan skrip dan tambahkan kode berikut ke dalamnya:
 1import sys
 2
 3from PyQt5.QtSql import QSqlDatabase, QSqlQuery
 4
 5# Create the connection
 6con = QSqlDatabase.addDatabase("QSQLITE")
 7con.setDatabaseName("contacts.sqlite")
 8
 9# Open the connection
10if not con.open():
11    print("Database Error: %s" % con.lastError().databaseText())
12    sys.exit(1)
13
14# Create a query and execute it right away using .exec()
15createTableQuery = QSqlQuery()
16createTableQuery.exec(
17    """
18    CREATE TABLE contacts (
19        id INTEGER PRIMARY KEY AUTOINCREMENT UNIQUE NOT NULL,
20        name VARCHAR(40) NOT NULL,
21        job VARCHAR(50),
22        email VARCHAR(40) NOT NULL
23    )
24    """
25)
26
27print(con.tables())
Dalam skrip ini, Anda mulai dengan mengimpor modul dan kelas yang akan Anda kerjakan. Kemudian Anda membuat koneksi database menggunakan .addDatabase() dengan driver SQLite. Anda mengatur nama database menjadi "contacts.sqlite" dan buka koneksinya.
Untuk membuat kueri pertama, Anda membuat instance QSqlQuery tanpa argumen apapun. Dengan objek kueri di tempat, Anda memanggil .exec() , meneruskan kueri SQL berbasis string sebagai argumen. Kueri semacam ini dikenal sebagai kueri statis karena tidak mendapatkan parameter apa pun dari luar kueri.
Kueri SQL di atas membuat tabel baru bernama contacts dalam basis data Anda. Tabel tersebut akan memiliki empat kolom berikut:
| Kolom | Konten |
|---|---|
id | Integer dengan kunci utama tabel |
name | String dengan nama kontak |
job | Sebuah string dengan jabatan pekerjaan dari sebuah kontak |
email | Sebuah string dengan email kontak |
Baris terakhir dalam skrip di atas mencetak daftar tabel yang terdapat dalam database Anda. Jika Anda menjalankan skrip, maka Anda akan melihat bahwa file database baru bernama contacts.sqlite dibuat di direktori Anda saat ini. Anda juga akan mendapatkan sesuatu seperti ['contacts', 'sqlite_sequence'] dicetak di layar Anda. Daftar ini berisi nama-nama tabel di database Anda.
Catatan: Kueri SQL berbasis string harus menggunakan sintaks yang sesuai dengan database SQL tertentu yang Anda kueri. Jika sintaksnya salah, maka .exec() mengabaikan kueri dan mengembalikan False .
Dalam kasus SQLite, kueri hanya dapat berisi satu pernyataan dalam satu waktu.
Memanggil .exec() pada QSqlQuery object adalah cara umum untuk segera mengeksekusi kueri SQL berbasis string di database Anda, tetapi bagaimana jika Anda ingin menyiapkan kueri sebelumnya untuk eksekusi nanti? Itulah topik bagian selanjutnya.
Melaksanakan Kueri Dinamis:Pemformatan String
Sejauh ini, Anda telah mempelajari cara mengeksekusi kueri statis pada database. Kueri statis adalah kueri yang tidak menerima parameter , sehingga kueri berjalan apa adanya. Meskipun kueri ini cukup berguna, terkadang Anda perlu membuat kueri yang mengambil data sebagai respons terhadap parameter masukan tertentu.
Kueri yang menerima parameter pada waktu eksekusi dikenal sebagai kueri dinamis . Menggunakan parameter memungkinkan Anda untuk menyempurnakan kueri dan mengambil data sebagai respons terhadap nilai parameter tertentu. Nilai yang berbeda akan menghasilkan hasil yang berbeda. Anda dapat mengambil parameter input dalam kueri dengan menggunakan salah satu dari dua pendekatan berikut:
- Buat kueri secara dinamis, menggunakan pemformatan string untuk menginterpolasi nilai parameter.
- Siapkan kueri menggunakan parameter placeholder, lalu ikat nilai tertentu ke parameter.
Pendekatan pertama memungkinkan Anda membuat kueri dinamis dengan cepat. Namun, untuk menggunakan pendekatan ini dengan aman, Anda harus yakin bahwa nilai parameter Anda berasal dari sumber tepercaya. Jika tidak, Anda mungkin menghadapi serangan injeksi SQL.
Berikut adalah contoh cara menggunakan pemformatan string untuk membuat kueri dinamis di PyQt:
>>>>>> from PyQt5.QtSql import QSqlQuery, QSqlDatabase
>>> con = QSqlDatabase.addDatabase("QSQLITE")
>>> con.setDatabaseName("contacts.sqlite")
>>> con.open()
True
>>> name = "Linda"
>>> job = "Technical Lead"
>>> email = "linda@example.com"
>>> query = QSqlQuery()
>>> query.exec(
... f"""INSERT INTO contacts (name, job, email)
... VALUES ('{name}', '{job}', '{email}')"""
... )
True
Dalam contoh ini, Anda menggunakan f-string untuk membuat kueri dinamis dengan menginterpolasi nilai tertentu ke dalam kueri SQL berbasis string. Kueri terakhir memasukkan data ke contacts Anda tabel, yang sekarang berisi data tentang Linda .
Catatan: Nanti dalam tutorial ini, Anda akan melihat cara mengambil dan menavigasi data yang disimpan dalam database.
Perhatikan bahwa agar jenis kueri dinamis ini berfungsi, Anda perlu memastikan bahwa nilai yang akan disisipkan memiliki tipe data yang benar. Jadi, Anda menggunakan tanda kutip tunggal di sekitar placeholder di f-string karena nilai tersebut harus berupa string.
Menjalankan Kueri Dinamis:Parameter Placeholder
Pendekatan kedua untuk mengeksekusi kueri dinamis mengharuskan Anda menyiapkan kueri terlebih dahulu menggunakan template dengan placeholder untuk parameter. PyQt mendukung dua gaya placeholder parameter:
- Gaya Oracle menggunakan placeholder bernama seperti
:nameatau:email. - Gaya ODBC menggunakan tanda tanya (
?) sebagai pengganti posisi.
Perhatikan bahwa gaya ini tidak dapat dicampur dalam kueri yang sama. Anda dapat melihat Pendekatan untuk Mengikat Nilai untuk contoh tambahan tentang cara menggunakan placeholder.
Catatan: ODBC adalah singkatan dari Open Database Connectivity.
Untuk membuat kueri dinamis semacam ini di PyQt, Anda terlebih dahulu membuat template dengan placeholder untuk setiap parameter kueri, lalu meneruskan template tersebut sebagai argumen ke .prepare() , yang mem-parsing, mengkompilasi, dan menyiapkan template kueri untuk dieksekusi. Jika template memiliki masalah, seperti kesalahan sintaks SQL, maka .prepare() gagal mengkompilasi template dan mengembalikan False .
Jika proses persiapan berhasil, maka prepare() mengembalikan True . Setelah itu, Anda dapat meneruskan nilai tertentu ke setiap parameter menggunakan .bindValue() dengan parameter bernama atau posisi atau menggunakan .addBindValue() dengan parameter posisi. .bindValue() memiliki dua variasi berikut:
.bindValue(placeholder, val).bindValue(pos, val)
Pada variasi pertama, placeholder mewakili placeholder gaya Oracle. Pada variasi kedua, pos mewakili bilangan bulat berbasis nol dengan posisi parameter dalam kueri. Dalam kedua variasi, val memegang nilai untuk diikat ke parameter tertentu.
.addBindValue() menambahkan nilai ke daftar placeholder menggunakan pengikatan posisi. Ini berarti urutan panggilan ke .addBindValue() menentukan nilai mana yang akan diikat ke setiap parameter placeholder dalam kueri yang disiapkan.
Untuk mulai menggunakan kueri yang telah disiapkan, Anda dapat menyiapkan INSERT INTO Pernyataan SQL untuk mengisi database Anda dengan beberapa contoh data. Kembali ke skrip yang Anda buat di bagian Menjalankan Kueri SQL Statis dan tambahkan kode berikut tepat setelah panggilan ke print() :
28# Creating a query for later execution using .prepare()
29insertDataQuery = QSqlQuery()
30insertDataQuery.prepare(
31    """
32    INSERT INTO contacts (
33        name,
34        job,
35        email
36    )
37    VALUES (?, ?, ?)
38    """
39)
40
41# Sample data
42data = [
43    ("Joe", "Senior Web Developer", "joe@example.com"),
44    ("Lara", "Project Manager", "lara@example.com"),
45    ("David", "Data Analyst", "david@example.com"),
46    ("Jane", "Senior Python Developer", "jane@example.com"),
47]
48
49# Use .addBindValue() to insert data
50for name, job, email in data:
51    insertDataQuery.addBindValue(name)
52    insertDataQuery.addBindValue(job)
53    insertDataQuery.addBindValue(email)
54    insertDataQuery.exec()
Langkah pertama adalah membuat QSqlQuery obyek. Kemudian Anda memanggil .prepare() pada objek kueri. Dalam hal ini, Anda menggunakan gaya ODBC untuk placeholder. Kueri Anda akan mengambil nilai untuk name kontak Anda , job , dan email , jadi Anda memerlukan tiga placeholder. Sejak id kolom adalah bilangan bulat yang bertambah secara otomatis, Anda tidak perlu memberikan nilai untuknya.
Kemudian Anda membuat beberapa sampel data untuk mengisi database. data menyimpan daftar tupel, dan setiap tupel berisi tiga item:nama, pekerjaan, dan email setiap kontak.
The final step is to bind the values that you want to pass to each placeholder and then call .exec() to execute the query. To do that, you use a for loop. The loop header unpacks each tuple in data into three separate variables with convenient names. Then you call .addBindValue() on the query object to bind the values to the placeholders.
Note that you’re using positional placeholders , so the order in which you call .addBindValue() will define the order in which each value is passed to the corresponding placeholder.
This approach for creating dynamic queries is handy when you want to customize your queries using values that come from your user’s input. Anytime you take the user’s input to complete a query on a database, you face the security risk of SQL injection.
In PyQt, combining .prepare() , .bindValue() , and .addBindValue() fully protects you against SQL injection attacks, so this is the way to go when you’re taking untrusted input to complete your queries.
Navigating the Records in a Query
If you execute a SELECT statement, then your QSqlQuery object will retrieve zero or more records from one or more tables in your database. The query will hold records containing data that matches the query’s criteria. If no data matches the criteria, then your query will be empty.
QSqlQuery provides a set of navigation methods that you can use to move throughout the records in a query result:
| Metode | Retrieves |
|---|---|
.next() | The next record |
.previous() | The previous record |
.first() | The first record |
.last() | The last record |
.seek(index, relative=False) | The record at position index |
All these methods position the query object on the retrieved record if that record is available. Most of these methods have specific rules that apply when using them. With these methods, you can move forward, backward, or arbitrarily through the records in a query result. Since they all return either True or False , you can use them in a while loop to navigate all the records in one go.
These methods work with active queries . A query is active when you’ve successfully run .exec() on it, but the query isn’t finished yet. Once an active query is on a valid record, you can retrieve data from that record using .value(index) . This method takes a zero-based integer number, index , and returns the value at that index (column) in the current record.
Note: If you execute a SELECT * type of query, then the columns in the result won’t follow a known order. This might cause problems when you use .value() to retrieve the value at a given column because there’s no way of knowing if you’re using the right column index.
You’ll look at a few examples of how to use some of the navigation methods to move throughout a query below. But first, you need to create a connection to your database:
>>>>>> from PyQt5.QtSql import QSqlDatabase, QSqlQuery
>>> con = QSqlDatabase.addDatabase("QSQLITE")
>>> con.setDatabaseName("contacts.sqlite")
>>> con.open()
True
Here, you create and open a new connection to contacts.sqlite . If you’ve been following along with this tutorial so far, then this database already contains some sample data. Now you can create a QSqlQuery object and execute it on that data:
>>> # Create and execute a query
>>> query = QSqlQuery()
>>> query.exec("SELECT name, job, email FROM contacts")
True
This query retrieves data about the name , job , and email of all the contacts stored in the contacts meja. Since .exec() returned True , the query was successful and is now an active query. You can navigate the records in this query using any of the navigation methods you saw before. You can also retrieve the data at any column in a record using .value() :
>>> # First record
>>> query.first()
True

>>> # Named indices for readability
>>> name, job, email = range(3)

>>> # Retrieve data from the first record
>>> query.value(name)
'Linda'

>>> # Next record
>>> query.next()
True
>>> query.value(job)
'Senior Web Developer'

>>> # Last record
>>> query.last()
True
>>> query.value(email)
'jane@example.com'
With the navigation methods, you can move around the query result. With .value() , you can retrieve the data at any column in a given record.
You can also iterate through all the records in your query using a while loop along with .next() :
>>> query.exec()
True

>>> while query.next():
...     print(query.value(name), query.value(job), query.value(email))
...
Linda Technical Lead linda@example.com
Joe Senior Web Developer joe@example.com
...
With .next() , you navigate all the records in a query result. .next() works similar to the iterator protocol in Python. Once you’ve iterated over the records in a query result, .next() starts returning False until you run .exec() again. A call to .exec() retrieves data from a database and places the query object’s internal pointer one position before the first record, so when you call .next() , you get the first record again.
You can also loop in reverse order using .previous() :
>>> while query.previous():
...     print(query.value(name), query.value(job), query.value(email))
...
Jane Senior Python Developer jane@example.com
David Data Analyst david@example.com
...
.previous() works similar to .next() , but the iteration is done in reverse order. In other words, the loop goes from the query pointer’s position back to the first record.
Sometimes you might want to get the index that identifies a given column in a table by using the name of that column. To do that, you can call .indexOf() on the return value of .record() :
>>> query.first()
True

>>> # Get the index of name
>>> name = query.record().indexOf("name")

>>> query.value(name)
'Linda'

>>> # Finish the query object if unneeded
>>> query.finish()
>>> query.isActive()
False
The call to .indexOf() on the result of .record() returns the index of the "name" column. If "name" doesn’t exist, then .indexOf() mengembalikan -1 . This is handy when you use a SELECT * statement in which the order of columns is unknown. Finally, if you’re done with a query object, then you can turn it inactive by calling .finish() . This will free the system memory associated with the query object at hand.
Closing and Removing Database Connections
In practice, some of your PyQt applications will depend on a database, and others won’t. An application that depends on a database often creates and opens a database connection just before creating any window or graphical component and keeps the connection open until the application is closed.
On the other hand, applications that don’t depend on a database but use a database to provide some of their functionalities typically connect to that database only when needed, if at all. In these cases, you can close the connection after use and free the resources associated with that connection, such as system memory.
To close a connection in PyQt, you call .close() on the connection. This method closes the connection and frees any acquired resources. It also invalidates any associated QSqlQuery objects because they can’t work properly without an active connection.
Here’s an example of how to close an active database connection using .close() :
>>> from PyQt5.QtSql import QSqlDatabase

>>> con = QSqlDatabase.addDatabase("QSQLITE")
>>> con.setDatabaseName("contacts.sqlite")

>>> con.open()
True
>>> con.isOpen()
True

>>> con.close()
>>> con.isOpen()
False
You can call .close() on a connection to close it and free all its associated resources. To make sure that a connection is closed, you call .isOpen() .
Note that QSqlQuery objects remain in memory after closing their associated connection, so you must make your queries inactive by calling .finish() or .clear() , or by deleting the QSqlQuery object before closing the connection. Otherwise, residual memory is left out in your query object.
You can reopen and reuse any previously closed connection. That’s because .close() doesn’t remove connections from the list of available connections, so they remain usable.
You can also completely remove your database connections using .removeDatabase() . To do this safely, first finish your queries using .finish() , then close the database using .close() , and finally remove the connection. You can use .removeDatabase(connectionName) to remove the database connection called connectionName from the list of available connections. Removed connections are no longer available for use in the application at hand.
To remove the default database connection, you can call .connectionName() on the object returned by .database() and pass the result to .removeDatabase() :
>>> # The connection is closed but still in the list of connections
>>> QSqlDatabase.connectionNames()
['qt_sql_default_connection']

>>> # Remove the default connection
>>> QSqlDatabase.removeDatabase(QSqlDatabase.database().connectionName())

>>> # The connection is no longer in the list of connections
>>> QSqlDatabase.connectionNames()
[]

>>> # Try to open a removed connection
>>> con.open()
False
Here, the call to .connectionNames() returns the list of available connections. In this case, you have only one connection, the default. Then you remove the connection using .removeDatabase() .
Note: Before closing and removing a database connection, you need to make sure that everything that uses the connection is deleted or set to use a different data source. Otherwise, you can have a resource leak .
Since you need a connection name to use .removeDatabase() , you call .connectionName() on the result of .database() to get the name of the default connection. Finally, you call .connectionNames() again to make sure that the connection is no longer in the list of available connections. Trying to open a removed connection will return False because the connection no longer exists.
Displaying and Editing Data With PyQt
A common requirement in GUI applications that use databases is the ability to load, display, and edit data from the database using different widgets. Table, list, and tree widgets are commonly used in GUIs to manage data.
PyQt provides two different kind of widgets for managing data:
- Standard widgets include internal containers for storing data.
- View widgets don’t maintain internal data containers but use models to access data.
For small GUI applications that manage small databases, you can use the first approach. The second approach is handy when you’re building complex GUI applications that manage large databases.
The second approach takes advantage of PyQt’s Model-View programming. With this approach, you have widgets that represent views such as tables, lists, and trees on one hand and model classes that communicate with your data on the other hand.
Understanding PyQt’s Model-View Architecture
The Model-View-Controller (MVC) design pattern is a general software pattern intended to divide an application’s code into three general layers, each with a different role.
The model takes care of the business logic of the application, the view provides on-screen representations, and the controller connects the model and the view to make the application work.
Qt provides a custom variation of MVC. They call it the Model-View architecture, and it’s available for PyQt as well. The pattern also separates the logic into three components:
-
Models communicate with and access the data. They also define an interface that’s used by views and delegates to access the data. All models are based on
QAbstractItemModel. Some commonly used models includeQStandardItemModel,QFileSystemModel, and SQL-related models. -
Views are responsible for displaying the data to the user. They also have similar functionality to the controller in the MVC pattern. All views are based on
QAbstractItemView. Some commonly used views areQListView,QTableView, andQTreeView. -
Delegates paint view items and provide editor widgets for modifying items. They also communicate back with the model if an item has been modified. The base class is
QAbstractItemDelegate.
Separating classes into these three components implies that changes on models will be reflected on associated views or widgets automatically, and changes on views or widgets through delegates will update the underlying model automatically.
In addition, you can display the same data in different views without the need for multiple models.
Using Standard Widget Classes
PyQt provides a bunch of standard widgets for displaying and editing data in your GUI applications. These standard widgets provide views such as tables, trees, and lists. They also provide an internal container for storing data and convenient delegates for editing the data. All these features are grouped into a single class.
Here are three of these standard classes:
| Standard Class | Displays |
|---|---|
QListWidget | A list of items |
QTreeWidget | A hierarchical tree of items |
QTableWidget | A table of items |
QTableWidget is arguably the most popular widget when it comes to displaying and editing data. It creates a 2D array of QTableWidgetItem objects. Each item holds an individual value as a string. All these values are displayed and organized in a table of rows and columns.
You can perform at least the following operations on a QTableWidget object:
- Editing the content of its items using delegate objects
- Adding new items using
.setItem() - Setting the number of rows and columns using
.setRowCount()and.setColumnCount() - Adding vertical and horizontal header labels using
setHorizontalHeaderLabels()and.setVerticalHeaderLabels
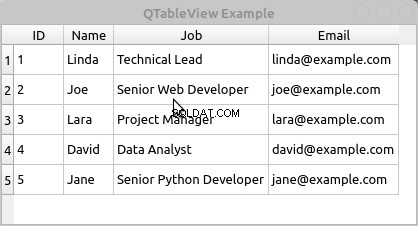
Here’s a sample application that shows how to use a QTableWidget object to display data in a GUI. The application uses the database you created and populated in previous sections, so if you want to run it, then you need to save the code into the same directory in which you have the contacts.sqlite database:
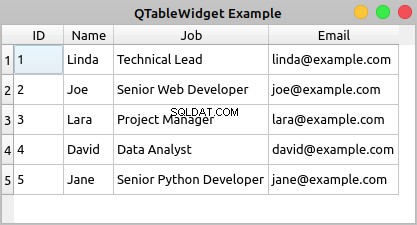
If you double-click any cell of the table, then you’ll be able to edit the content of the cell. However, your changes won’t be saved to your database.
Here’s the code for your application:
 1import sys
 2
 3from PyQt5.QtSql import QSqlDatabase, QSqlQuery
 4from PyQt5.QtWidgets import (
 5    QApplication,
 6    QMainWindow,
 7    QMessageBox,
 8    QTableWidget,
 9    QTableWidgetItem,
10)
11
12class Contacts(QMainWindow):
13    def __init__(self, parent=None):
14        super().__init__(parent)
15        self.setWindowTitle("QTableView Example")
16        self.resize(450, 250)
17        # Set up the view and load the data
18        self.view = QTableWidget()
19        self.view.setColumnCount(4)
20        self.view.setHorizontalHeaderLabels(["ID", "Name", "Job", "Email"])
21        query = QSqlQuery("SELECT id, name, job, email FROM contacts")
22        while query.next():
23            rows = self.view.rowCount()
24            self.view.setRowCount(rows + 1)
25            self.view.setItem(rows, 0, QTableWidgetItem(str(query.value(0))))
26            self.view.setItem(rows, 1, QTableWidgetItem(query.value(1)))
27            self.view.setItem(rows, 2, QTableWidgetItem(query.value(2)))
28            self.view.setItem(rows, 3, QTableWidgetItem(query.value(3)))
29        self.view.resizeColumnsToContents()
30        self.setCentralWidget(self.view)
31
32def createConnection():
33    con = QSqlDatabase.addDatabase("QSQLITE")
34    con.setDatabaseName("contacts.sqlite")
35    if not con.open():
36        QMessageBox.critical(
37            None,
38            "QTableView Example - Error!",
39            "Database Error: %s" % con.lastError().databaseText(),
40        )
41        return False
42    return True
43
44app = QApplication(sys.argv)
45if not createConnection():
46    sys.exit(1)
47win = Contacts()
48win.show()
49sys.exit(app.exec_())
Here’s what’s happening in this example:
- Lines 18 to 20 create a
QTableWidgetobject, set the number of columns to4, and set user-friendly labels for each column’s header. - Line 21 creates and executes a
SELECTSQL query on your database to get all the data in thecontactstable. - Line 22 starts a
whileloop to navigate the records in the query result using.next(). - Line 24 increments the number of rows in the table by
1using.setRowCount(). - Lines 25 to 28 add items of data to your table using
.setItem(). Note that since the values in theidcolumns are integer numbers, you need to convert them into strings to be able to store them in aQTableWidgetItemobject.
.setItem() takes three arguments:
rowholds a zero-based integer that represents the index of a given row in the table.columnholds a zero-based integer that represents the index of a given column in the table.itemholds theQTableWidgetItemobject that you need to place at a given cell in the table.
Finally, you call .resizeColumnsToContents() on your view to adjust the size of the columns to their content and provide a better rendering of the data.
Displaying and editing database tables using standard widgets can become a challenging task. That’s because you’ll have two copies of the same data. In other words you’ll have a copy of the data in two locations:
- Outside the widget, in your database
- Inside the widget, in the widget’s internal containers
You’re responsible for synchronizing both copies of your data manually, which can be an annoying and error-prone operation. Luckily, you can use PyQt’s Model-View architecture to avoid most of these problems, as you’ll see in the following section.
Using View and Model Classes
PyQt’s Model-View classes eliminate the problems of data duplication and synchronization that may occur when you use standard widget classes to build database applications. The Model-View architecture allows you to use several views to display the same data because you can pass one model to many views.
Model classes provide an application programming interface (API) that you can use to manipulate data. View classes provide convenient delegate objects that you can use to edit data in the view directly. To connect a view with a given module, you need to call .setModel() on the view object.
PyQt offers a set of view classes that support the Model-View architecture:
| View Class | Displays |
|---|---|
QListView | A list of items that take values directly from a model class |
QTreeView | A hierarchical tree of items that take values directly from a model class |
QTableView | A table of items that take values directly from a model class |
You can use these view classes along with model classes to create your database applications. This will make your applications more robust, faster to code, and less error-prone.
Here are some of the model classes that PyQt provides for working with SQL databases:
| Model Class | Deskripsi |
|---|---|
QSqlQueryModel | A read-only data model for SQL queries |
QSqlTableModel | An editable data model for reading and writing records in a single table |
QSqlRelationalTableModel | An editable data model for reading and writing records in a relational table |
Once you’ve connected one of these models to a physical database table or query, you can use them to populate your views. Views provide delegate objects that allow you to modify the data directly in the view. The model connected to the view will update the data in your database to reflect any change in the view. Note that you don’t have to update the data in the database manually. The model will do that for you.
Here’s an example that shows the basics of how to use a QTableView object and a QSqlTableModel object together to build a database application using PyQt’s Model-View architecture:
To edit the data in a cell of the table, you can double-click the cell. A convenient delegate widget will show in the cell, allowing you to edit its content. Then you can hit Enter to save the changes.
The ability to automatically handle and save changes in the data is one of the more important advantages of using PyQt’s Model-View classes. The Model-View architecture will improve your productivity and reduce the errors that can appear when you have to write data manipulation code by yourself.
Here’s the code to create the application:
 1import sys
 2
 3from PyQt5.QtCore import Qt
 4from PyQt5.QtSql import QSqlDatabase, QSqlTableModel
 5from PyQt5.QtWidgets import (
 6    QApplication,
 7    QMainWindow,
 8    QMessageBox,
 9    QTableView,
10)
11
12class Contacts(QMainWindow):
13    def __init__(self, parent=None):
14        super().__init__(parent)
15        self.setWindowTitle("QTableView Example")
16        self.resize(415, 200)
17        # Set up the model
18        self.model = QSqlTableModel(self)
19        self.model.setTable("contacts")
20        self.model.setEditStrategy(QSqlTableModel.OnFieldChange)
21        self.model.setHeaderData(0, Qt.Horizontal, "ID")
22        self.model.setHeaderData(1, Qt.Horizontal, "Name")
23        self.model.setHeaderData(2, Qt.Horizontal, "Job")
24        self.model.setHeaderData(3, Qt.Horizontal, "Email")
25        self.model.select()
26        # Set up the view
27        self.view = QTableView()
28        self.view.setModel(self.model)
29        self.view.resizeColumnsToContents()
30        self.setCentralWidget(self.view)
31
32def createConnection():
33    con = QSqlDatabase.addDatabase("QSQLITE")
34    con.setDatabaseName("contacts.sqlite")
35    if not con.open():
36        QMessageBox.critical(
37            None,
38            "QTableView Example - Error!",
39            "Database Error: %s" % con.lastError().databaseText(),
40        )
41        return False
42    return True
43
44app = QApplication(sys.argv)
45if not createConnection():
46    sys.exit(1)
47win = Contacts()
48win.show()
49sys.exit(app.exec_())
Here’s what’s happening in this code:
- Line 18 creates an editable
QSqlTableModelobject. - Line 19 connects your model with the
contactstable in your database using.setTable(). - Line 20 sets the edit strategy of the model to
OnFieldChange. This strategy allows the model to automatically update the data in your database if the user modifies any of the data directly in the view. - Lines 21 to 24 set some user-friendly labels to the horizontal headers of the model using
.setHeaderData(). - Line 25 loads the data from your database and populates the model by calling
.select(). - Line 27 creates the table view object to display the data contained in the model.
- Line 28 connects the view with the model by calling
.setModel()on the view with your data model as an argument. - Line 29 calls
.resizeColumnsToContents()on the view object to adjust the table to its content.
That’s it! You now have a fully-functional database application.
Using SQL Databases in PyQt:Best Practices
When it comes to using PyQt’s SQL support effectively, there are some best practices that you might want to use in your applications:
-
Favor PyQt’s SQL support over Python standard library or third-party libraries to take advantage of the natural integration of these classes with the rest of PyQt’s classes and infrastructure, mostly with the Model-View architecture.
-
Use previously prepared dynamic queries with placeholders for parameters and bind values to those parameters using
.addBindValue()and.bindValue(). This will help prevent SQL injection attacks. -
Handle errors that can occur when opening a database connection to avoid unexpected behaviors and application crashes.
-
Close and remove unneeded database connections and queries to free any acquired system resources.
-
Minimize the use of
SELECT *queries to avoid problems when retrieving data with.value(). -
Pass your passwords to
.open()instead of to.setPassword()to avoid the risk of compromising your security. -
Take advantage of PyQt’s Model-View architecture and its integration with PyQt’s SQL support to make your applications more robust.
This list isn’t complete, but it’ll help you make better use of PyQt’s SQL support when developing your database applications.
Conclusion
Using PyQt’s built-in support to work with SQL databases is an important skill for any Python developer who’s creating PyQt GUI applications and needs to connect them to a database. PyQt provides a consistent set of classes for managing SQL databases.
These classes fully integrate with PyQt’s Model-View architecture, allowing you to develop GUI applications that can manage databases in a user-friendly way.
In this tutorial, you’ve learned how to:
- Use PyQt’s SQL support to connect to a database
- Execute SQL queries on a database with PyQt
- Build database applications using PyQt’s Model-View architecture
- Display and edit data from a database using PyQt widgets
With this knowledge, you can improve your productivity when creating nontrivial database applications and make your GUI applications more robust.