MySQL adalah salah satu sistem manajemen basis data (DBMS) yang paling populer di pasaran saat ini. Ini peringkat kedua setelah Oracle DBMS di Peringkat DB-Engine tahun ini. Karena sebagian besar aplikasi perangkat lunak perlu berinteraksi dengan data dalam beberapa bentuk, bahasa pemrograman seperti Python menyediakan alat untuk menyimpan dan mengakses sumber data ini.
Dengan menggunakan teknik yang dibahas dalam tutorial ini, Anda akan dapat mengintegrasikan database MySQL dengan aplikasi Python secara efisien. Anda akan mengembangkan database MySQL kecil untuk sistem rating film dan mempelajari cara mengkuerinya langsung dari kode Python Anda.
Di akhir tutorial ini, Anda akan dapat:
- Identifikasi fitur unik MySQL
- Hubungkan aplikasi Anda ke database MySQL
- Kueri database untuk mengambil data yang diperlukan
- Menangani pengecualian yang terjadi saat mengakses database
- Gunakan praktik terbaik sambil membangun aplikasi basis data
Untuk mendapatkan hasil maksimal dari tutorial ini, Anda harus memiliki pengetahuan tentang konsep Python seperti for loop, fungsi, penanganan pengecualian, dan menginstal paket Python menggunakan pip . Anda juga harus memiliki pemahaman dasar tentang sistem manajemen basis data relasional dan kueri SQL seperti SELECT , DROP , CREATE , dan JOIN .
Unduhan Gratis: Dapatkan contoh bab dari Trik Python:Buku yang menunjukkan praktik terbaik Python dengan contoh sederhana yang dapat Anda terapkan secara instan untuk menulis kode + Python yang lebih indah.
Membandingkan MySQL dengan Database SQL Lainnya
SQL singkatan dari Structured Query Language dan merupakan bahasa pemrograman yang banyak digunakan untuk mengelola database relasional. Anda mungkin pernah mendengar tentang rasa yang berbeda dari DBMS berbasis SQL. Yang paling populer termasuk MySQL, PostgreSQL, SQLite, dan SQL Server. Semua database ini sesuai dengan standar SQL tetapi dengan berbagai tingkat kepatuhan.
Menjadi sumber terbuka sejak didirikan pada tahun 1995, MySQL dengan cepat menjadi pemimpin pasar di antara solusi SQL. MySQL juga merupakan bagian dari ekosistem Oracle. Meskipun fungsionalitas intinya benar-benar gratis, ada juga beberapa add-on berbayar. Saat ini, MySQL digunakan oleh semua perusahaan teknologi besar, termasuk Google, LinkedIn, Uber, Netflix, Twitter, dan lainnya.
Terlepas dari dukungan komunitas open source yang besar, ada banyak alasan lain untuk kesuksesan MySQL:
-
Kemudahan pemasangan: MySQL dirancang untuk menjadi user-friendly. Cukup mudah untuk menyiapkan database MySQL, dan beberapa alat pihak ketiga yang tersedia secara luas, seperti phpMyAdmin, lebih merampingkan proses penyiapan. MySQL tersedia untuk semua sistem operasi utama, termasuk Windows, macOS, Linux, dan Solaris.
-
Kecepatan: MySQL memiliki reputasi sebagai solusi database yang sangat cepat. Ini memiliki footprint yang relatif lebih kecil dan sangat skalabel dalam jangka panjang.
-
Hak istimewa dan keamanan pengguna: MySQL hadir dengan skrip yang memungkinkan Anda untuk mengatur tingkat keamanan kata sandi, menetapkan kata sandi admin, dan menambah dan menghapus hak istimewa akun pengguna. Skrip ini tidak memperumit proses admin untuk portal manajemen pengguna web hosting. DBMS lain, seperti PostgreSQL, menggunakan file konfigurasi yang lebih rumit untuk digunakan.
Meskipun MySQL terkenal dengan kecepatan dan kemudahan penggunaannya, Anda bisa mendapatkan fitur yang lebih canggih dengan PostgreSQL. Selain itu, MySQL tidak sepenuhnya sesuai dengan SQL dan memiliki keterbatasan fungsional tertentu, seperti tidak ada dukungan untuk FULL JOIN klausa.
Anda mungkin juga menghadapi beberapa masalah dengan membaca dan menulis secara bersamaan di MySQL. Jika perangkat lunak Anda memiliki banyak pengguna yang menulis data sekaligus, maka PostgreSQL mungkin menjadi pilihan yang lebih cocok.
Catatan: Untuk perbandingan MySQL dan PostgreSQL yang lebih mendalam dalam konteks dunia nyata, lihat Mengapa Uber Engineering Beralih dari Postgres ke MySQL.
SQL Server juga merupakan DBMS yang sangat populer dan dikenal karena keandalan, efisiensi, dan keamanannya. Ini lebih disukai oleh perusahaan, terutama di domain perbankan, yang secara teratur menangani beban kerja lalu lintas yang besar. Ini adalah solusi komersial dan merupakan salah satu sistem yang paling kompatibel dengan layanan Windows.
Pada tahun 2010, ketika Oracle mengakuisisi Sun Microsystems dan MySQL, banyak yang khawatir tentang masa depan MySQL. Pada saat itu, Oracle adalah pesaing terbesar MySQL. Pengembang khawatir bahwa ini adalah pengambilalihan yang tidak bersahabat dari Oracle dengan tujuan menghancurkan MySQL.
Beberapa pengembang yang dipimpin oleh Michael Widenius, penulis asli MySQL, membuat fork dari basis kode MySQL dan meletakkan dasar MariaDB. Tujuannya adalah untuk mengamankan akses ke MySQL dan membuatnya tetap gratis selamanya.
Sampai saat ini, MariaDB tetap sepenuhnya berlisensi GPL, menyimpannya sepenuhnya dalam domain publik. Beberapa fitur MySQL, di sisi lain, hanya tersedia dengan lisensi berbayar. Selain itu, MariaDB menyediakan beberapa fitur yang sangat berguna yang tidak didukung oleh server MySQL, seperti SQL terdistribusi dan penyimpanan kolom. Anda dapat menemukan lebih banyak perbedaan antara MySQL dan MariaDB yang tercantum di situs web MariaDB.
MySQL menggunakan sintaks yang sangat mirip dengan SQL Standar. Namun, ada beberapa perbedaan penting yang disebutkan dalam dokumentasi resmi.
Menginstal Server MySQL dan Konektor/Python MySQL
Sekarang, untuk mulai mengerjakan tutorial ini, Anda perlu menyiapkan dua hal:server MySQL dan konektor MySQL . Server MySQL akan menyediakan semua layanan yang diperlukan untuk menangani database Anda. Setelah server aktif dan berjalan, Anda dapat menghubungkan aplikasi Python Anda dengannya menggunakan MySQL Connector/Python.
Menginstal Server MySQL
Dokumentasi resmi merinci cara yang disarankan untuk mengunduh dan menginstal server MySQL. Anda akan menemukan petunjuk untuk semua sistem operasi populer, termasuk Windows, macOS, Solaris, Linux, dan banyak lagi.
Untuk Windows, cara terbaik adalah mengunduh Penginstal MySQL dan membiarkannya menangani seluruh proses. Manajer instalasi juga membantu Anda mengonfigurasi pengaturan keamanan server MySQL. Di halaman Akun dan Peran, Anda harus memasukkan kata sandi untuk root (admin) akun dan juga opsional menambahkan pengguna lain dengan berbagai hak istimewa:
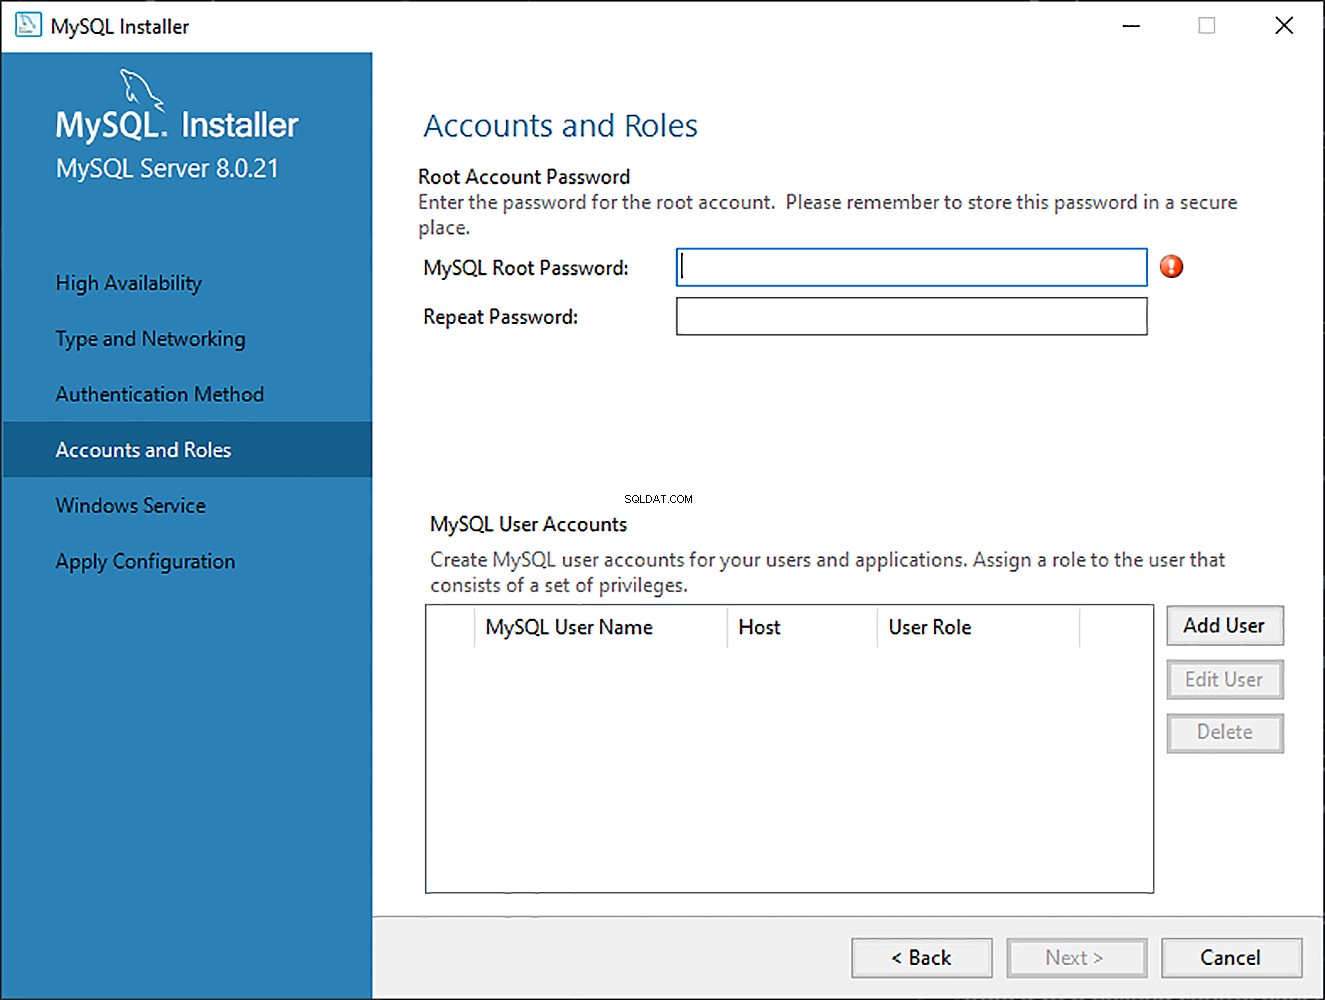
Meskipun Anda harus menentukan kredensial untuk akun root selama penyiapan, Anda dapat mengubah setelan ini nanti.
Catatan: Ingat nama host, nama pengguna, dan kata sandi karena ini akan diperlukan untuk membuat koneksi dengan server MySQL nanti.
Meskipun Anda hanya memerlukan server MySQL untuk tutorial ini, Anda juga dapat menyiapkan alat bermanfaat lainnya seperti MySQL Workbench menggunakan penginstal ini. Jika Anda tidak ingin menginstal MySQL secara langsung di sistem operasi Anda, menerapkan MySQL di Linux dengan Docker adalah alternatif yang nyaman.
Menginstal Konektor MySQL/Python
Driver database adalah bagian dari perangkat lunak yang memungkinkan aplikasi untuk terhubung dan berinteraksi dengan sistem database. Bahasa pemrograman seperti Python memerlukan driver khusus sebelum dapat berbicara ke database dari vendor tertentu.
Driver ini biasanya diperoleh sebagai modul pihak ketiga. API Database Python (DB-API) mendefinisikan antarmuka standar yang harus dipatuhi oleh semua driver database Python. Detail ini didokumentasikan dalam PEP 249. Semua driver database Python, seperti sqlite3 untuk SQLite, psycopg untuk PostgreSQL, dan MySQL Connector/Python untuk MySQL, ikuti aturan implementasi ini.
Catatan: Dokumentasi resmi MySQL menggunakan istilah konektor bukannya pengemudi . Secara teknis, konektor hanya terkait dengan koneksi ke database, tidak berinteraksi dengannya. Namun, istilah ini sering digunakan untuk seluruh modul akses database yang terdiri dari konektor dan pengemudi.
Untuk menjaga konsistensi dengan dokumentasi, Anda akan melihat istilah konektor setiap kali MySQL disebutkan.
Banyak bahasa pemrograman populer memiliki API database mereka sendiri. Misalnya, Java memiliki Java Database Connectivity (JDBC) API. Jika Anda perlu menghubungkan aplikasi Java ke database MySQL, maka Anda perlu menggunakan konektor MySQL JDBC, yang mengikuti JDBC API.
Demikian pula, di Python Anda perlu menginstal konektor Python MySQL untuk berinteraksi dengan database MySQL. Banyak paket mengikuti standar DB-API, tetapi yang paling populer di antaranya adalah MySQL Connector/Python. Anda bisa mendapatkannya dengan pip :
$ pip install mysql-connector-python
pip menginstal konektor sebagai modul pihak ketiga di lingkungan virtual yang saat ini aktif. Sebaiknya Anda menyiapkan lingkungan virtual yang terisolasi untuk proyek bersama dengan semua dependensinya.
Untuk menguji apakah instalasi berhasil, ketik perintah berikut pada terminal Python Anda:
>>>>>> import mysql.connector
Jika kode di atas dijalankan tanpa kesalahan, maka mysql.connector sudah terpasang dan siap digunakan. Jika Anda menemukan kesalahan, pastikan Anda berada di lingkungan virtual yang benar dan Anda menggunakan juru bahasa Python yang tepat.
Pastikan Anda memasang mysql-connector-python yang benar package, yang merupakan implementasi Python murni. Waspadalah terhadap konektor dengan nama yang sama tetapi sekarang sudah tidak digunakan lagi seperti mysql-connector .
Membuat Koneksi Dengan Server MySQL
MySQL adalah berbasis server sistem manajemen basis data. Satu server mungkin berisi beberapa database. Untuk berinteraksi dengan database, Anda harus terlebih dahulu membuat koneksi dengan server. Alur kerja umum program Python yang berinteraksi dengan database berbasis MySQL adalah sebagai berikut:
- Hubungkan ke server MySQL.
- Buat database baru.
- Hubungkan ke database yang baru dibuat atau yang sudah ada.
- Jalankan kueri SQL dan ambil hasil.
- Beri tahu database jika ada perubahan pada tabel.
- Tutup koneksi ke server MySQL.
Ini adalah alur kerja umum yang mungkin berbeda tergantung pada aplikasi individu. Tapi apapun aplikasinya, langkah pertama adalah menghubungkan database Anda dengan aplikasi Anda.
Membangun Koneksi
Langkah pertama dalam berinteraksi dengan server MySQL adalah membuat koneksi. Untuk melakukan ini, Anda memerlukan connect() dari mysql.connector modul. Fungsi ini mengambil parameter seperti host , user , dan password dan mengembalikan MySQLConnection obyek. Anda dapat menerima kredensial ini sebagai masukan dari pengguna dan meneruskannya ke connect() :
from getpass import getpass
from mysql.connector import connect, Error

try:
    with connect(
        host="localhost",
        user=input("Enter username: "),
        password=getpass("Enter password: "),
    ) as connection:
        print(connection)
except Error as e:
    print(e)
Kode di atas menggunakan kredensial login yang dimasukkan untuk membuat koneksi dengan server MySQL Anda. Sebagai imbalannya, Anda mendapatkan MySQLConnection objek, yang disimpan di connection variabel. Mulai sekarang, Anda akan menggunakan variabel ini untuk mengakses server MySQL Anda.
Ada beberapa hal penting yang perlu diperhatikan dalam kode di atas:
-
Anda harus selalu menangani pengecualian yang mungkin muncul saat membuat koneksi ke server MySQL. Inilah mengapa Anda menggunakan
try…exceptblokir untuk menangkap dan mencetak pengecualian yang mungkin Anda temui. -
Anda harus selalu menutup koneksi setelah selesai mengakses database. Membiarkan koneksi terbuka yang tidak digunakan dapat menyebabkan beberapa kesalahan tak terduga dan masalah kinerja. Kode di atas memanfaatkan pengelola konteks menggunakan
with, yang mengabstraksikan proses pembersihan koneksi. -
Anda seharusnya tidak pernah membuat kode keras kredensial login Anda , yaitu, nama pengguna dan kata sandi Anda, langsung dalam skrip Python. Ini adalah praktik yang buruk untuk penerapan dan menimbulkan ancaman keamanan yang serius. Kode di atas meminta pengguna untuk kredensial login. Ini menggunakan
getpass. bawaan modul untuk menyembunyikan kata sandi. Meskipun ini lebih baik daripada hard-coding, ada cara lain yang lebih aman untuk menyimpan informasi sensitif, seperti menggunakan variabel lingkungan.
Anda sekarang telah membuat koneksi antara program dan server MySQL Anda, tetapi Anda masih perlu membuat database baru atau menyambung ke database yang ada di dalam server.
Membuat Basis Data Baru
Di bagian terakhir, Anda membuat koneksi dengan server MySQL Anda. Untuk membuat database baru, Anda perlu menjalankan pernyataan SQL:
CREATE DATABASE books_db;
Pernyataan di atas akan membuat database baru dengan nama books_db .
Catatan: Di MySQL, itu wajib untuk menempatkan titik koma (; ) di akhir pernyataan, yang menunjukkan penghentian kueri. Namun, MySQL Connector/Python secara otomatis menambahkan titik koma di akhir kueri Anda, jadi tidak perlu menggunakannya dalam kode Python Anda.
Untuk menjalankan kueri SQL dengan Python, Anda harus menggunakan kursor, yang mengabstraksikan akses ke catatan database. MySQL Connector/Python memberi Anda MySQLCursor class, yang membuat instance objek yang dapat mengeksekusi kueri MySQL dengan Python. Sebuah instance dari MySQLCursor kelas juga disebut cursor .
cursor objek menggunakan MySQLConnection objek untuk berinteraksi dengan server MySQL Anda. Untuk membuat cursor , gunakan .cursor() metode connection Anda variabel:
cursor = connection.cursor()
Kode di atas memberi Anda sebuah instance dari MySQLCursor kelas.
Kueri yang perlu dieksekusi dikirim ke cursor.execute() dalam bentuk string. Dalam kesempatan khusus ini, Anda akan mengirimkan CREATE DATABASE kueri ke cursor.execute() :
from getpass import getpass
from mysql.connector import connect, Error

try:
    with connect(
        host="localhost",
        user=input("Enter username: "),
        password=getpass("Enter password: "),
    ) as connection:
        create_db_query = "CREATE DATABASE online_movie_rating"
        with connection.cursor() as cursor:
            cursor.execute(create_db_query)
except Error as e:
    print(e)
Setelah mengeksekusi kode di atas, Anda akan memiliki database baru bernama online_movie_rating di server MySQL Anda.
CREATE DATABASE kueri disimpan sebagai string di create_db_query variabel dan kemudian diteruskan ke cursor.execute() untuk eksekusi. Kode menggunakan pengelola konteks dengan cursor objek untuk menangani proses pembersihan.
Anda mungkin menerima kesalahan di sini jika database dengan nama yang sama sudah ada di server Anda. Untuk mengkonfirmasi ini, Anda dapat menampilkan nama semua database di server Anda. Menggunakan MySQLConnection yang sama objek dari sebelumnya, jalankan SHOW DATABASES pernyataan:
>>> show_db_query = "SHOW DATABASES"
>>> with connection.cursor() as cursor:
...     cursor.execute(show_db_query)
...     for db in cursor:
...         print(db)
...
('information_schema',)
('mysql',)
('online_movie_rating',)
('performance_schema',)
('sys',)
Kode di atas mencetak nama semua database yang saat ini ada di server MySQL Anda. SHOW DATABASES perintah juga menampilkan beberapa database yang tidak Anda buat di server Anda, seperti information_schema , performance_schema , dan seterusnya. Database ini dihasilkan secara otomatis oleh server MySQL dan menyediakan akses ke berbagai metadata database dan pengaturan server MySQL.
Anda membuat database baru di bagian ini dengan menjalankan CREATE DATABASE penyataan. Di bagian berikutnya, Anda akan melihat cara menghubungkan ke database yang sudah ada.
Menghubungkan ke Database yang Ada
Di bagian terakhir, Anda membuat database baru bernama online_movie_rating . Namun, Anda masih belum terhubung dengannya. Dalam banyak situasi, Anda sudah memiliki database MySQL yang ingin Anda hubungkan dengan aplikasi Python Anda.
Anda dapat melakukan ini menggunakan connect() yang sama fungsi yang Anda gunakan sebelumnya dengan mengirimkan parameter tambahan yang disebut database :
from getpass import getpass
from mysql.connector import connect, Error

try:
    with connect(
        host="localhost",
        user=input("Enter username: "),
        password=getpass("Enter password: "),
        database="online_movie_rating",
    ) as connection:
        print(connection)
except Error as e:
    print(e)
Kode di atas sangat mirip dengan skrip koneksi yang Anda gunakan sebelumnya. Satu-satunya perubahan di sini adalah database tambahan parameter, di mana nama database Anda diteruskan ke connect() . Setelah Anda menjalankan skrip ini, Anda akan terhubung ke online_movie_rating basis data.
Membuat, Mengubah, dan Menghapus Tabel
Di bagian ini, Anda akan mempelajari cara melakukan beberapa kueri DDL dasar seperti CREATE , DROP , dan ALTER dengan Python. Anda akan melihat sekilas database MySQL yang akan Anda gunakan di sisa tutorial ini. Anda juga akan membuat semua tabel yang diperlukan untuk database dan mempelajari cara melakukan modifikasi pada tabel ini nanti.
Mendefinisikan Skema Basis Data
Anda bisa mulai dengan membuat skema database untuk sistem rating film online. Basis data akan terdiri dari tiga tabel:
moviesberisi informasi umum tentang film dan memiliki atribut berikut:idtitlerelease_yeargenrecollection_in_mil
reviewersberisi informasi tentang orang-orang yang memposting ulasan atau penilaian dan memiliki atribut berikut:idfirst_namelast_name
ratingsberisi informasi tentang rating yang telah diposting dan memiliki atribut sebagai berikut:movie_id(kunci asing)reviewer_id(kunci asing)ratings
Sistem peringkat film dunia nyata, seperti IMDb, perlu menyimpan banyak atribut lain, seperti email, daftar pemeran film, dan sebagainya. Jika mau, Anda bisa menambahkan lebih banyak tabel dan atribut ke database ini. Tapi tiga tabel ini sudah cukup untuk tujuan tutorial ini.
Gambar di bawah menggambarkan skema database:
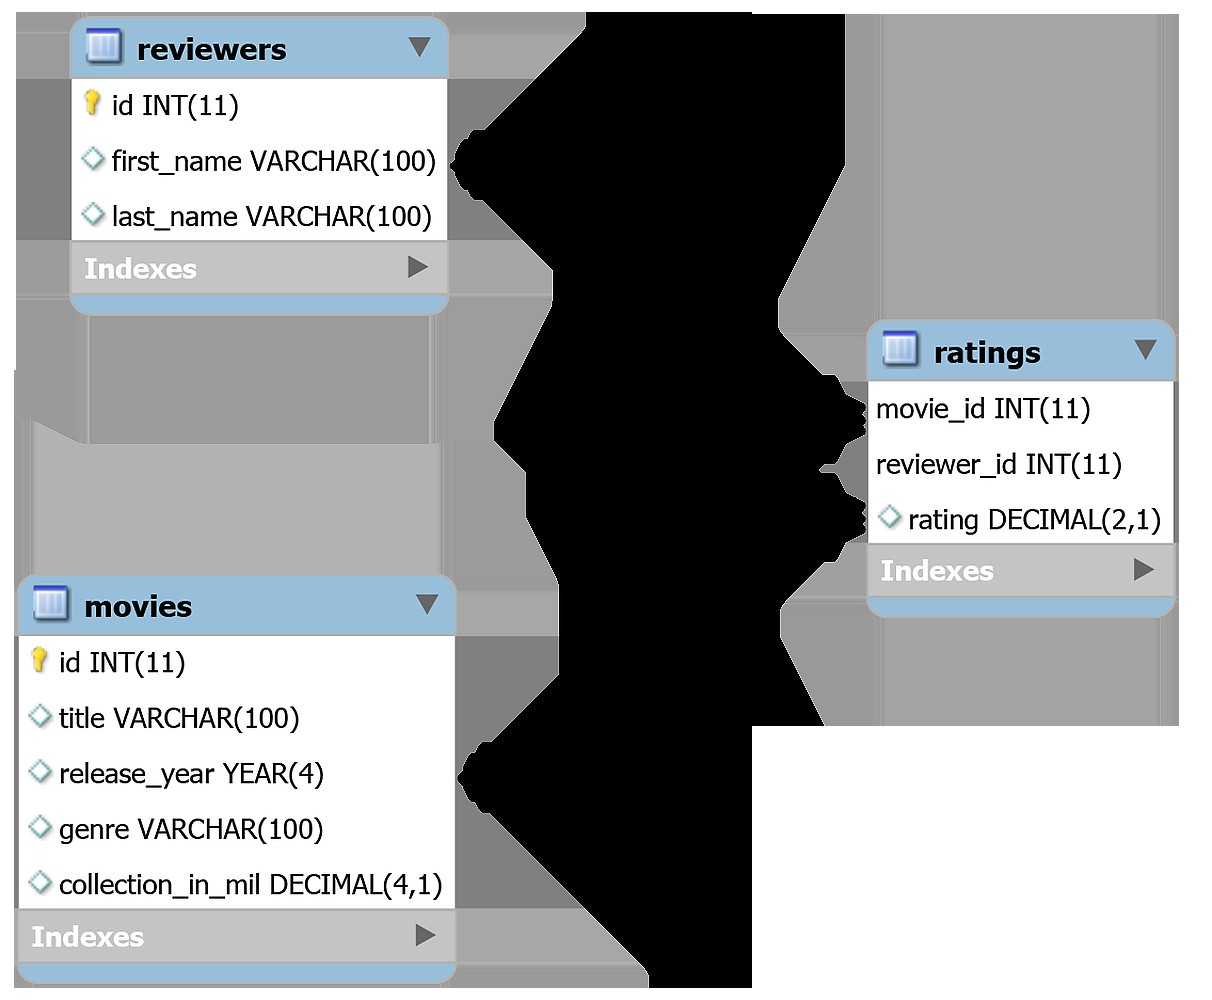
Tabel-tabel dalam database ini saling berhubungan satu sama lain. movies dan reviewers akan memiliki banyak-ke-banyak hubungan karena satu film dapat ditinjau oleh beberapa pengulas dan satu pengulas dapat meninjau beberapa film. ratings tabel menghubungkan movies tabel dengan reviewers tabel.
Membuat Tabel Menggunakan CREATE TABLE Pernyataan
Sekarang, untuk membuat tabel baru di MySQL, Anda perlu menggunakan CREATE TABLE penyataan. Kueri MySQL berikut akan membuat movies tabel untuk online_movie_rating basis data:
CREATE TABLE movies(
    id INT AUTO_INCREMENT PRIMARY KEY,
    title VARCHAR(100),
    release_year YEAR(4),
    genre VARCHAR(100),
    collection_in_mil INT
);
Jika Anda pernah melihat pernyataan SQL sebelumnya, maka sebagian besar kueri di atas mungkin masuk akal. Namun ada beberapa perbedaan dalam sintaks MySQL yang harus Anda ketahui.
Misalnya, MySQL memiliki berbagai tipe data untuk Anda teliti, termasuk YEAR , INT , BIGINT , dan seterusnya. Selain itu, MySQL menggunakan AUTO_INCREMENT kata kunci ketika nilai kolom harus ditambahkan secara otomatis pada penyisipan catatan baru.
Untuk membuat tabel baru, Anda harus meneruskan kueri ini ke cursor.execute() , yang menerima kueri MySQL dan mengeksekusi kueri pada database MySQL yang terhubung:
create_movies_table_query = """
CREATE TABLE movies(
    id INT AUTO_INCREMENT PRIMARY KEY,
    title VARCHAR(100),
    release_year YEAR(4),
    genre VARCHAR(100),
    collection_in_mil INT
)
"""
with connection.cursor() as cursor:
    cursor.execute(create_movies_table_query)
    connection.commit()
Sekarang Anda memiliki movies tabel di database Anda. Anda lulus create_movies_table_query ke cursor.execute() , yang melakukan eksekusi yang diperlukan.
Catatan: connection variabel mengacu pada MySQLConnection objek yang dikembalikan saat Anda terhubung ke database Anda.
Perhatikan juga connection.commit() pernyataan di akhir kode. Secara default, konektor MySQL Anda tidak melakukan transaksi otomatis. Di MySQL, modifikasi yang disebutkan dalam transaksi hanya terjadi ketika Anda menggunakan COMMIT perintah pada akhirnya. Selalu panggil metode ini setelah setiap transaksi untuk melakukan perubahan pada tabel yang sebenarnya.
Seperti yang Anda lakukan dengan movies tabel, jalankan skrip berikut untuk membuat reviewers tabel:
create_reviewers_table_query = """
CREATE TABLE reviewers (
    id INT AUTO_INCREMENT PRIMARY KEY,
    first_name VARCHAR(100),
    last_name VARCHAR(100)
)
"""
with connection.cursor() as cursor:
    cursor.execute(create_reviewers_table_query)
    connection.commit()
Jika diperlukan, Anda dapat menambahkan lebih banyak informasi tentang pengulas, seperti ID email atau informasi demografis mereka. Tapi first_name dan last_name akan memenuhi tujuan Anda untuk saat ini.
Terakhir, Anda dapat membuat ratings tabel menggunakan skrip berikut:
create_ratings_table_query = """
CREATE TABLE ratings (
    movie_id INT,
    reviewer_id INT,
    rating DECIMAL(2,1),
    FOREIGN KEY(movie_id) REFERENCES movies(id),
    FOREIGN KEY(reviewer_id) REFERENCES reviewers(id),
    PRIMARY KEY(movie_id, reviewer_id)
)
"""
with connection.cursor() as cursor:
    cursor.execute(create_ratings_table_query)
    connection.commit()
Implementasi hubungan kunci asing di MySQL sedikit berbeda dan terbatas dibandingkan dengan SQL standar. Di MySQL, orang tua dan anak dalam batasan kunci asing harus menggunakan mesin penyimpanan yang sama .
Mesin penyimpanan adalah komponen perangkat lunak dasar yang digunakan sistem manajemen basis data untuk melakukan operasi SQL. Di MySQL, mesin penyimpanan hadir dalam dua rasa yang berbeda:
-
Mesin penyimpanan transaksional transaksi aman dan memungkinkan Anda untuk mengembalikan transaksi menggunakan perintah sederhana seperti
rollback. Banyak mesin MySQL populer, termasuk InnoDB dan NDB, termasuk dalam kategori ini. -
Mesin penyimpanan nontransaksional bergantung pada kode manual yang rumit untuk membatalkan pernyataan yang dilakukan pada database. MyISAM, MEMORY, dan banyak mesin MySQL lainnya tidak bersifat transaksional.
InnoDB adalah mesin penyimpanan default dan paling populer. Ini membantu menjaga integritas data dengan mendukung batasan kunci asing. Ini berarti bahwa setiap operasi CRUD pada kunci asing diperiksa untuk memastikan bahwa itu tidak menyebabkan inkonsistensi di tabel yang berbeda.
Perhatikan juga bahwa ratings tabel menggunakan kolom movie_id dan reviewer_id , keduanya kunci asing, bersama-sama sebagai kunci utama . Langkah ini memastikan bahwa pengulas tidak dapat menilai film yang sama dua kali.
Anda dapat memilih untuk menggunakan kembali kursor yang sama untuk beberapa eksekusi. Dalam hal ini, semua eksekusi akan menjadi satu transaksi atomik daripada beberapa transaksi terpisah. Misalnya, Anda dapat menjalankan semua CREATE TABLE pernyataan dengan satu kursor dan kemudian lakukan transaksi Anda hanya sekali:
with connection.cursor() as cursor:
    cursor.execute(create_movies_table_query)
    cursor.execute(create_reviewers_table_query)
    cursor.execute(create_ratings_table_query)
    connection.commit()
Kode di atas pertama-tama akan mengeksekusi ketiga CREATE pernyataan. Kemudian akan mengirimkan COMMIT perintah ke server MySQL yang melakukan transaksi Anda. Anda juga dapat menggunakan .rollback() untuk mengirim ROLLBACK perintah ke server MySQL dan hapus semua perubahan data dari transaksi.
Menampilkan Skema Tabel Menggunakan DESCRIBE Pernyataan
Sekarang, setelah Anda membuat ketiga tabel, Anda dapat melihat skemanya menggunakan pernyataan SQL berikut:
DESCRIBE <table_name>;
Untuk mendapatkan kembali beberapa hasil dari cursor objek, Anda perlu menggunakan cursor.fetchall() . Metode ini mengambil semua baris dari pernyataan yang terakhir dieksekusi. Dengan asumsi Anda sudah memiliki MySQLConnection objek di connection variabel, Anda dapat mencetak semua hasil yang diambil oleh cursor.fetchall() :
>>> show_table_query = "DESCRIBE movies"
>>> with connection.cursor() as cursor:
...     cursor.execute(show_table_query)
...     # Fetch rows from last executed query
...     result = cursor.fetchall()
...     for row in result:
...         print(row)
...
('id', 'int(11)', 'NO', 'PRI', None, 'auto_increment')
('title', 'varchar(100)', 'YES', '', None, '')
('release_year', 'year(4)', 'YES', '', None, '')
('genre', 'varchar(100)', 'YES', '', None, '')
('collection_in_mil', 'int(11)', 'YES', '', None, '')
Setelah Anda menjalankan kode di atas, Anda akan menerima tabel yang berisi informasi tentang semua kolom di movies meja. Untuk setiap kolom, Anda akan menerima detail seperti tipe data kolom, apakah kolom tersebut adalah kunci utama, dan seterusnya.
Memodifikasi Skema Tabel Menggunakan ALTER Pernyataan
Dalam movies tabel, Anda memiliki kolom bernama collection_in_mil , yang berisi koleksi film box office dalam jutaan dolar. Anda dapat menulis pernyataan MySQL berikut untuk mengubah tipe data collection_in_mil atribut dari INT ke DECIMAL :
ALTER TABLE movies MODIFY COLUMN collection_in_mil DECIMAL(4,1);
DECIMAL(4,1) artinya bilangan desimal maksimal 4 digit, di antaranya 1 adalah desimal, seperti 120.1 , 3.4 , 38.0 , dan seterusnya. Setelah menjalankan ALTER TABLE pernyataan, Anda dapat menampilkan skema tabel yang diperbarui menggunakan DESCRIBE :
>>> alter_table_query = """
... ALTER TABLE movies
... MODIFY COLUMN collection_in_mil DECIMAL(4,1)
... """
>>> show_table_query = "DESCRIBE movies"
>>> with connection.cursor() as cursor:
...     cursor.execute(alter_table_query)
...     cursor.execute(show_table_query)
...     # Fetch rows from last executed query
...     result = cursor.fetchall()
...     print("Movie Table Schema after alteration:")
...     for row in result:
...         print(row)
...
Movie Table Schema after alteration
('id', 'int(11)', 'NO', 'PRI', None, 'auto_increment')
('title', 'varchar(100)', 'YES', '', None, '')
('release_year', 'year(4)', 'YES', '', None, '')
('genre', 'varchar(100)', 'YES', '', None, '')
('collection_in_mil', 'decimal(4,1)', 'YES', '', None, '')
Seperti yang ditunjukkan pada output, collection_in_mil atribut sekarang bertipe DECIMAL(4,1) . Perhatikan juga bahwa dalam kode di atas, Anda memanggil cursor.execute() dua kali. Tapi cursor.fetchall() mengambil baris hanya dari kueri yang dieksekusi terakhir, yaitu show_table_query .
Menghapus Tabel Menggunakan DROP Pernyataan
Untuk menghapus tabel, Anda perlu menjalankan DROP TABLE pernyataan di MySQL. Menghapus tabel adalah tidak dapat diubah proses. Jika Anda menjalankan kode di bawah ini, maka Anda harus memanggil CREATE TABLE kueri lagi untuk menggunakan ratings tabel di bagian mendatang.
Untuk menghapus ratings tabel, kirim drop_table_query ke cursor.execute() :
drop_table_query = "DROP TABLE ratings"
with connection.cursor() as cursor:
    cursor.execute(drop_table_query)
Jika Anda menjalankan kode di atas, Anda akan berhasil menghapus ratings tabel.
Menyisipkan Catatan dalam Tabel
Di bagian terakhir, Anda membuat tiga tabel di database Anda:movies , reviewers , dan ratings . Sekarang Anda perlu mengisi tabel ini dengan data. Bagian ini akan membahas dua cara berbeda untuk menyisipkan catatan di Konektor MySQL untuk Python.
Metode pertama, .execute() , bekerja dengan baik ketika jumlah catatan kecil dan catatan dapat dikodekan secara keras. Metode kedua, .executemany() , lebih populer dan lebih cocok untuk skenario dunia nyata.
Menggunakan .execute()
Pendekatan pertama menggunakan cursor.execute() yang sama metode yang telah Anda gunakan sampai sekarang. Anda menulis INSERT INTO kueri dalam string dan berikan ke cursor.execute() . Anda dapat menggunakan metode ini untuk memasukkan data ke dalam movies tabel.
Untuk referensi, movies tabel memiliki lima atribut:
idtitlerelease_yeargenrecollection_in_mil
Anda tidak perlu menambahkan data untuk id sebagai AUTO_INCREMENT otomatis menghitung id untuk kamu. Skrip berikut menyisipkan catatan ke dalam movies tabel:
insert_movies_query = """
INSERT INTO movies (title, release_year, genre, collection_in_mil)
VALUES
    ("Forrest Gump", 1994, "Drama", 330.2),
    ("3 Idiots", 2009, "Drama", 2.4),
    ("Eternal Sunshine of the Spotless Mind", 2004, "Drama", 34.5),
    ("Good Will Hunting", 1997, "Drama", 138.1),
    ("Skyfall", 2012, "Action", 304.6),
    ("Gladiator", 2000, "Action", 188.7),
    ("Black", 2005, "Drama", 3.0),
    ("Titanic", 1997, "Romance", 659.2),
    ("The Shawshank Redemption", 1994, "Drama",28.4),
    ("Udaan", 2010, "Drama", 1.5),
    ("Home Alone", 1990, "Comedy", 286.9),
    ("Casablanca", 1942, "Romance", 1.0),
    ("Avengers: Endgame", 2019, "Action", 858.8),
    ("Night of the Living Dead", 1968, "Horror", 2.5),
    ("The Godfather", 1972, "Crime", 135.6),
    ("Haider", 2014, "Action", 4.2),
    ("Inception", 2010, "Adventure", 293.7),
    ("Evil", 2003, "Horror", 1.3),
    ("Toy Story 4", 2019, "Animation", 434.9),
    ("Air Force One", 1997, "Drama", 138.1),
    ("The Dark Knight", 2008, "Action",535.4),
    ("Bhaag Milkha Bhaag", 2013, "Sport", 4.1),
    ("The Lion King", 1994, "Animation", 423.6),
    ("Pulp Fiction", 1994, "Crime", 108.8),
    ("Kai Po Che", 2013, "Sport", 6.0),
    ("Beasts of No Nation", 2015, "War", 1.4),
    ("Andadhun", 2018, "Thriller", 2.9),
    ("The Silence of the Lambs", 1991, "Crime", 68.2),
    ("Deadpool", 2016, "Action", 363.6),
    ("Drishyam", 2015, "Mystery", 3.0)
"""
with connection.cursor() as cursor:
    cursor.execute(insert_movies_query)
    connection.commit()
The movies table is now loaded with thirty records. The code calls connection.commit() at the end. It’s crucial to call .commit() after preforming any modifications to a table.
Using .executemany()
The previous approach is more suitable when the number of records is fairly small and you can write these records directly into the code. But this is rarely true. You’ll often have this data stored in some other file, or the data will be generated by a different script and will need to be added to the MySQL database.
This is where .executemany() comes in handy. It accepts two parameters:
- A query that contains placeholders for the records that need to be inserted
- A list that contains all records that you wish to insert
The following example inserts records for the reviewers table:
insert_reviewers_query = """
INSERT INTO reviewers
(first_name, last_name)
VALUES ( %s, %s )
"""
reviewers_records = [
    ("Chaitanya", "Baweja"),
    ("Mary", "Cooper"),
    ("John", "Wayne"),
    ("Thomas", "Stoneman"),
    ("Penny", "Hofstadter"),
    ("Mitchell", "Marsh"),
    ("Wyatt", "Skaggs"),
    ("Andre", "Veiga"),
    ("Sheldon", "Cooper"),
    ("Kimbra", "Masters"),
    ("Kat", "Dennings"),
    ("Bruce", "Wayne"),
    ("Domingo", "Cortes"),
    ("Rajesh", "Koothrappali"),
    ("Ben", "Glocker"),
    ("Mahinder", "Dhoni"),
    ("Akbar", "Khan"),
    ("Howard", "Wolowitz"),
    ("Pinkie", "Petit"),
    ("Gurkaran", "Singh"),
    ("Amy", "Farah Fowler"),
    ("Marlon", "Crafford"),
]
with connection.cursor() as cursor:
    cursor.executemany(insert_reviewers_query, reviewers_records)
    connection.commit()
In the script above, you pass both the query and the list of records as arguments to .executemany() . These records could have been fetched from a file or from the user and stored in the reviewers_records list.
The code uses %s as a placeholder for the two strings that had to be inserted in the insert_reviewers_query . Placeholders act as format specifiers and help reserve a spot for a variable inside a string. The specified variable is then added to this spot during execution.
You can similarly use .executemany() to insert records in the ratings table:
insert_ratings_query = """
INSERT INTO ratings
(rating, movie_id, reviewer_id)
VALUES ( %s, %s, %s)
"""
ratings_records = [
    (6.4, 17, 5), (5.6, 19, 1), (6.3, 22, 14), (5.1, 21, 17),
    (5.0, 5, 5), (6.5, 21, 5), (8.5, 30, 13), (9.7, 6, 4),
    (8.5, 24, 12), (9.9, 14, 9), (8.7, 26, 14), (9.9, 6, 10),
    (5.1, 30, 6), (5.4, 18, 16), (6.2, 6, 20), (7.3, 21, 19),
    (8.1, 17, 18), (5.0, 7, 2), (9.8, 23, 3), (8.0, 22, 9),
    (8.5, 11, 13), (5.0, 5, 11), (5.7, 8, 2), (7.6, 25, 19),
    (5.2, 18, 15), (9.7, 13, 3), (5.8, 18, 8), (5.8, 30, 15),
    (8.4, 21, 18), (6.2, 23, 16), (7.0, 10, 18), (9.5, 30, 20),
    (8.9, 3, 19), (6.4, 12, 2), (7.8, 12, 22), (9.9, 15, 13),
    (7.5, 20, 17), (9.0, 25, 6), (8.5, 23, 2), (5.3, 30, 17),
    (6.4, 5, 10), (8.1, 5, 21), (5.7, 22, 1), (6.3, 28, 4),
    (9.8, 13, 1)
]
with connection.cursor() as cursor:
    cursor.executemany(insert_ratings_query, ratings_records)
    connection.commit()
All three tables are now populated with data. You now have a fully functional online movie rating database. The next step is to understand how to interact with this database.
Reading Records From the Database
Until now, you’ve been building your database. Now it’s time to perform some queries on it and find some interesting properties from this dataset. In this section, you’ll learn how to read records from database tables using the SELECT statement.
Reading Records Using the SELECT Statement
To retrieve records, you need to send a SELECT query to cursor.execute() . Then you use cursor.fetchall() to extract the retrieved table in the form of a list of rows or records.
Try writing a MySQL query to select all records from the movies table and send it to .execute() :
>>> select_movies_query = "SELECT * FROM movies LIMIT 5"
>>> with connection.cursor() as cursor:
...     cursor.execute(select_movies_query)
...     result = cursor.fetchall()
...     for row in result:
...         print(row)
...
(1, 'Forrest Gump', 1994, 'Drama', Decimal('330.2'))
(2, '3 Idiots', 2009, 'Drama', Decimal('2.4'))
(3, 'Eternal Sunshine of the Spotless Mind', 2004, 'Drama', Decimal('34.5'))
(4, 'Good Will Hunting', 1997, 'Drama', Decimal('138.1'))
(5, 'Skyfall', 2012, 'Action', Decimal('304.6'))
The result variable holds the records returned from using .fetchall() . It’s a list of tuples representing individual records from the table.
In the query above, you use the LIMIT clause to constrain the number of rows that are received from the SELECT statement. Developers often use LIMIT to perform pagination when handling large volumes of data.
In MySQL, the LIMIT clause takes one or two nonnegative numeric arguments. When using one argument, you specify the maximum number of rows to return. Since your query includes LIMIT 5 , only the first 5 records are fetched. When using both arguments, you can also specify the offset of the first row to return:
SELECT * FROM movies LIMIT 2,5;
The first argument specifies an offset of 2 , and the second argument constrains the number of returned rows to 5 . The above query will return rows 3 to 7.
You can also query for selected columns:
>>>>>> select_movies_query = "SELECT title, release_year FROM movies LIMIT 5"
>>> with connection.cursor() as cursor:
... cursor.execute(select_movies_query)
... for row in cursor.fetchall():
... print(row)
...
('Forrest Gump', 1994)
('3 Idiots', 2009)
('Eternal Sunshine of the Spotless Mind', 2004)
('Good Will Hunting', 1997)
('Skyfall', 2012)
Now, the code outputs values only from the two specified columns:title and release_year .
Filtering Results Using the WHERE Clause
You can filter table records by specific criteria using the WHERE clause. For example, to retrieve all movies with a box office collection greater than $300 million, you could run the following query:
SELECT title, collection_in_mil
FROM movies
WHERE collection_in_mil > 300;
You can also use ORDER BY clause in the last query to sort the results from the highest to the lowest earner:
>>> select_movies_query = """
... SELECT title, collection_in_mil
... FROM movies
... WHERE collection_in_mil > 300
... ORDER BY collection_in_mil DESC
... """
>>> with connection.cursor() as cursor:
...     cursor.execute(select_movies_query)
...     for movie in cursor.fetchall():
...         print(movie)
...
('Avengers: Endgame', Decimal('858.8'))
('Titanic', Decimal('659.2'))
('The Dark Knight', Decimal('535.4'))
('Toy Story 4', Decimal('434.9'))
('The Lion King', Decimal('423.6'))
('Deadpool', Decimal('363.6'))
('Forrest Gump', Decimal('330.2'))
('Skyfall', Decimal('304.6'))
MySQL offers a plethora of string formatting operations like CONCAT for concatenating strings. Often, websites will show the movie title along with its release year to avoid confusion. To retrieve the titles of the top five grossing movies, concatenated with their release years, you can write the following query:
>>> select_movies_query = """
... SELECT CONCAT(title, " (", release_year, ")"),
...       collection_in_mil
... FROM movies
... ORDER BY collection_in_mil DESC
... LIMIT 5
... """
>>> with connection.cursor() as cursor:
...     cursor.execute(select_movies_query)
...     for movie in cursor.fetchall():
...         print(movie)
...
('Avengers: Endgame (2019)', Decimal('858.8'))
('Titanic (1997)', Decimal('659.2'))
('The Dark Knight (2008)', Decimal('535.4'))
('Toy Story 4 (2019)', Decimal('434.9'))
('The Lion King (1994)', Decimal('423.6'))
If you don’t want to use the LIMIT clause and you don’t need to fetch all the records, then the cursor object has .fetchone() and .fetchmany() methods as well:
.fetchone()retrieves either the next row of the result, as a tuple, orNoneif no more rows are available..fetchmany()retrieves the next set of rows from the result as a list of tuples. It has asizeargument, which defaults to1, that you can use to specify the number of rows you need to fetch. If no more rows are available, then the method returns an empty list.
Try retrieving the titles of the five highest-grossing movies concatenated with their release years again, but this time use .fetchmany() :
>>> select_movies_query = """
... SELECT CONCAT(title, " (", release_year, ")"),
...       collection_in_mil
... FROM movies
... ORDER BY collection_in_mil DESC
... """
>>> with connection.cursor() as cursor:
...     cursor.execute(select_movies_query)
...     for movie in cursor.fetchmany(size=5):
...         print(movie)
...     cursor.fetchall()
...
('Avengers: Endgame (2019)', Decimal('858.8'))
('Titanic (1997)', Decimal('659.2'))
('The Dark Knight (2008)', Decimal('535.4'))
('Toy Story 4 (2019)', Decimal('434.9'))
('The Lion King (1994)', Decimal('423.6'))
The output with .fetchmany() is similar to what you received when you used the LIMIT clause. You might have noticed the additional cursor.fetchall() call at the end. You do this to clean all the remaining results that weren’t read by .fetchmany() .
It’s necessary to clean all unread results before executing any other statements on the same connection. Otherwise, an InternalError: Unread result found exception will be raised.
Handling Multiple Tables Using the JOIN Statement
If you found the queries in the last section to be quite straightforward, don’t worry. You can make your SELECT queries as complex as you want using the same methods from the last section.
Let’s look at some slightly more complex JOIN queries. If you want to find out the name of the top five highest-rated movies in your database, then you can run the following query:
>>> select_movies_query = """
... SELECT title, AVG(rating) as average_rating
... FROM ratings
... INNER JOIN movies
...     ON movies.id = ratings.movie_id
... GROUP BY movie_id
... ORDER BY average_rating DESC
... LIMIT 5
... """
>>> with connection.cursor() as cursor:
...     cursor.execute(select_movies_query)
...     for movie in cursor.fetchall():
...         print(movie)
...
('Night of the Living Dead', Decimal('9.90000'))
('The Godfather', Decimal('9.90000'))
('Avengers: Endgame', Decimal('9.75000'))
('Eternal Sunshine of the Spotless Mind', Decimal('8.90000'))
('Beasts of No Nation', Decimal('8.70000'))
As shown above, Night of the Living Dead and The Godfather are tied as the highest-rated movies in your online_movie_rating database.
To find the name of the reviewer who gave the most ratings, write the following query:
>>>>>> select_movies_query = """
... SELECT CONCAT(first_name, " ", last_name), COUNT(*) as num
... FROM reviewers
... INNER JOIN ratings
... ON reviewers.id = ratings.reviewer_id
... GROUP BY reviewer_id
... ORDER BY num DESC
... LIMIT 1
... """
>>> with connection.cursor() as cursor:
... cursor.execute(select_movies_query)
... for movie in cursor.fetchall():
... print(movie)
...
('Mary Cooper', 4)
Mary Cooper is the most frequent reviewer in this database. As seen above, it doesn’t matter how complicated the query is because it’s ultimately handled by the MySQL server. Your process for executing a query will always remain the same:pass the query to cursor.execute() and fetch the results using .fetchall() .
Updating and Deleting Records From the Database
In this section, you’ll be updating and deleting records from the database. Both of these operations can be performed on either a single record or multiple records in the table. You’ll select the rows that need to be modified using the WHERE clause.
UPDATE Command
One of the reviewers in your database, Amy Farah Fowler , is now married to Sheldon Cooper . Her last name has now changed to Cooper , so you need to update your database accordingly. For updating records, MySQL uses the UPDATE statement:
update_query = """
UPDATE
    reviewers
SET
    last_name = "Cooper"
WHERE
    first_name = "Amy"
"""
with connection.cursor() as cursor:
    cursor.execute(update_query)
    connection.commit()
The code passes the update query to cursor.execute() , and .commit() brings the required changes to the reviewers table.
Note: In the UPDATE query, the WHERE clause helps specify the records that need to be updated. If you don’t use WHERE , then all records will be updated!
Suppose you need to provide an option that allows reviewers to modify ratings. A reviewer will provide three values, movie_id , reviewer_id , and the new ratings . The code will display the record after performing the specified modification.
Assuming that movie_id = 18 , reviewer_id = 15 , and the new rating = 5.0 , you can use the following MySQL queries to perform the required modification:
UPDATE
    ratings
SET
    rating = 5.0
WHERE
    movie_id = 18 AND reviewer_id = 15;

SELECT *
FROM ratings
WHERE
    movie_id = 18 AND reviewer_id = 15;
The above queries first update the rating and then display it. You can create a complete Python script that establises a connection with the database and allows the reviewer to modify a rating:
from getpass import getpass
from mysql.connector import connect, Error

movie_id = input("Enter movie id: ")
reviewer_id = input("Enter reviewer id: ")
new_rating = input("Enter new rating: ")
update_query = """
UPDATE
    ratings
SET
    rating = "%s"
WHERE
    movie_id = "%s" AND reviewer_id = "%s";

SELECT *
FROM ratings
WHERE
    movie_id = "%s" AND reviewer_id = "%s"
""" % (
    new_rating,
    movie_id,
    reviewer_id,
    movie_id,
    reviewer_id,
)

try:
    with connect(
        host="localhost",
        user=input("Enter username: "),
        password=getpass("Enter password: "),
        database="online_movie_rating",
    ) as connection:
        with connection.cursor() as cursor:
            for result in cursor.execute(update_query, multi=True):
                if result.with_rows:
                    print(result.fetchall())
            connection.commit()
except Error as e:
    print(e)
Save this code to a file named modify_ratings.py . The above code uses %s placeholders to insert the received input in the update_query string. For the first time in this tutorial, you have multiple queries inside a single string. To pass multiple queries to a single cursor.execute() , you need to set the method’s multi argument to True .
If multi is True , then cursor.execute() returns an iterator. Each item in the iterator corresponds to a cursor object that executes a statement passed in the query. The above code runs a for loop on this iterator and then calls .fetchall() on each cursor objek.
Note: Running .fetchall() on all cursor objects is important. To execute a new statement on the same connection, you must ensure that there are no unread results from previous executions. If there are unread results, then you’ll receive an exception.
If no result set is fetched on an operation, then .fetchall() raises an exception. To avoid this error, in the code above you use the cursor.with_rows property, which indicates whether the most recently executed operation produced rows.
While this code should solve your purpose, the WHERE clause is a prime target for web hackers in its current state. It’s vulnerable to what is called a SQL injection attack, which can allow malicious actors to either corrupt or misuse your database.
Warning :Don’t try the below inputs on your database! They will corrupt your table and you’ll need to recreate it.
For example, if a user sends movie_id=18 , reviewer_id=15 , and the new rating=5.0 as input, then the output looks like this:
$ python modify_ratings.py
Enter movie id: 18
Enter reviewer id: 15
Enter new rating: 5.0
Enter username: <user_name>
Enter password:
[(18, 15, Decimal('5.0'))]
The ratings with movie_id=18 and reviewer_id=15 has been changed to 5.0 . But if you were hacker, then you might send a hidden command in your input:
$ python modify_ratings.py
Enter movie id: 18
Enter reviewer id: 15"; UPDATE reviewers SET last_name = "A
Enter new rating: 5.0
Enter username: <user_name>
Enter password:
[(18, 15, Decimal('5.0'))]
Again, the output shows that the specified ratings has been changed to 5.0 . What’s changed?
The hacker sneaked in an update query while entering the reviewer_id . The update query, update reviewers set last_name = "A , changes the last_name of all records in the reviewers table to "A" . You can see this change if you print out the reviewers table:
>>> select_query = """
... SELECT first_name, last_name
... FROM reviewers
... """
>>> with connection.cursor() as cursor:
...     cursor.execute(select_query)
...     for reviewer in cursor.fetchall():
...         print(reviewer)
...
('Chaitanya', 'A')
('Mary', 'A')
('John', 'A')
('Thomas', 'A')
('Penny', 'A')
('Mitchell', 'A')
('Wyatt', 'A')
('Andre', 'A')
('Sheldon', 'A')
('Kimbra', 'A')
('Kat', 'A')
('Bruce', 'A')
('Domingo', 'A')
('Rajesh', 'A')
('Ben', 'A')
('Mahinder', 'A')
('Akbar', 'A')
('Howard', 'A')
('Pinkie', 'A')
('Gurkaran', 'A')
('Amy', 'A')
('Marlon', 'A')
The above code displays the first_name and last_name for all records in the reviewers table. The SQL injection attack corrupted this table by changing the last_name of all records to "A" .
There’s a quick fix to prevent such attacks. Don’t add the query values provided by the user directly to your query string. Instead, update the modify_ratings.py script to send these query values as arguments to .execute() :
from getpass import getpass
from mysql.connector import connect, Error

movie_id = input("Enter movie id: ")
reviewer_id = input("Enter reviewer id: ")
new_rating = input("Enter new rating: ")
update_query = """
UPDATE
    ratings
SET
    rating = %s
WHERE
    movie_id = %s AND reviewer_id = %s;

SELECT *
FROM ratings
WHERE
    movie_id = %s AND reviewer_id = %s
"""
val_tuple = (
    new_rating,
    movie_id,
    reviewer_id,
    movie_id,
    reviewer_id,
)

try:
    with connect(
        host="localhost",
        user=input("Enter username: "),
        password=getpass("Enter password: "),
        database="online_movie_rating",
    ) as connection:
        with connection.cursor() as cursor:
            for result in cursor.execute(update_query, val_tuple, multi=True):
                if result.with_rows:
                    print(result.fetchall())
            connection.commit()
except Error as e:
    print(e)
Notice that the %s placeholders are no longer in string quotes. Strings passed to the placeholders might contain some special characters. If necessary, these can be correctly escaped by the underlying library.
cursor.execute() makes sure that the values in the tuple received as argument are of the required data type. If a user tries to sneak in some problematic characters, then the code will raise an exception:
$ python modify_ratings.py
Enter movie id: 18
Enter reviewer id: 15"; UPDATE reviewers SET last_name = "A
Enter new rating: 5.0
Enter username: <user_name>
Enter password:
1292 (22007): Truncated incorrect DOUBLE value: '15";
UPDATE reviewers SET last_name = "A'
cursor.execute() will raise an exception if it finds any unwanted characters in the user input. You should use this approach whenever you incorporate user input in a query. There are other ways of preventing SQL injection attacks as well.
DELETE Command
Deleting records works very similarly to updating records. You use the DELETE statement to remove selected records.
Note: Deleting is an irreversible proses. If you don’t use the WHERE clause, then all records from the specified table will be deleted. You’ll need to run the INSERT INTO query again to get back the deleted records.
It’s recommended that you first run a SELECT query with the same filter to make sure that you’re deleting the right records. For example, to remove all ratings given by reviewer_id = 2 , you should first run the corresponding SELECT query:
>>> select_movies_query = """
... SELECT reviewer_id, movie_id FROM ratings
... WHERE reviewer_id = 2
... """
>>> with connection.cursor() as cursor:
...     cursor.execute(select_movies_query)
...     for movie in cursor.fetchall():
...         print(movie)
...
(2, 7)
(2, 8)
(2, 12)
(2, 23)
The above code snippet outputs the reviewer_id and movie_id for records in the ratings table where reviewer_id = 2 . Once you’ve confirmed that these are the records that you need to delete, you can run a DELETE query with the same filter:
delete_query = "DELETE FROM ratings WHERE reviewer_id = 2"
with connection.cursor() as cursor:
    cursor.execute(delete_query)
    connection.commit()
With this query, you remove all ratings given by the reviewer with reviewer_id = 2 from the ratings table.
Other Ways to Connect Python and MySQL
In this tutorial, you saw MySQL Connector/Python, which is the officially recommended means of interacting with a MySQL database from a Python application. There are two other popular connectors:
-
mysqlclient is a library that is a close competitor to the official connector and is actively updated with new features. Because its core is written in C, it has better performance than the pure-Python official connector. A big drawback is that it’s fairly difficult to set up and install, especially on Windows.
-
MySQLdb is a legacy software that’s still used in commercial applications. It’s written in C and is faster than MySQL Connector/Python but is available only for Python 2.
These connectors act as interfaces between your program and a MySQL database, and you send your SQL queries through them. But many developers prefer using an object-oriented paradigm rather than SQL queries to manipulate data.
Object-relational mapping (ORM) is a technique that allows you to query and manipulate data from a database directly using an object-oriented language. An ORM library encapsulates the code needed to manipulate data, which eliminates the need to use even a tiny bit of SQL. Here are the most popular Python ORMs for SQL-based databases:
-
SQLAlchemy is an ORM that facilitates communication between Python and other SQL databases. You can create different engines for different databases like MySQL, PostgreSQL, SQLite, and so on. SQLAlchemy is commonly used alongside the pandas library to provide complete data-handling functionality.
-
peewee is a lightweight and fast ORM that’s quick to set up. This is quite useful when your interaction with the database is limited to extracting a few records. For example, if you need to copy selected records from a MySQL database into a CSV file, then peewee might be your best choice.
-
Django ORM is one of the most powerful features of Django and is supplied alongside the Django web framework. It can interact with a variety of databases such as SQLite, PostgreSQL, and MySQL. Many Django-based applications use the Django ORM for data modeling and basic queries but often switch to SQLAlchemy for more complex requirements.
You might find one of these approaches to be more suitable for your application. If you’re not sure which one to use, then it’s best to go with the officially recommended MySQL Connector/Python that you saw in action in this tutorial.
Kesimpulan
In this tutorial, you saw how to use MySQL Connector/Python to integrate a MySQL database with your Python application. You also saw some unique features of a MySQL database that differentiate it from other SQL databases.
Along the way, you learned some programming best practices that are worth considering when it comes to establishing a connection, creating tables, and inserting and updating records in a database application. You also developed a sample MySQL database for an online movie rating system and interacted with it directly from your Python application.
In this tutorial, you learned how to:
- Connect your Python app with a MySQL database
- Bring data from a MySQL database into Python for further analysis
- Execute SQL queries from your Python application
- Handle exceptions while accessing the database
- Prevent SQL injection attacks on your application
If you’re interested, Python also has connectors for other DBMSs like MongoDB and PostgreSQL. For more information, check out Python Database Tutorials.