Di Bagian 2 seri ini, Anda menambahkan kemampuan untuk menyimpan perubahan yang dibuat melalui REST API ke database menggunakan SQLAlchemy dan mempelajari cara membuat serial data tersebut untuk REST API menggunakan Marshmallow. Menghubungkan REST API ke database sehingga aplikasi dapat membuat perubahan pada data yang ada dan membuat data baru sangat bagus dan membuat aplikasi jauh lebih berguna dan tangguh.
Namun, itu hanya sebagian dari kekuatan yang ditawarkan database. Fitur yang lebih hebat lagi adalah R bagian dari RDBMS sistem:hubungan . Dalam database, hubungan adalah kemampuan untuk menghubungkan dua atau lebih tabel bersama-sama dengan cara yang berarti. Dalam artikel ini, Anda akan mempelajari cara menerapkan hubungan dan mengubah Person . Anda database ke dalam aplikasi web mini-blogging.
Dalam artikel ini, Anda akan mempelajari:
- Mengapa lebih dari satu tabel dalam database berguna dan penting
- Bagaimana tabel terkait satu sama lain
- Bagaimana SQLAlchemy dapat membantu Anda mengelola hubungan
- Bagaimana hubungan membantu Anda membangun aplikasi mini-blogging
Untuk Siapa Artikel Ini
Bagian 1 dari seri ini memandu Anda dalam membangun REST API, dan Bagian 2 menunjukkan cara menghubungkan REST API ke database.
Artikel ini memperluas sabuk alat pemrograman Anda lebih jauh. Anda akan belajar cara membuat struktur data hierarkis yang direpresentasikan sebagai hubungan satu-ke-banyak oleh SQLAlchemy. Selain itu, Anda akan memperluas REST API yang telah Anda buat untuk memberikan dukungan CRUD (Buat, Baca, Perbarui, dan Hapus) untuk elemen dalam struktur hierarki ini.
Aplikasi web yang disajikan di Bagian 2 akan memiliki file HTML dan JavaScript yang dimodifikasi dengan cara utama untuk membuat aplikasi mini-blogging yang lebih berfungsi penuh. Anda dapat meninjau versi final kode dari Bagian 2 di repositori GitHub untuk artikel tersebut.
Tunggu saat Anda mulai membuat hubungan dan aplikasi mini-blogging Anda!
Ketergantungan Tambahan
Tidak ada dependensi Python baru di luar apa yang diperlukan untuk artikel Bagian 2. Namun, Anda akan menggunakan dua modul JavaScript baru di aplikasi web untuk membuat segalanya lebih mudah dan lebih konsisten. Kedua modul tersebut adalah sebagai berikut:
- Stang.js adalah mesin templating untuk JavaScript, seperti Jinja2 untuk Flask.
- Moment.js adalah modul penguraian dan pemformatan datetime yang membuat tampilan stempel waktu UTC lebih mudah.
Anda tidak perlu mengunduh salah satu dari ini, karena aplikasi web akan mendapatkannya langsung dari Cloudflare CDN (Content Delivery Network), seperti yang sudah Anda lakukan untuk modul jQuery.
Data Orang Diperluas untuk Blogging
Di Bagian 2, Person data ada sebagai kamus di build_database.py kode python. Inilah yang Anda gunakan untuk mengisi database dengan beberapa data awal. Anda akan mengubah Person struktur data untuk memberi setiap orang daftar catatan yang terkait dengan mereka. Person new yang baru struktur data akan terlihat seperti ini:
# Data to initialize database with
PEOPLE = [
    {
        "fname": "Doug",
        "lname": "Farrell",
        "notes": [
            ("Cool, a mini-blogging application!", "2019-01-06 22:17:54"),
            ("This could be useful", "2019-01-08 22:17:54"),
            ("Well, sort of useful", "2019-03-06 22:17:54"),
        ],
    },
    {
        "fname": "Kent",
        "lname": "Brockman",
        "notes": [
            (
                "I'm going to make really profound observations",
                "2019-01-07 22:17:54",
            ),
            (
                "Maybe they'll be more obvious than I thought",
                "2019-02-06 22:17:54",
            ),
        ],
    },
    {
        "fname": "Bunny",
        "lname": "Easter",
        "notes": [
            ("Has anyone seen my Easter eggs?", "2019-01-07 22:47:54"),
            ("I'm really late delivering these!", "2019-04-06 22:17:54"),
        ],
    },
]
Setiap orang dalam Person kamus sekarang menyertakan kunci yang disebut notes , yang dikaitkan dengan daftar yang berisi tupel data. Setiap tuple dalam notes list mewakili satu catatan berisi konten dan cap waktu. Stempel waktu diinisialisasi (bukan dibuat secara dinamis) untuk mendemonstrasikan pengurutan nanti di REST API.
Setiap satu orang dikaitkan dengan beberapa catatan, dan setiap satu catatan dikaitkan dengan hanya satu orang. Hirarki data ini dikenal sebagai hubungan satu ke banyak, di mana objek induk tunggal terkait dengan banyak objek anak. Anda akan melihat bagaimana hubungan satu-ke-banyak ini dikelola dalam database dengan SQLAlchemy.
Pendekatan Brute Force
Basis data yang Anda buat menyimpan data dalam tabel, dan tabel adalah larik baris dan kolom dua dimensi. Bisakah Person kamus di atas diwakili dalam satu tabel baris dan kolom? Bisa jadi, dengan cara berikut, di person your Anda tabel basis data. Sayangnya, memasukkan semua data aktual dalam contoh akan membuat bilah gulir untuk tabel, seperti yang akan Anda lihat di bawah:
person_id | lname | fname | timestamp | content | note_timestamp |
|---|---|---|---|---|---|
| 1 | Farrell | Doug | 08-08-2018 21:16:01 | Keren, aplikasi mini-blogging! | 06-01-2019 22:17:54 |
| 2 | Farrell | Doug | 08-08-2018 21:16:01 | Ini bisa berguna | 08-01-2019 22:17:54 |
| 3 | Farrell | Doug | 08-08-2018 21:16:01 | Yah, agak berguna | 06-03-2019 22:17:54 |
| 4 | Brockman | Kent | 08-08-2018 21:16:01 | Saya akan melakukan pengamatan yang sangat mendalam | 07-01-2019 22:17:54 |
| 5 | Brockman | Kent | 08-08-2018 21:16:01 | Mungkin mereka akan lebih jelas dari yang saya kira | 06-02-2019 22:17:54 |
| 6 | Paskah | Kelinci | 08-08-2018 21:16:01 | Apakah ada yang melihat telur Paskah saya? | 07-01-2019 22:47:54 |
| 7 | Paskah | Kelinci | 08-08-2018 21:16:01 | Saya sangat terlambat mengirimkan ini! | 06-04-2019 22:17:54 |
Tabel di atas akan benar-benar berfungsi. Semua data diwakili, dan satu orang dikaitkan dengan kumpulan catatan yang berbeda.
Keuntungan
Secara konseptual, struktur tabel di atas memiliki kelebihan karena relatif mudah dipahami. Anda bahkan dapat membuat kasus bahwa data dapat disimpan ke file datar alih-alih database.
Karena struktur tabel dua dimensi, Anda dapat menyimpan dan menggunakan data ini dalam spreadsheet. Spreadsheet telah ditekan ke dalam layanan sebagai penyimpanan data cukup sedikit.
Kekurangan
Sementara struktur tabel di atas akan berfungsi, ia memiliki beberapa kelemahan nyata.
Untuk mewakili kumpulan catatan, semua data untuk setiap orang diulang untuk setiap catatan unik, oleh karena itu data orang tersebut berlebihan. Ini bukan masalah besar untuk data orang Anda karena tidak banyak kolom. Tapi bayangkan jika seseorang memiliki lebih banyak kolom. Bahkan dengan disk drive besar, ini bisa menjadi masalah penyimpanan jika Anda berurusan dengan jutaan baris data.
Memiliki data yang berlebihan seperti ini dapat menyebabkan masalah pemeliharaan seiring berjalannya waktu. Misalnya, bagaimana jika Kelinci Paskah memutuskan perubahan nama adalah ide yang bagus. Untuk melakukan ini, setiap catatan yang berisi nama Kelinci Paskah harus diperbarui agar data tetap konsisten. Pekerjaan terhadap database semacam ini dapat menyebabkan inkonsistensi data, terutama jika pekerjaan tersebut dilakukan oleh orang yang menjalankan kueri SQL dengan tangan.
Penamaan kolom menjadi canggung. Pada tabel di atas, ada timestamp kolom yang digunakan untuk melacak waktu pembuatan dan pembaruan seseorang dalam tabel. Anda juga ingin memiliki fungsi serupa untuk waktu pembuatan dan pembaruan catatan, tetapi karena timestamp sudah digunakan, nama yang dibuat-buat dari note_timestamp digunakan.
Bagaimana jika Anda ingin menambahkan hubungan satu-ke-banyak tambahan ke person meja? Misalnya, untuk memasukkan anak atau nomor telepon seseorang. Setiap orang dapat memiliki banyak anak dan beberapa nomor telepon. Ini dapat dilakukan dengan relatif mudah ke People Python kamus di atas dengan menambahkan children dan phone_numbers kunci dengan daftar baru yang berisi data.
Namun, mewakili hubungan satu-ke-banyak yang baru dalam person . Anda tabel database di atas menjadi jauh lebih sulit. Setiap hubungan satu-ke-banyak baru meningkatkan jumlah baris yang diperlukan untuk mewakilinya untuk setiap entri dalam data anak secara dramatis. Selain itu, masalah yang terkait dengan redundansi data menjadi lebih besar dan lebih sulit untuk ditangani.
Terakhir, data yang Anda dapatkan kembali dari struktur tabel di atas tidak akan terlalu Pythonic:itu hanya daftar besar daftar. SQLAlchemy tidak akan dapat banyak membantu Anda karena hubungannya tidak ada.
Pendekatan Basis Data Relasional
Berdasarkan apa yang telah Anda lihat di atas, menjadi jelas bahwa mencoba merepresentasikan bahkan kumpulan data yang cukup kompleks dalam satu tabel menjadi tidak dapat dikelola dengan cukup cepat. Mengingat itu, alternatif apa yang ditawarkan database? Di sinilah R bagian dari RDBMS database ikut bermain. Mewakili hubungan menghilangkan kerugian yang diuraikan di atas.
Alih-alih mencoba mewakili data hierarkis dalam satu tabel, data dipecah menjadi beberapa tabel, dengan mekanisme untuk menghubungkannya satu sama lain. Tabel dipecah di sepanjang garis koleksi, jadi untuk Person . Anda kamus di atas, ini berarti akan ada tabel yang mewakili orang dan satu lagi yang mewakili catatan. Ini mengembalikan person asli Anda tabel, yang terlihat seperti ini:
person_id | lname | fname | timestamp |
|---|---|---|---|
| 1 | Farrell | Doug | 08-08-2018 21:16:01.888444 |
| 2 | Brockman | Kent | 08-08-2018 21:16:01.889060 |
| 3 | Paskah | Kelinci | 08-08-2018 21:16:01.886834 |
Untuk mewakili informasi catatan baru, Anda akan membuat tabel baru bernama note . (Ingat konvensi penamaan tabel tunggal kita.) Tabelnya terlihat seperti ini:
note_id | person_id | content | timestamp |
|---|---|---|---|
| 1 | 1 | Keren, aplikasi mini-blogging! | 06-01-2019 22:17:54 |
| 2 | 1 | Ini bisa berguna | 08-01-2019 22:17:54 |
| 3 | 1 | Yah, agak berguna | 06-03-2019 22:17:54 |
| 4 | 2 | Saya akan melakukan pengamatan yang sangat mendalam | 07-01-2019 22:17:54 |
| 5 | 2 | Mungkin mereka akan lebih jelas dari yang saya kira | 06-02-2019 22:17:54 |
| 6 | 3 | Apakah ada yang melihat telur Paskah saya? | 07-01-2019 22:47:54 |
| 7 | 3 | Saya sangat terlambat mengirimkan ini! | 06-04-2019 22:17:54 |
Perhatikan bahwa, seperti person tabel, note tabel memiliki pengidentifikasi unik yang disebut note_id , yang merupakan kunci utama untuk note meja. Satu hal yang tidak jelas adalah pencantuman person_id nilai dalam tabel. Untuk apa itu digunakan? Inilah yang menciptakan hubungan dengan person meja. Sedangkan note_id adalah kunci utama untuk tabel, person_id adalah apa yang dikenal sebagai kunci asing.
Kunci asing memberikan setiap entri dalam note tabel kunci utama person merekam itu terkait dengan. Dengan menggunakan ini, SQLAlchemy dapat mengumpulkan semua catatan yang terkait dengan setiap orang dengan menghubungkan person.person_id kunci utama ke note.person_id kunci asing, menciptakan hubungan.
Keuntungan
Dengan memecah kumpulan data menjadi dua tabel, dan memperkenalkan konsep kunci asing, Anda telah membuat data sedikit lebih rumit untuk dipikirkan, Anda telah menyelesaikan kekurangan dari representasi tabel tunggal. SQLAlchemy akan membantu Anda mengkodekan peningkatan kompleksitas dengan cukup mudah.
Data tidak lagi berlebihan dalam database. Hanya ada satu entri orang untuk setiap orang yang ingin Anda simpan dalam database. Ini menyelesaikan masalah penyimpanan dengan segera dan secara dramatis menyederhanakan masalah pemeliharaan.
Jika Kelinci Paskah masih ingin mengganti nama, maka Anda hanya perlu mengubah satu baris di person tabel, dan hal lain yang terkait dengan baris tersebut (seperti note table) akan segera memanfaatkan perubahan tersebut.
Penamaan kolom lebih konsisten dan bermakna. Karena data orang dan catatan ada di tabel terpisah, stempel waktu pembuatan dan pembaruan dapat dinamai secara konsisten di kedua tabel, karena tidak ada konflik nama di seluruh tabel.
Selain itu, Anda tidak perlu lagi membuat permutasi setiap baris untuk hubungan satu-ke-banyak baru yang mungkin ingin Anda wakili. Ambil children kami dan phone_numbers contoh dari sebelumnya. Menerapkan ini akan membutuhkan children dan phone_numbers tabel. Setiap tabel akan berisi kunci asing person_id menghubungkannya kembali dengan person tabel.
Menggunakan SQLAlchemy, data yang Anda dapatkan kembali dari tabel di atas akan lebih berguna, karena apa yang Anda dapatkan adalah objek untuk setiap baris orang. Objek itu memiliki atribut bernama yang setara dengan kolom dalam tabel. Salah satu atribut tersebut adalah daftar Python yang berisi objek catatan terkait.
Kekurangan
Di mana pendekatan brute force lebih sederhana untuk dipahami, konsep kunci asing dan hubungan membuat pemikiran tentang data agak lebih abstrak. Abstraksi ini perlu dipikirkan untuk setiap hubungan yang Anda buat di antara tabel.
Memanfaatkan hubungan berarti berkomitmen untuk menggunakan sistem database. Ini adalah alat lain untuk menginstal, mempelajari, dan memelihara di atas dan di luar aplikasi yang benar-benar menggunakan data.
Model SQLAlchemy
Untuk menggunakan dua tabel di atas, dan hubungan di antara keduanya, Anda harus membuat model SQLAlchemy yang mengetahui kedua tabel dan hubungan di antara keduanya. Inilah Person SQLAlchemy model dari Bagian 2, diperbarui untuk menyertakan hubungan dengan kumpulan note :
 1class Person(db.Model):
 2    __tablename__ = 'person'
 3    person_id = db.Column(db.Integer, primary_key=True)
 4    lname = db.Column(db.String(32))
 5    fname = db.Column(db.String(32))
 6    timestamp = db.Column(
 7        db.DateTime, default=datetime.utcnow, onupdate=datetime.utcnow
 8    )
 9    notes = db.relationship(
10        'Note',
11        backref='person',
12        cascade='all, delete, delete-orphan',
13        single_parent=True,
14        order_by='desc(Note.timestamp)'
15    )
Baris 1 hingga 8 dari kelas Python di atas terlihat persis seperti yang Anda buat sebelumnya di Bagian 2. Baris 9 hingga 16 membuat atribut baru di Person kelas yang disebut note . note baru ini atribut didefinisikan dalam baris kode berikut:
-
Baris 9: Seperti atribut kelas lainnya, baris ini membuat atribut baru yang disebut
notesdan menyetelnya sama dengan instance objek yang disebutdb.relationship. Objek ini membuat hubungan yang Anda tambahkan kePersonclass dan dibuat dengan semua parameter yang ditentukan dalam baris berikutnya. -
Baris 10: Parameter string
'Note'mendefinisikan kelas SQLAlchemy yangPersonkelas akan berhubungan dengan.Noteclass belum didefinisikan, itulah sebabnya string di sini. Ini adalah referensi ke depan dan membantu menangani masalah yang dapat disebabkan oleh urutan definisi ketika sesuatu diperlukan yang tidak ditentukan hingga nanti dalam kode.'Note'string memungkinkanPersonkelas untuk menemukanNotekelas saat runtime, yang setelah keduanyaPersondanNotetelah ditentukan. -
Baris 11
backref='person'parameternya lebih rumit. Ini menciptakan apa yang dikenal sebagai referensi mundur diNoteobjek. Setiap contohNoteobjek akan berisi atribut yang disebutperson.personatribut mereferensikan objek induk yangNotetertentu contoh dikaitkan dengan. Memiliki referensi ke objek induk (persondalam hal ini) pada anak bisa sangat berguna jika kode Anda berulang di atas catatan dan harus menyertakan informasi tentang induknya. Ini sering terjadi secara mengejutkan dalam kode rendering tampilan. -
Baris 12:
cascade='all, delete, delete-orphan'parameter menentukan bagaimana memperlakukan instance objek catatan ketika perubahan dilakukan padaPersonparent induknya contoh. Misalnya, ketikaPersonobjek dihapus, SQLAlchemy akan membuat SQL yang diperlukan untuk menghapusPersondari database. Selain itu, parameter ini memberitahunya untuk juga menghapus semuaNotekasus yang terkait dengannya. Anda dapat membaca lebih lanjut tentang opsi ini di dokumentasi SQLAlchemy. -
Baris 13:
single_parent=Trueparameter diperlukan jikadelete-orphanadalah bagian daricascadeprevious sebelumnya parameter. Ini memberi tahu SQLAlchemy untuk tidak mengizinkanNoteinstance (NotetanpaPersonorang tua objek) ada karena setiapNotememiliki orang tua tunggal. -
Baris 14:
order_by='desc(Note.timestamp)'parameter memberitahu SQLAlchemy cara mengurutkanNoteinstance yang terkait denganPerson. SaatPersonobjek diambil, secara defaultnotedaftar atribut akan berisiNoteobjek dalam urutan yang tidak diketahui. SQLAlchemydesc(...)fungsi akan mengurutkan catatan dalam urutan dari terbaru ke terlama. Jika baris ini sebagai gantinyaorder_by='Note.timestamp', SQLAlchemy akan secara default menggunakanasc(...)fungsi, dan mengurutkan catatan dalam urutan menaik, terlama ke terbaru.
Sekarang setelah Person . Anda model memiliki note . baru atribut, dan ini mewakili hubungan satu-ke-banyak ke Note objek, Anda harus mendefinisikan model SQLAlchemy untuk Note :
 1class Note(db.Model):
 2    __tablename__ = 'note'
 3    note_id = db.Column(db.Integer, primary_key=True)
 4    person_id = db.Column(db.Integer, db.ForeignKey('person.person_id'))
 5    content = db.Column(db.String, nullable=False)
 6    timestamp = db.Column(
 7        db.DateTime, default=datetime.utcnow, onupdate=datetime.utcnow
 8    )
Note class mendefinisikan atribut yang membuat catatan seperti yang terlihat pada contoh note tabel database dari atas. Atribut didefinisikan di sini:
-
Baris 1 membuat
Notekelas, mewarisi daridb.Model, persis seperti yang Anda lakukan sebelumnya saat membuatPersonkelas. -
Baris 2 memberitahu kelas tabel database apa yang digunakan untuk menyimpan
Noteobjek. -
Baris 3 membuat
note_idatribut, mendefinisikannya sebagai nilai integer, dan sebagai kunci utama untukNoteobjek. -
Baris 4 membuat
person_idatribut, dan mendefinisikannya sebagai kunci asing, menghubungkanNotekelas kePersonkelas menggunakanperson.person_idkunci utama. Ini, danPerson.notesatribut, adalah bagaimana SQLAlchemy mengetahui apa yang harus dilakukan saat berinteraksi denganPersondanNoteobjek. -
Baris 5 membuat
contentatribut, yang berisi teks sebenarnya dari catatan.nullable=Falseparameter menunjukkan bahwa tidak apa-apa untuk membuat catatan baru yang tidak memiliki konten. -
Baris 6 membuat
timestampatribut, dan persis sepertiPersonclass, ini berisi waktu pembuatan atau pembaruan untukNotetertentu contoh.
Inisialisasi Database
Sekarang Anda telah memperbarui Person dan membuat Note model, Anda akan menggunakannya untuk membangun kembali database pengujian people.db . Anda akan melakukannya dengan memperbarui build_database.py kode dari Bagian 2. Berikut tampilan kodenya:
 1import os
 2from datetime import datetime
 3from config import db
 4from models import Person, Note
 5
 6# Data to initialize database with
 7PEOPLE = [
 8    {
 9        "fname": "Doug",
10        "lname": "Farrell",
11        "notes": [
12            ("Cool, a mini-blogging application!", "2019-01-06 22:17:54"),
13            ("This could be useful", "2019-01-08 22:17:54"),
14            ("Well, sort of useful", "2019-03-06 22:17:54"),
15        ],
16    },
17    {
18        "fname": "Kent",
19        "lname": "Brockman",
20        "notes": [
21            (
22                "I'm going to make really profound observations",
23                "2019-01-07 22:17:54",
24            ),
25            (
26                "Maybe they'll be more obvious than I thought",
27                "2019-02-06 22:17:54",
28            ),
29        ],
30    },
31    {
32        "fname": "Bunny",
33        "lname": "Easter",
34        "notes": [
35            ("Has anyone seen my Easter eggs?", "2019-01-07 22:47:54"),
36            ("I'm really late delivering these!", "2019-04-06 22:17:54"),
37        ],
38    },
39]
40
41# Delete database file if it exists currently
42if os.path.exists("people.db"):
43    os.remove("people.db")
44
45# Create the database
46db.create_all()
47
48# Iterate over the PEOPLE structure and populate the database
49for person in PEOPLE:
50    p = Person(lname=person.get("lname"), fname=person.get("fname"))
51
52    # Add the notes for the person
53    for note in person.get("notes"):
54        content, timestamp = note
55        p.notes.append(
56            Note(
57                content=content,
58                timestamp=datetime.strptime(timestamp, "%Y-%m-%d %H:%M:%S"),
59            )
60        )
61    db.session.add(p)
62
63db.session.commit()
Kode di atas berasal dari Bagian 2, dengan beberapa perubahan untuk membuat hubungan satu-ke-banyak antara Person dan Note . Berikut adalah baris yang diperbarui atau baris baru yang ditambahkan ke kode:
-
Baris 4 telah diperbarui untuk mengimpor
Notekelas yang ditentukan sebelumnya. -
Baris 7 hingga 39 berisi
PEOPLE. yang diperbarui kamus yang berisi data orang kita, beserta daftar catatan yang berhubungan dengan setiap orang. Data ini akan dimasukkan ke dalam database. -
Baris 49 hingga 61 ulangi
PEOPLEkamus, dapatkan setiappersonpada gilirannya dan menggunakannya untuk membuatPersonobyek. -
Baris 53 mengulangi
person.noteslist, dapatkan setiapnotesecara bergantian. -
Baris 54 membongkar
contentdantimestampdari setiapnotetupel. -
Baris 55 hingga 60 membuat
Noteobjek dan menambahkannya ke koleksi catatan orang menggunakanp.notes.append(). -
Baris 61 menambahkan
Personobjekpke sesi database. -
Baris 63 melakukan semua aktivitas dalam sesi ke database. Pada titik inilah semua data ditulis ke
persondannotetabel dipeople.dbfile basis data.
Anda dapat melihatnya bekerja dengan note koleksi di Person contoh objek p sama seperti bekerja dengan daftar lain dengan Python. SQLAlchemy menangani informasi hubungan satu-ke-banyak yang mendasari ketika db.session.commit() panggilan dibuat.
Misalnya, seperti Person instance memiliki bidang kunci utama person_id diinisialisasi oleh SQLAlchemy ketika di-commit ke database, instance dari Note akan memiliki bidang kunci utama mereka diinisialisasi. Selain itu, Note kunci asing person_id juga akan diinisialisasi dengan nilai kunci utama Person contoh yang terkait dengannya.
Berikut adalah contoh instance dari Person objek sebelum db.session.commit() dalam semacam pseudocode:
Person (
    person_id = None
    lname = 'Farrell'
    fname = 'Doug'
    timestamp = None
    notes = [
        Note (
            note_id = None
            person_id = None
            content = 'Cool, a mini-blogging application!'
            timestamp = '2019-01-06 22:17:54'
        ),
        Note (
            note_id = None
            person_id = None
            content = 'This could be useful'
            timestamp = '2019-01-08 22:17:54'
        ),
        Note (
            note_id = None
            person_id = None
            content = 'Well, sort of useful'
            timestamp = '2019-03-06 22:17:54'
        )
    ]
)
Berikut contoh Person objek setelah db.session.commit() :
Person (
    person_id = 1
    lname = 'Farrell'
    fname = 'Doug'
    timestamp = '2019-02-02 21:27:10.336'
    notes = [
        Note (
            note_id = 1
            person_id = 1
            content = 'Cool, a mini-blogging application!'
            timestamp = '2019-01-06 22:17:54'
        ),
        Note (
            note_id = 2
            person_id = 1
            content = 'This could be useful'
            timestamp = '2019-01-08 22:17:54'
        ),
        Note (
            note_id = 3
            person_id = 1
            content = 'Well, sort of useful'
            timestamp = '2019-03-06 22:17:54'
        )
    ]
)
Perbedaan penting antara keduanya adalah bahwa kunci utama dari Person dan Note objek telah diinisialisasi. Mesin database menangani hal ini saat objek dibuat karena fitur peningkatan otomatis dari kunci utama yang dibahas di Bagian 2.
Selain itu, person_id kunci asing di semua Note instance telah diinisialisasi untuk mereferensikan induknya. Hal ini terjadi karena urutan Person dan Note objek dibuat dalam database.
SQLAlchemy menyadari hubungan antara Person dan Note objek. Saat Person objek dikomit ke person tabel database, SQLAlchemy mendapatkan person_id nilai kunci utama. Nilai tersebut digunakan untuk menginisialisasi nilai kunci asing person_id dalam Note objek sebelum di-commit ke database.
SQLAlchemy menangani pekerjaan pembersihan database ini karena informasi yang Anda berikan saat Person.notes atribut diinisialisasi dengan db.relationship(...) objek.
Selain itu, Person.timestamp atribut telah diinisialisasi dengan stempel waktu saat ini.
Menjalankan build_database.py program dari baris perintah (dalam lingkungan virtual akan membuat ulang database dengan tambahan baru, menyiapkannya untuk digunakan dengan aplikasi web. Baris perintah ini akan membangun kembali database:
$ python build_database.py
build_database.py program utilitas tidak menampilkan pesan apa pun jika berhasil dijalankan. Jika melempar pengecualian, maka kesalahan akan dicetak di layar.
Perbarui REST API
Anda telah memperbarui model SQLAlchemy dan menggunakannya untuk memperbarui people.db basis data. Sekarang saatnya memperbarui REST API untuk memberikan akses ke informasi catatan baru. Inilah REST API yang Anda buat di Bagian 2:
| Tindakan | Kata Kerja HTTP | Jalur URL | Deskripsi |
|---|---|---|---|
| Buat | POST | /api/people | URL untuk membuat orang baru |
| Baca | GET | /api/people | URL untuk membaca kumpulan orang |
| Baca | GET | /api/people/{person_id} | URL untuk membaca satu orang dengan person_id |
| Perbarui | PUT | /api/people/{person_id} | URL untuk memperbarui orang yang ada dengan person_id |
| Hapus | DELETE | /api/people/{person_id} | URL untuk menghapus orang yang ada dengan person_id |
REST API di atas menyediakan jalur URL HTTP ke kumpulan benda, dan ke benda itu sendiri. Anda bisa mendapatkan daftar orang atau berinteraksi dengan satu orang dari daftar orang tersebut. Gaya jalur ini menyempurnakan apa yang dikembalikan dengan cara kiri-ke-kanan, menjadi lebih terperinci seiring berjalannya waktu.
Anda akan melanjutkan pola kiri-ke-kanan ini untuk mendapatkan lebih banyak rincian dan mengakses koleksi catatan. Inilah REST API yang diperluas yang akan Anda buat untuk memberikan catatan ke aplikasi web mini-blog:
| Tindakan | Kata Kerja HTTP | Jalur URL | Deskripsi |
|---|---|---|---|
| Buat | POST | /api/people/{person_id}/notes | URL untuk membuat catatan baru |
| Baca | GET | /api/people/{person_id}/notes/{note_id} | URL untuk membaca catatan satu orang |
| Pembaruan | PUT | api/people/{person_id}/notes/{note_id} | URL untuk memperbarui catatan satu orang |
| Hapus | DELETE | api/people/{person_id}/notes/{note_id} | URL untuk menghapus catatan satu orang |
| Baca | GET | /api/notes | URL untuk mendapatkan semua catatan untuk semua orang yang diurutkan berdasarkan note.timestamp |
Ada dua variasi dalam note bagian dari REST API dibandingkan dengan konvensi yang digunakan dalam people bagian:
-
Tidak ada URL yang ditentukan untuk mendapatkan semua
noteterkait dengan seseorang, hanya URL untuk mendapatkan satu catatan. Ini akan membuat REST API selesai dengan cara tertentu, tetapi aplikasi web yang akan Anda buat nanti tidak memerlukan fungsi ini. Oleh karena itu, telah ditinggalkan. -
There is the inclusion of the last URL
/api/notes. This is a convenience method created for the web application. It will be used in the mini-blog on the home page to show all the notes in the system. There isn’t a way to get this information readily using the REST API pathing style as designed, so this shortcut has been added.
As in Part 2, the REST API is configured in the swagger.yml file.
Catatan:
The idea of designing a REST API with a path that gets more and more granular as you move from left to right is very useful. Thinking this way can help clarify the relationships between different parts of a database. Just be aware that there are realistic limits to how far down a hierarchical structure this kind of design should be taken.
For example, what if the Note object had a collection of its own, something like comments on the notes. Using the current design ideas, this would lead to a URL that went something like this:/api/people/{person_id}/notes/{note_id}/comments/{comment_id}
There is no practical limit to this kind of design, but there is one for usefulness. In actual use in real applications, a long, multilevel URL like that one is hardly ever needed. A more common pattern is to get a list of intervening objects (like notes) and then use a separate API entry point to get a single comment for an application use case.
Implement the API
With the updated REST API defined in the swagger.yml file, you’ll need to update the implementation provided by the Python modules. This means updating existing module files, like models.py and people.py , and creating a new module file called notes.py to implement support for Notes in the extended REST API.
Update Response JSON
The purpose of the REST API is to get useful JSON data out of the database. Now that you’ve updated the SQLAlchemy Person and created the Note models, you’ll need to update the Marshmallow schema models as well. As you may recall from Part 2, Marshmallow is the module that translates the SQLAlchemy objects into Python objects suitable for creating JSON strings.
The updated and newly created Marshmallow schemas are in the models.py module, which are explained below, and look like this:
 1class PersonSchema(ma.ModelSchema):
 2    class Meta:
 3        model = Person
 4        sqla_session = db.session
 5    notes = fields.Nested('PersonNoteSchema', default=[], many=True)
 6
 7class PersonNoteSchema(ma.ModelSchema):
 8    """
 9    This class exists to get around a recursion issue
10    """
11    note_id = fields.Int()
12    person_id = fields.Int()
13    content = fields.Str()
14    timestamp = fields.Str()
15
16class NoteSchema(ma.ModelSchema):
17    class Meta:
18        model = Note
19        sqla_session = db.session
20    person = fields.Nested('NotePersonSchema', default=None)
21
22class NotePersonSchema(ma.ModelSchema):
23    """
24    This class exists to get around a recursion issue
25    """
26    person_id = fields.Int()
27    lname = fields.Str()
28    fname = fields.Str()
29    timestamp = fields.Str()
There are some interesting things going on in the above definitions. The PersonSchema class has one new entry:the notes attribute defined in line 5. This defines it as a nested relationship to the PersonNoteSchema . It will default to an empty list if nothing is present in the SQLAlchemy notes relationship. The many=True parameter indicates that this is a one-to-many relationship, so Marshmallow will serialize all the related notes .
The PersonNoteSchema class defines what a Note object looks like as Marshmallow serializes the notes list. The NoteSchema defines what a SQLAlchemy Note object looks like in terms of Marshmallow. Notice that it has a person attribute. This attribute comes from the SQLAlchemy db.relationship(...) definition parameter backref='person' . The person Marshmallow definition is nested, but because it doesn’t have the many=True parameter, there is only a single person connected.
The NotePersonSchema class defines what is nested in the NoteSchema.person attribute.
Catatan:
You might be wondering why the PersonSchema class has its own unique PersonNoteSchema class to define the notes collection attribute. By the same token, the NoteSchema class has its own unique NotePersonSchema class to define the person attribute. You may be wondering whether the PersonSchema class could be defined this way:
class PersonSchema(ma.ModelSchema):
    class Meta:
        model = Person
        sqla_session = db.session
    notes = fields.Nested('NoteSchema', default=[], many=True)
Additionally, couldn’t the NoteSchema class be defined using the PersonSchema to define the person attribute? A class definition like this would each refer to the other, and this causes a recursion error in Marshmallow as it will cycle from PersonSchema to NoteSchema until it runs out of stack space. Using the unique schema references breaks the recursion and allows this kind of nesting to work.
People
Now that you’ve got the schemas in place to work with the one-to-many relationship between Person and Note , you need to update the person.py and create the note.py modules in order to implement a working REST API.
The people.py module needs two changes. The first is to import the Note class, along with the Person class at the top of the module. Then only read_one(person_id) needs to change in order to handle the relationship. That function will look like this:
 1def read_one(person_id):
 2    """
 3    This function responds to a request for /api/people/{person_id}
 4    with one matching person from people
 5
 6    :param person_id:   Id of person to find
 7    :return:            person matching id
 8    """
 9    # Build the initial query
10    person = (
11        Person.query.filter(Person.person_id == person_id)
12        .outerjoin(Note)
13        .one_or_none()
14    )
15
16    # Did we find a person?
17    if person is not None:
18
19        # Serialize the data for the response
20        person_schema = PersonSchema()
21        data = person_schema.dump(person).data
22        return data
23
24    # Otherwise, nope, didn't find that person
25    else:
26        abort(404, f"Person not found for Id: {person_id}")
The only difference is line 12:.outerjoin(Note) . An outer join (left outer join in SQL terms) is necessary for the case where a user of the application has created a new person object, which has no notes related to it. The outer join ensures that the SQL query will return a person object, even if there are no note rows to join with.
At the start of this article, you saw how person and note data could be represented in a single, flat table, and all of the disadvantages of that approach. You also saw the advantages of breaking that data up into two tables, person and note , with a relationship between them.
Until now, we’ve been working with the data as two distinct, but related, items in the database. But now that you’re actually going to use the data, what we essentially want is for the data to be joined back together. This is what a database join does. It combines data from two tables together using the primary key to foreign key relationship.
A join is kind of a boolean and operation because it only returns data if there is data in both tables to combine. If, for example, a person row exists but has no related note row, then there is nothing to join, so nothing is returned. This isn’t what you want for read_one(person_id) .
This is where the outer join comes in handy. It’s a kind of boolean or operation. It returns person data even if there is no associated note data to combine with. This is the behavior you want for read_one(person_id) to handle the case of a newly created Person object that has no notes yet.
You can see the complete people.py in the article repository.
Notes
You’ll create a notes.py module to implement all the Python code associated with the new note related REST API definitions. In many ways, it works like the people.py module, except it must handle both a person_id and a note_id as defined in the swagger.yml configuration file. As an example, here is read_one(person_id, note_id) :
 1def read_one(person_id, note_id):
 2    """
 3    This function responds to a request for
 4    /api/people/{person_id}/notes/{note_id}
 5    with one matching note for the associated person
 6
 7    :param person_id:       Id of person the note is related to
 8    :param note_id:         Id of the note
 9    :return:                json string of note contents
10    """
11    # Query the database for the note
12    note = (
13        Note.query.join(Person, Person.person_id == Note.person_id)
14        .filter(Person.person_id == person_id)
15        .filter(Note.note_id == note_id)
16        .one_or_none()
17    )
18
19    # Was a note found?
20    if note is not None:
21        note_schema = NoteSchema()
22        data = note_schema.dump(note).data
23        return data
24
25    # Otherwise, nope, didn't find that note
26    else:
27        abort(404, f"Note not found for Id: {note_id}")
The interesting parts of the above code are lines 12 to 17:
- Line 13 begins a query against the
NoteSQLAlchemy objects and joins to the relatedPersonSQLAlchemy object comparingperson_idfrom bothPersonandNote. - Line 14 filters the result down to the
Noteobjects that has aPerson.person_idequal to the passed inperson_idparameter. - Line 15 filters the result further to the
Noteobject that has aNote.note_idequal to the passed innote_idparameter. - Line 16 returns the
Noteobject if found, orNoneif nothing matching the parameters is found.
You can check out the complete notes.py .
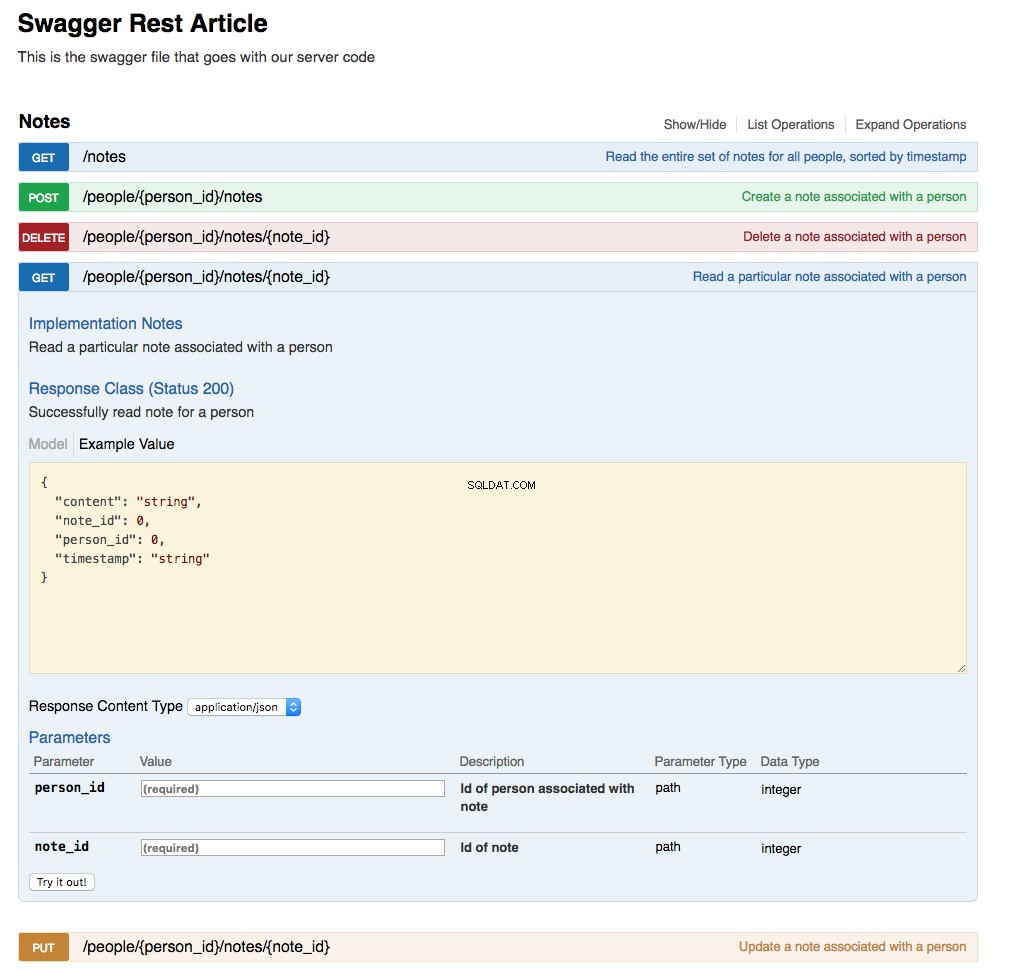
Updated Swagger UI
The Swagger UI has been updated by the action of updating the swagger.yml file and creating the URL endpoint implementations. Below is a screenshot of the updated UI showing the Notes section with the GET /api/people/{person_id}/notes/{note_id} expanded:
Mini-Blogging Web Application
The web application has been substantially changed to show its new purpose as a mini-blogging application. It has three pages:
-
The home page (
localhost:5000/) , which shows all of the blog messages (notes) sorted from newest to oldest -
The people page (
localhost:5000/people) , which shows all the people in the system, sorted by last name, and also allows the user to create a new person and update or delete an existing one -
The notes page (
localhost:5000/people/{person_id}/notes) , which shows all the notes associated with a person, sorted from newest to oldest, and also allows the user to create a new note and update or delete an existing one
Navigation
There are two buttons on every page of the application:
- The Home button will navigate to the home screen.
- The People button navigates to the
/peoplescreen, showing all people in the database.
These two buttons are present on every screen in the application as a way to get back to a starting point.
Home Page
Below is a screenshot of the home page showing the initialized database contents:
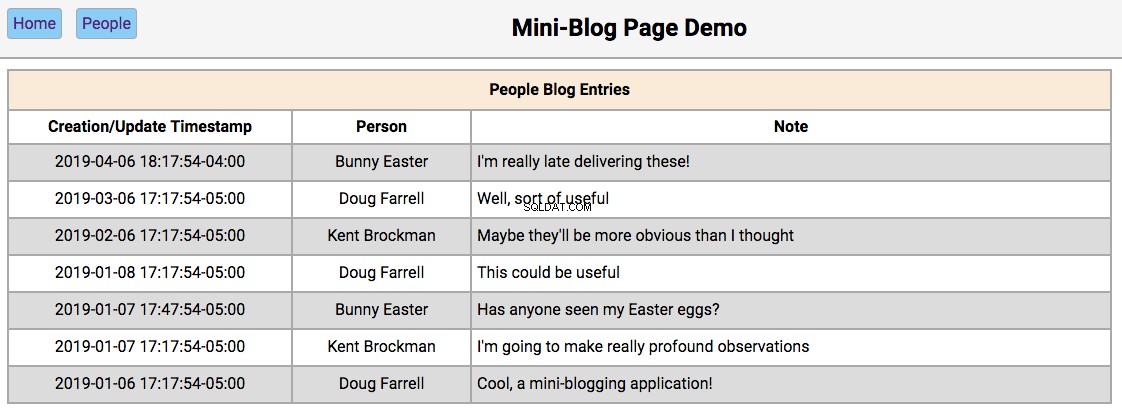
The functionality of this page works like this:
-
Double-clicking on a person’s name will take the user to the
/people/{person_id}page, with the editor section filled in with the person’s first and last names and the update and reset buttons enabled. -
Double-clicking on a person’s note will take the user to the
/people/{person_id}/notes/{note_id}page, with the editor section filled in with the note’s contents and the Update and Reset buttons enabled.
People Page
Below is a screenshot of the people page showing the people in the initialized database:
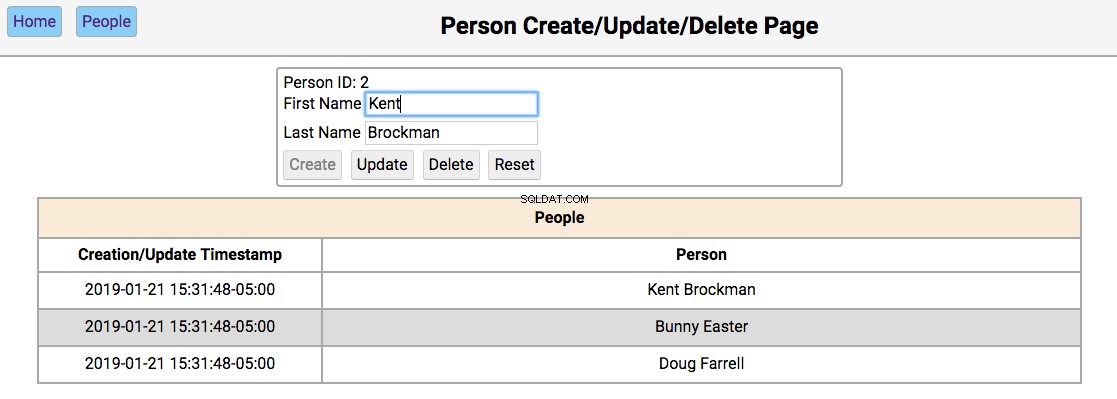
The functionality of this page works like this:
-
Single-clicking on a person’s name will populate the editor section of the page with the person’s first and last name, disabling the Create button, and enabling the Update and Delete buttons.
-
Double clicking on a person’s name will navigate to the notes pages for that person.
The functionality of the editor works like this:
-
If the first and last name fields are empty, the Create and Reset buttons are enabled. Entering a new name in the fields and clicking Create will create a new person and update the database and re-render the table below the editor. Clicking Reset will clear the editor fields.
-
If the first and last name fields have data, the user navigated here by double-clicking the person’s name from the home screen. In this case, the Update , Delete , and Reset buttons are enabled. Changing the first or last name and clicking Update will update the database and re-render the table below the editor. Clicking Delete will remove the person from the database and re-render the table.
Notes Page
Below is a screenshot of the notes page showing the notes for a person in the initialized database:
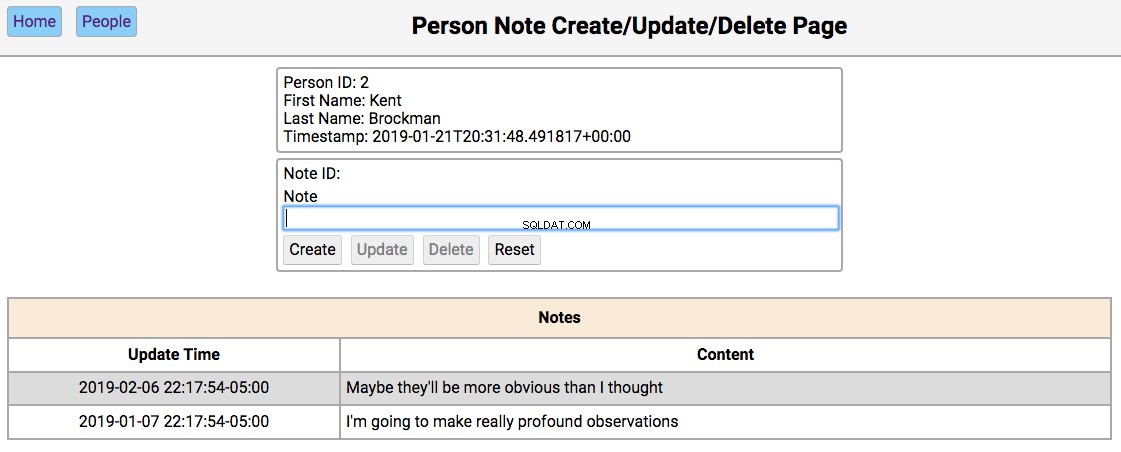
The functionality of this page works like this:
-
Single-clicking on a note will populate the editor section of the page with the notes content, disabling the Create button, and enabling the Update and Delete buttons.
-
All other functionality of this page is in the editor section.
The functionality of the editor works like this:
-
If the note content field is empty, then the Create and Reset buttons are enabled. Entering a new note in the field and clicking Create will create a new note and update the database and re-render the table below the editor. Clicking Reset will clear the editor fields.
-
If the note field has data, the user navigated here by double-clicking the person’s note from the home screen. In this case, the Update , Delete , and Reset buttons are enabled. Changing the note and clicking Update will update the database and re-render the table below the editor. Clicking Delete will remove the note from the database and re-render the table.
Web Application
This article is primarily focused on how to use SQLAlchemy to create relationships in the database, and how to extend the REST API to take advantage of those relationships. As such, the code for the web application didn’t get much attention. When you look at the web application code, keep an eye out for the following features:
-
Each page of the application is a fully formed single page web application.
-
Each page of the application is driven by JavaScript following an MVC (Model/View/Controller) style of responsibility delegation.
-
The HTML that creates the pages takes advantage of the Jinja2 inheritance functionality.
-
The hardcoded JavaScript table creation has been replaced by using the Handlebars.js templating engine.
-
The timestamp formating in all of the tables is provided by Moment.js.
You can find the following code in the repository for this article:
- The HTML for the web application
- The CSS for the web application
- The JavaScript for the web application
All of the example code for this article is available in the GitHub repository for this article. This contains all of the code related to this article, including all of the web application code.
Kesimpulan
Congratulations are in order for what you’ve learned in this article! Knowing how to build and use database relationships gives you a powerful tool to solve many difficult problems. There are other relationship besides the one-to-many example from this article. Other common ones are one-to-one, many-to-many, and many-to-one. All of them have a place in your toolbelt, and SQLAlchemy can help you tackle them all!
For more information about databases, you can check out these tutorials. You can also set up Flask to use SQLAlchemy. You can check out Model-View-Controller (MVC) more information about the pattern used in the web application JavaScript code.
In Part 4 of this series, you’ll focus on the HTML, CSS, and JavaScript files used to create the web application.
« Part 2:Database PersistencePart 3:Database RelationshipsPart 4:Simple Web Applications »