Pengantar
Cepat atau lambat, setiap sistem informasi mendapatkan database, seringkali – lebih dari satu. Seiring waktu, basis data itu mengumpulkan sangat banyak data, dari beberapa GB hingga puluhan TB. Untuk memahami bagaimana kinerja fungsional dengan volume data yang meningkat, kita perlu membuat data untuk mengisi database tersebut.

Semua skrip yang disajikan dan diimplementasikan akan dijalankan di JobEmplDB database layanan perekrutan. Realisasi database tersedia di sini.
Pendekatan pengisian data dalam database untuk pengujian dan pengembangan
Pengembangan dan pengujian database melibatkan dua pendekatan utama untuk mengisi data:
- Untuk menyalin seluruh database dari lingkungan produksi dengan data pribadi dan data sensitif lainnya yang diubah. Dengan cara ini, Anda memastikan data dan menghapus data rahasia.
- Untuk menghasilkan data sintetis. Ini berarti menghasilkan data uji yang mirip dengan data nyata dalam tampilan, properti, dan interkoneksi.
Keuntungan dari Pendekatan 1 adalah bahwa pendekatan ini mendekati data dan distribusinya dengan kriteria yang berbeda ke database produksi. Ini memungkinkan kami untuk menganalisis semuanya dengan tepat dan, oleh karena itu, membuat kesimpulan dan prognosis yang sesuai.
Namun, pendekatan ini tidak memungkinkan Anda meningkatkan database itu sendiri berkali-kali. Menjadi bermasalah untuk memprediksi perubahan di seluruh fungsi sistem informasi di masa depan.
Di sisi lain, Anda dapat menganalisis data sanitasi impersonal yang diambil dari database produksi. Berdasarkan mereka, Anda dapat menentukan cara menghasilkan data uji yang akan menjadi seperti data nyata dengan penampilan, properti, dan keterkaitannya. Dengan cara ini, Pendekatan 1 menghasilkan Pendekatan 2.
Sekarang, mari kita tinjau secara rinci kedua pendekatan pengisian data dalam database untuk pengujian dan pengembangan.
Menyalin dan mengubah data dalam database produksi
Pertama, mari kita definisikan algoritme umum untuk menyalin dan mengubah data dari lingkungan produksi.
Algoritme umum
Algoritma umumnya adalah sebagai berikut:
- Buat database baru yang kosong.
- Buat skema di database yang baru dibuat – sistem yang sama dengan yang ada di database produksi.
- Salin data yang diperlukan dari database produksi ke database yang baru dibuat.
- Sanitasi dan ubah data rahasia di database baru.
- Buat cadangan dari database yang baru dibuat.
- Kirim dan pulihkan cadangan di lingkungan yang diperlukan.
Namun, algoritme menjadi lebih rumit setelah langkah 5. Misalnya, langkah 6 memerlukan lingkungan khusus yang dilindungi untuk pengujian awal. Tahap itu harus memastikan bahwa semua data bersifat impersonal, dan data rahasia diubah.
Setelah tahap itu, Anda dapat kembali ke langkah 5 lagi untuk database yang diuji di lingkungan non-produksi yang dilindungi. Kemudian, Anda meneruskan cadangan yang telah diuji ke lingkungan yang diperlukan untuk memulihkannya dan menggunakannya untuk pengembangan dan pengujian.
Kami telah menyajikan algoritme umum penyalinan dan perubahan data basis data produksi. Mari kita jelaskan bagaimana menerapkannya.
Realisasi algoritma umum
Pembuatan database baru yang kosong
Anda dapat membuat database kosong dengan bantuan konstruksi CREATE DATABASE seperti di sini.
Basis data bernama JobEmplDB_Test . Ini memiliki tiga grup file:
- PRIMER – ini adalah filegroup utama secara default. Ini mendefinisikan dua file:JobEmplDB_Test1(path D:\DBData\JobEmplDB_Test1.mdf) , dan JobEmplDB_Test2 (jalur D:\DBData\JobEmplDB_Test2.ndf) . Ukuran awal setiap file adalah 64 Mb, dan langkah pertumbuhannya adalah 8 Mb untuk setiap file.
- DBTableGroup – grup file khusus yang menentukan dua file:JobEmplDB_TestTableGroup1 (jalur D:\DBData\JobEmplDB_TestTableGroup1.ndf) dan JobEmplDB_TestTableGroup2 (jalur D:\DBData\JobEmplDB_TestTableGroup2.ndf) . Ukuran awal setiap file adalah 8 Gb, dan langkah pertumbuhannya adalah 1 Gb untuk setiap file.
- DBIndexGroup – grup file khusus yang menentukan dua file:JobEmplDB_TestIndexGroup1 (jalur D:\DBData\JobEmplDB_TestIndexGroup1.ndf) , dan JobEmplDB_TestIndexGroup2 (jalur D:\DBData\JobEmplDB_TestIndexGroup2.ndf) . Ukuran awal adalah 16 Gb untuk setiap file, dan langkah pertumbuhannya adalah 1 Gb untuk setiap file.
Juga, database ini mencakup satu jurnal transaksi:JobEmplDB_Testlog , jalur E:\DBLog\JobEmplDB_Testlog.ldf . Ukuran awal file adalah 8 Gb, dan langkah pertumbuhannya adalah 1 Gb.
Menyalin skema dan data yang diperlukan dari database produksi ke database yang baru dibuat
Untuk menyalin skema dan data yang diperlukan dari database produksi ke yang baru, Anda dapat menggunakan beberapa alat. Pertama, itu adalah Visual Studio (SSDT). Atau, Anda dapat menggunakan utilitas pihak ketiga seperti:
- Perbandingan Skema DbForge dan Perbandingan Data DbForge
- Perbedaan ApexSQL dan Perbedaan Data Apex
- Alat Bandingkan SQL dan Alat Bandingkan Data SQL
Membuat skrip untuk perubahan data
Persyaratan penting untuk skrip perubahan data
1. Pasti tidak mungkin mengembalikan data asli menggunakan skrip itu.
mis., Pembalikan garis tidak akan sesuai, karena memungkinkan kita untuk memulihkan data yang sebenarnya. Biasanya, metodenya adalah mengganti setiap karakter atau byte dengan karakter atau byte pseudorandom. Hal yang sama berlaku untuk tanggal dan waktu.
2. Perubahan data tidak boleh mengubah selektivitas nilainya.
Tidak akan berfungsi untuk menetapkan NULL ke bidang tabel. Sebagai gantinya, Anda harus memastikan bahwa nilai yang sama dalam data nyata akan tetap sama dalam data yang diubah. Misalnya, dalam data nyata, Anda memiliki nilai 103785 yang ditemukan 12 kali dalam tabel. Saat Anda mengubah nilai ini dalam data yang diubah, nilai baru harus tetap 12 kali di bidang tabel yang sama.
3. Ukuran dan panjang nilai tidak boleh berbeda secara signifikan dalam data yang diubah. Misalnya, Anda mengganti setiap byte atau karakter dengan byte atau karakter pseudorandom. String awal tetap sama dalam ukuran dan panjang.
4. Keterkaitan dalam data tidak boleh terputus setelah perubahan. Ini terkait dengan kunci eksternal dan semua kasus lain di mana Anda merujuk ke data yang diubah. Data yang diubah harus tetap dalam hubungan yang sama dengan data sebenarnya.
Penerapan skrip perubahan data
Sekarang, mari kita tinjau kasus tertentu dari perubahan data untuk mendepersonalisasi dan menyembunyikan informasi rahasia. Sampelnya adalah database rekrutmen.
Basis data sampel mencakup data pribadi berikut yang perlu Anda depersonalisasi:
- Nama belakang dan nama depan;
- Tanggal lahir;
- Tanggal penerbitan KTP;
- Sertifikat akses jarak jauh sebagai urutan byte;
- Biaya layanan untuk promosi resume.
Pertama, kami akan memeriksa contoh sederhana untuk setiap jenis data yang diubah:
- Perubahan tanggal dan waktu;
- Perubahan nilai numerik;
- Mengubah urutan byte;
- Perubahan data karakter.
Perubahan tanggal dan waktu
Anda bisa mendapatkan tanggal dan waktu acak menggunakan skrip berikut:
DECLARE @dt DATETIME;

SET @dt = CAST(CAST(@StartDate AS FLOAT) + (CAST(@FinishDate AS FLOAT) - CAST(@StartDate AS FLOAT)) * RAND(CHECKSUM(NEWID())) AS DATETIME);
Di sini, @StartDate dan @FinishDate adalah nilai awal dan akhir rentang. Mereka berkorelasi masing-masing untuk generasi tanggal dan waktu pseudorandom.
Untuk menghasilkan data ini, Anda menggunakan fungsi sistem RAND, CHECKSUM, dan NEWID.
UPDATE [dbo].[Employee]
SET [DocDate] = CAST(CAST(CAST(CAST([BirthDate] AS DATETIME) AS FLOAT) + (CAST(GETDATE() AS FLOAT) - CAST(CAST([BirthDate] AS DATETIME) AS FLOAT)) * RAND(CHECKSUM(NEWID())) AS DATETIME) AS DATE);
Bidang [DocDate] adalah singkatan dari tanggal penerbitan dokumen. Kami menggantinya dengan tanggal pseudorandom, dengan mengingat rentang tanggal dan batasannya.
Batas "bawah" adalah tanggal lahir kandidat. Tepi "atas" adalah tanggal saat ini. Kami tidak membutuhkan waktu di sini, jadi transformasi format waktu dan tanggal ke tanggal yang diperlukan akan berakhir. Anda bisa mendapatkan nilai pseudorandom untuk setiap bagian dari tanggal dan waktu dengan cara yang sama.
Perubahan nilai numerik
Anda bisa mendapatkan bilangan bulat acak dengan bantuan skrip berikut:
DECLARE @Int INT;

SET @Int = CAST(((@MaxVal + 1) - @MinVal) *
    RAND(CHECKSUM(NEWID())) + @MinVal AS INT);
@MinVal @MaxVal adalah nilai rentang awal dan akhir untuk pembangkitan bilangan pseudorandom. Kami membuatnya menggunakan fungsi sistem RAND, CHECKSUM, dan NEWID.
UPDATE [dbo].[Employee]
SET [CountRequest] = CAST(((@MaxVal + 1) - @MinVal) *
    RAND(CHECKSUM(NEWID())) + @MinVal AS INT);
Kolom [CountRequest] menunjukkan jumlah permintaan yang dibuat perusahaan untuk resume kandidat ini.
Demikian pula, Anda bisa mendapatkan nilai pseudorandom untuk nilai numerik apa pun. Misalnya, lihat nomor acak dari tipe desimal (18,2) generasi:
DECLARE @Dec DECIMAL(18,2);

SET @Dec=CAST(((@MaxVal + 1) - @MinVal) *
    RAND(CHECKSUM(NEWID())) + @MinVal AS DECIMAL(18,2));
Dengan demikian, Anda dapat memperbarui biaya layanan promosi resume dengan cara berikut:
UPDATE [dbo].[Employee]
SET [PaymentAmount] = CAST(((@MaxVal + 1) - @MinVal) *
    RAND(CHECKSUM(NEWID())) + @MinVal AS DECIMAL(18,2));
Mengubah urutan byte
Anda bisa mendapatkan urutan byte acak menggunakan skrip berikut:
DECLARE @res VARBINARY(MAX);

SET @res = CRYPT_GEN_RANDOM(@Length, CAST(NEWID() AS VARBINARY(16)));
@Panjang singkatan dari panjang barisan. Ini mendefinisikan jumlah byte yang dikembalikan. Di sini, @Panjang tidak boleh lebih besar dari 16.
Generasi dilakukan dengan bantuan fungsi sistem CRYPT_GEN_RANDOM dan NEWID.
Misalnya, Anda dapat memperbarui sertifikat akses jarak jauh untuk setiap kandidat dengan cara berikut:
UPDATE [dbo].[Employee]
SET [RemoteAccessCertificate] = CRYPT_GEN_RANDOM(CAST(LEN([RemoteAccessCertificate]) AS INT), CAST(NEWID() AS VARBINARY(16)));
Kami menghasilkan urutan byte pseudorandom dengan panjang yang sama yang ada di bidang [RemoteAccessCertificate] pada saat perubahan. Kami menganggap bahwa panjang urutan byte tidak melebihi 16.
Demikian pula, kita dapat membuat fungsi kita yang akan mengembalikan urutan byte pseudorandom dengan panjang berapa pun. Ini akan menempatkan hasil fungsi sistem CRYPT_GEN_RANDOM bekerja sama menggunakan operator penambahan “+” sederhana. Tapi 16 byte biasanya cukup dalam prakteknya.
Mari kita buat fungsi sampel yang mengembalikan urutan byte pseudorandom dengan panjang tertentu, di mana dimungkinkan untuk mengatur panjang lebih dari 16 byte. Untuk ini, buatlah presentasi berikut:
CREATE VIEW [test].[GetNewID]
AS
SELECT NEWID() AS [NewID];
GO
Kami membutuhkannya untuk menghindari batasan yang melarang kami menggunakan NEWID dalam fungsi tersebut.
Dengan cara yang sama, buat presentasi berikutnya untuk tujuan yang sama:
CREATE VIEW [test].[GetRand]
AS
SELECT RAND(CHECKSUM((SELECT TOP(1) [NewID] FROM [test].[GetNewID]))) AS [Value];
GO
Buat satu presentasi lagi:
CREATE VIEW [test].[GetRandVarbinary16]
AS
SELECT CRYPT_GEN_RANDOM(16, CAST((SELECT TOP(1) [NewID] FROM [test].[GetNewID]) AS VARBINARY(16))) AS [Value];
GO
Definisi ketiga fungsi ada di sini. Dan berikut adalah implementasi dari fungsi yang mengembalikan urutan byte pseudorandom dengan panjang tertentu.
Pertama, kita tentukan apakah fungsi yang diperlukan ada. Jika tidak – kami membuat stud terlebih dahulu. Bagaimanapun, kode melibatkan perubahan definisi fungsi dengan tepat. Pada akhirnya, kami menambahkan deskripsi fungsi melalui properti yang diperluas. Detail lebih lanjut tentang dokumentasi database ada di artikel ini.
Untuk memperbarui sertifikat akses jarak jauh untuk setiap kandidat, Anda dapat melakukan hal berikut:
UPDATE [dbo].[Employee]
SET [RemoteAccessCertificate] = [test].[GetRandVarbinary](CAST(LEN([RemoteAccessCertificate]) AS INT));
Seperti yang Anda lihat, tidak ada batasan panjang urutan byte di sini.
Perubahan Data – Perubahan Data Karakter
Di sini, kami mengambil contoh untuk alfabet Inggris dan Rusia, tetapi Anda dapat melakukannya untuk alfabet lainnya. Satu-satunya syarat adalah karakternya harus ada dalam tipe NCHAR.
Kita perlu membuat fungsi yang menerima baris, mengganti setiap karakter dengan karakter pseudorandom, lalu menggabungkan hasilnya dan mengembalikannya.
Namun, kita perlu terlebih dahulu memahami karakter mana yang kita butuhkan. Untuk itu, kita bisa mengeksekusi script berikut:
DECLARE @tbl TABLE ([ValueInt] INT, [ValueNChar] NCHAR(1), [ValueChar] CHAR(1));

DECLARE @ind int=0;
DECLARE @count INT=65535;

WHILE(@count>=0)
BEGIN
	INSERT INTO @tbl ([ValueInt], [ValueNChar], [ValueChar])
	SELECT @ind, NCHAR(@ind), CHAR(@ind)

	SET @ind+=1;
	SET @count-=1;
END

SELECT *
INTO [test].[TblCharactersCode]
FROM @tbl;
Kami membuat tabel [test].[TblCharacterCode] yang mencakup bidang berikut:
- ValueInt – nilai numerik karakter;
- ValueNChar – karakter tipe NCHAR;
- ValueChar – karakter tipe CHAR.
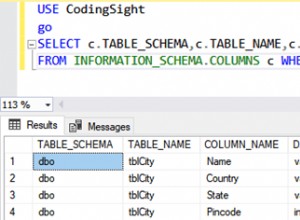
Mari kita tinjau isi tabel ini. Kami membutuhkan permintaan berikut:
SELECT [ValueInt]
      ,[ValueNChar]
      ,[ValueChar]
  FROM [test].[TblCharactersCode];
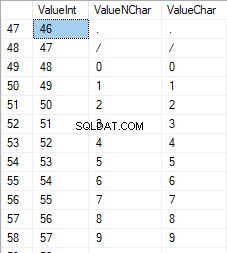
Angkanya berkisar antara 48 hingga 57:
Karakter Latin dalam huruf besar berkisar antara 65 hingga 90:

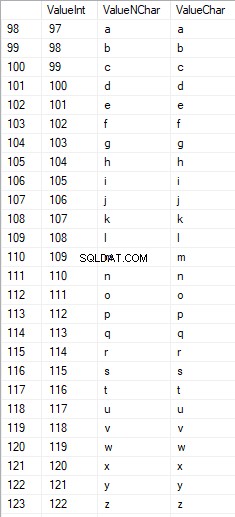
Karakter Latin di bawah perawatan berada di kisaran 97 hingga 122:
Karakter Rusia dalam huruf besar berada dalam kisaran 1040 hingga 1071:

Karakter Rusia dalam huruf kecil berada di kisaran 1072 hingga 1103:


Dan, karakter dalam kisaran 58 hingga 64:

Kami memilih karakter yang diperlukan dan memasukkannya ke dalam tabel [test].[SelectCharactersCode] dengan cara berikut:
SELECT
	[ValueInt]
   ,[ValueNChar]
   ,[ValueChar]
   ,CASE
		WHEN ([ValueInt] BETWEEN 48 AND 57) THEN 1
		ELSE 0
	END AS [IsNumeral]
   ,CASE
		WHEN (([ValueInt] BETWEEN 65 AND 90) OR
			([ValueInt] BETWEEN 1040 AND 1071)) THEN 1
		ELSE 0
	END AS [IsUpperCase]
   ,CASE
		WHEN (([ValueInt] BETWEEN 65 AND 90) OR
			([ValueInt] BETWEEN 97 AND 122)) THEN 1
		ELSE 0
	END AS [IsLatin]
   ,CASE
		WHEN (([ValueInt] BETWEEN 1040 AND 1071) OR
			([ValueInt] BETWEEN 1072 AND 1103)) THEN 1
		ELSE 0
	END AS [IsRus]
   ,CASE
		WHEN (([ValueInt] BETWEEN 33 AND 47) OR
			([ValueInt] BETWEEN 58 AND 64)) THEN 1
		ELSE 0
	END AS [IsExtra]
INTO [test].[SelectCharactersCode]
FROM [test].[TblCharactersCode]
WHERE ([ValueInt] BETWEEN 48 AND 57)
OR ([ValueInt] BETWEEN 65 AND 90)
OR ([ValueInt] BETWEEN 97 AND 122)
OR ([ValueInt] BETWEEN 1040 AND 1071)
OR ([ValueInt] BETWEEN 1072 AND 1103)
OR ([ValueInt] BETWEEN 33 AND 47)
OR ([ValueInt] BETWEEN 58 AND 64);
Sekarang, mari kita periksa isi tabel ini menggunakan skrip berikut:
SELECT [ValueInt]
      ,[ValueNChar]
      ,[ValueChar]
      ,[IsNumeral]
      ,[IsUpperCase]
      ,[IsLatin]
      ,[IsRus]
      ,[IsExtra]
  FROM [test].[SelectCharactersCode];
Kami menerima hasil berikut:

Dengan cara ini, kami memiliki [test].[SelectCharactersCode] tabel, di mana:
- ValueInt – nilai numerik karakter
- NilaiNhar – karakter tipe NCHAR
- ValueChar – karakter tipe CHAR
- IsNumeral – kriteria karakter berupa angka
- IsUpperCase – kriteria karakter dalam huruf besar
- IsLatin – kriteria karakter menjadi karakter Latin;
- IsRus – kriteria karakter sebagai karakter Rusia
- IsExtra – kriteria karakter menjadi karakter tambahan
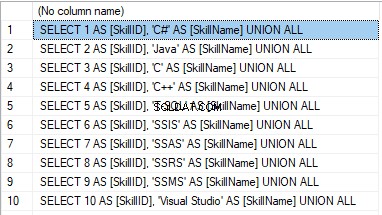
Sekarang, kita bisa mendapatkan kode untuk penyisipan karakter yang diperlukan. Misalnya, ini adalah cara melakukannya untuk karakter Latin dalam huruf kecil:
SELECT 'SELECT '+CAST([ValueInt] AS NVARCHAR(255))+' AS [ValueInt], '+''''+[ValueNChar]+''''+' AS [ValueNChar], '+''''+[ValueChar]+''''+' AS [ValueChar] UNION ALL'
  FROM [test].[SelectCharactersCode]
  WHERE [IsUpperCase]=0
    AND [IsLatin]=1;
Kami menerima hasil berikut:

Hal yang sama untuk karakter Rusia dalam huruf kecil:
SELECT 'SELECT '+CAST([ValueInt] AS NVARCHAR(255))+' AS [ValueInt], '+''''+[ValueNChar]+''''+' AS [ValueNChar], '+COALESCE(''''+[ValueChar]+'''', 'NULL')+' AS [ValueChar] UNION ALL'
  FROM [test].[SelectCharactersCode]
  WHERE [IsUpperCase]=0
    AND [IsRus]=1;
Kami mendapatkan hasil berikut:

Hal yang sama untuk karakter:
SELECT 'SELECT '+CAST([ValueInt] AS NVARCHAR(255))+' AS [ValueInt], '+''''+[ValueNChar]+''''+' AS [ValueNChar], '+''''+[ValueChar]+''''+' AS [ValueChar] UNION ALL'
  FROM [test].[SelectCharactersCode]
  WHERE [IsNumeral]=1;
Hasilnya adalah sebagai berikut:

Jadi, kami memiliki kode untuk memasukkan data berikut secara terpisah:
- Karakter Latin dalam huruf kecil.
- Karakter Rusia dalam huruf kecil.
- Digit.
Ini berfungsi untuk tipe NCHAR dan CHAR.
Demikian pula, kita dapat menyiapkan skrip penyisipan untuk set karakter apa pun. Selain itu, setiap set akan mendapatkan fungsi tabulasinya sendiri.
Sederhananya, kami menerapkan fungsi tabulasi umum yang akan mengembalikan kumpulan data yang diperlukan untuk data yang dipilih sebelumnya dengan cara berikut:
SELECT
	'SELECT ' + CAST([ValueInt] AS NVARCHAR(255)) + ' AS [ValueInt], '
	+ '''' + [ValueNChar] + '''' + ' AS [ValueNChar], '
	+ COALESCE('''' + [ValueChar] + '''', ‘NULL’) + ' AS [ValueChar], '
	+ CAST([IsNumeral] AS NCHAR(1)) + ' AS [IsNumeral], ' +
	+CAST([IsUpperCase] AS NCHAR(1)) + ' AS [IsUpperCase], ' +
	+CAST([IsLatin] AS NCHAR(1)) + ' AS [IsLatin], ' +
	+CAST([IsRus] AS NCHAR(1)) + ' AS [IsRus], ' +
	+CAST([IsExtra] AS NCHAR(1)) + ' AS [IsExtra]' +
	+' UNION ALL'
FROM [test].[SelectCharactersCode];
Hasil akhirnya adalah sebagai berikut:

Script siap dibungkus dalam fungsi tabulasi [test].[GetSelectCharacters].
Penting untuk menghapus UNION ALL ekstra di akhir skrip yang dihasilkan, dan di [ValueInt]=39, kita perlu mengubah ”’ menjadi ””:
SELECT 39 AS [ValueInt], '''' AS [ValueNChar], '''' AS [ValueChar], 0 AS [IsNumeral], 0 AS [IsUpperCase], 0 AS [IsLatin], 0 AS [IsRus], 1 AS [IsExtra] UNION ALLFungsi tabulasi ini mengembalikan kumpulan bidang berikut:
- Bilangan – nomor baris dalam kumpulan data yang dikembalikan;
- ValueInt – nilai numerik karakter;
- NilaiNhar – karakter tipe NCHAR;
- ValueChar – karakter tipe CHAR;
- IsNumeral – kriteria karakter berupa angka;
- IsUpperCase – kriteria yang menentukan bahwa karakter dalam huruf besar;
- IsLatin – kriteria yang menentukan bahwa karakter tersebut adalah karakter Latin;
- IsRus – kriteria yang menentukan bahwa karakter tersebut adalah karakter Rusia;
- IsExtra – kriteria yang menentukan bahwa karakter tersebut adalah karakter tambahan.
Untuk input, Anda memiliki parameter berikut:
- @IsNumeral – jika harus mengembalikan angka;
- @IsUpperCase :
- 0 – hanya mengembalikan huruf kecil untuk huruf;
- 1 – hanya mengembalikan huruf besar;
- NULL – harus mengembalikan huruf dalam semua kasus.
- @IsLatin – harus mengembalikan karakter Latin
- @IsRus – itu harus mengembalikan karakter Rusia
- @IsExtra – harus mengembalikan karakter tambahan.
Semua flag digunakan sesuai dengan logika OR. Misalnya, jika Anda ingin mengembalikan angka dan karakter Latin dalam huruf kecil, Anda memanggil fungsi tabulasi dengan cara berikut:
Kami mendapatkan hasil berikut:
declare
@IsNumeral BIT=1
   ,@IsUpperCase BIT=0
   ,@IsLatin BIT=1
   ,@IsRus BIT=0
   ,@IsExtra BIT=0;

SELECT *
FROM [test].[GetSelectCharacters](@IsNumeral, @IsUpperCase, @IsLatin, @IsRus, @IsExtra);
Kami mendapatkan hasil berikut:

Kami mengimplementasikan fungsi [test].[GetRandString] yang akan menggantikan baris dengan karakter pseudorandom, dengan mempertahankan panjang string awal. Fungsi ini harus mencakup kemungkinan pengoperasian karakter yang hanya berupa angka. Misalnya, ini dapat berguna ketika Anda mengubah seri dan nomor KTP.
Saat kita mengimplementasikan fungsi [test].[GetRandString], pertama-tama kita mendapatkan set karakter yang diperlukan untuk menghasilkan garis pseudorandom dengan panjang yang ditentukan dalam parameter input @Length. Parameter lainnya berfungsi seperti yang dijelaskan di atas.
Kemudian, kami menempatkan kumpulan data yang diterima ke dalam variabel tabulasi @tbl . Tabel ini menyimpan field [ID] – nomor urut dalam tabel karakter yang dihasilkan, dan [Value] – penyajian karakter dalam tipe NCHAR.
Setelah itu, dalam satu siklus, menghasilkan angka pseudorandom dalam kisaran 1 hingga kardinalitas karakter @tbl yang diterima sebelumnya. Kami memasukkan nomor ini ke dalam [ID] variabel tabulasi @tbl untuk pencarian. Saat pencarian mengembalikan garis, kami mengambil karakter [Value] dan "menempelkannya" ke baris yang dihasilkan @res.
Saat pekerjaan siklus berakhir, jalur yang diterima akan kembali melalui variabel @res.
Anda dapat mengubah nama depan dan nama belakang kandidat dengan cara berikut:
UPDATE [dbo].[Employee]
SET [FirstName] = [test].[GetRandString](LEN([FirstName])),
        [LastName] = [test].[GetRandString](LEN([LastName]));
Jadi, kami telah memeriksa implementasi fungsi dan penggunaannya untuk tipe NCHAR dan NVARCHAR. Kita dapat melakukan hal yang sama dengan mudah untuk tipe CHAR dan VARCHAR.
Namun, terkadang kita perlu membuat garis sesuai dengan kumpulan karakter, bukan karakter alfabet atau angka. Dengan cara ini, pertama-tama kita perlu menggunakan fungsi multi-operator berikut [test].[GetListCharacters].
Fungsi [test].[GetListCharacters] mendapatkan dua parameter berikut untuk input:
- @str – garis karakter itu sendiri;
- @IsGroupUnique – menentukan apakah perlu mengelompokkan karakter unik dalam baris.
Dengan CTE rekursif, baris input @str diubah menjadi tabel karakter – @ListCharacters. Tabel itu berisi bidang-bidang berikut:
- ID – nomor urut baris dalam tabel karakter yang dihasilkan;
- Karakter – penyajian karakter dalam NCHAR(1)
- Hitung – jumlah pengulangan karakter dalam baris (selalu 1 jika parameter @IsGroupUnique=0)
Mari kita ambil dua contoh penggunaan fungsi ini untuk memahami pekerjaannya dengan lebih baik:
- Transformasi baris menjadi daftar karakter non-unik:
SELECT *
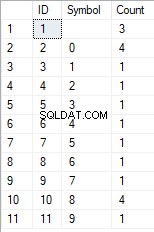
FROM [test].[GetListCharacters]('123456888 789 0000', 0);
Kami mendapatkan hasilnya:

Contoh ini menunjukkan bahwa baris diubah menjadi daftar karakter "sebagaimana adanya", tanpa mengelompokkannya berdasarkan keunikan karakter (bidang [Hitung] selalu berisi 1).
- Transformasi garis menjadi daftar karakter unik
SELECT *
FROM [test].[GetListCharacters]('123456888  789 0000', 1);
Hasilnya adalah sebagai berikut:
Contoh ini menunjukkan bahwa baris diubah menjadi daftar karakter yang dikelompokkan berdasarkan keunikannya. Kolom [Count] menampilkan jumlah temuan setiap karakter di baris input.
Berdasarkan fungsi multi-operator [test].[GetListCharacters], kami membuat fungsi skalar [test].[GetRandString2].
Definisi fungsi skalar baru menunjukkan kemiripannya dengan fungsi skalar [test].[GetRandString]. Satu-satunya perbedaan adalah ia menggunakan fungsi multi-operator [test].[GetListCharacters] alih-alih fungsi tabulasi [test].[GetSelectCharacters].
Di sini, mari kita tinjau dua contoh penerapan fungsi skalar :
Kami menghasilkan baris pseudorandom dengan panjang 12 karakter dari baris input karakter yang tidak dikelompokkan berdasarkan keunikan:
SELECT [test].[GetRandString2](12, '123456789!!!!!!!!0!!!', DEFAULT);Hasilnya adalah:
64017!!5!!!7
Kata kuncinya adalah DEFAULT. Ini menyatakan bahwa nilai default menetapkan parameter. Ini adalah nol (0).
Atau
Kami menghasilkan baris pseudorandom dalam panjang 12 karakter dari baris input karakter yang dikelompokkan berdasarkan keunikan:
SELECT [test].[GetRandString2](12, '123456789!!!!!!!!0!!!', 1);Hasilnya adalah:
35792!428273
Implementasi skrip umum untuk sanitasi data dan perubahan data rahasia
Kami telah memeriksa contoh sederhana untuk setiap jenis data yang diubah:
- Mengubah tanggal dan waktu;
- Mengubah nilai numerik;
- Mengubah urutan byte;
- Mengubah data karakter.
Namun, contoh berikut tidak memenuhi kriteria 2 dan 3 untuk skrip pengubah data:
- Kriteria 2 :selektivitas nilai tidak akan berubah secara signifikan dalam data yang diubah. Anda tidak dapat menggunakan NULL untuk bidang tabel. Sebagai gantinya, Anda harus memastikan bahwa nilai data nyata yang sama tetap sama dalam data yang diubah. Misalnya, jika data sebenarnya berisi nilai 103785 12 kali di bidang tabel yang dapat berubah, data yang dimodifikasi harus menyertakan nilai (yang diubah) berbeda yang ditemukan 12 kali di bidang tabel yang sama.
- Kriteria 3 :panjang dan ukuran nilai tidak boleh diubah secara signifikan dalam data yang diubah. Misalnya, Anda mengganti setiap karakter/byte dengan karakter/byte pseudorandom.
Jadi, kita perlu membuat skrip dengan mempertimbangkan selektivitas nilai di bidang tabel.
Mari kita lihat database kami untuk layanan rekrutmen. Seperti yang kita lihat, data pribadi hanya ada di tabel kandidat [dbo].[Karyawan].
Asumsikan bahwa tabel menyertakan bidang berikut:
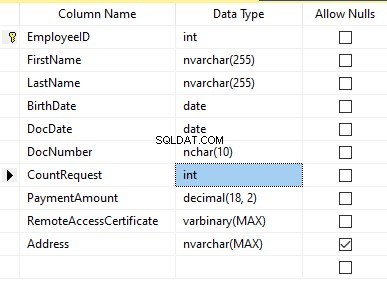
Deskripsi:
- Nama Depan – nama, baris NVARCHAR(255)
- Nama Belakang – nama belakang, baris NVARCHAR(255)
- Tanggal Lahir – tanggal lahir, TANGGAL
- DocNumber – nomor KTP dengan dua digit di awal untuk seri paspor, dan tujuh digit berikutnya adalah nomor dokumen. Di antara mereka, kami memiliki tanda hubung sebagai garis NCHAR(10).
- Tanggal Dokumen – tanggal penerbitan KTP, TANGGAL
- Permintaan Hitung – jumlah permintaan untuk kandidat tersebut selama pencarian resume, bilangan bulat INT
- Jumlah Pembayaran – biaya layanan promosi resume yang diterima, angka desimal (18,2)
- Sertifikat Akses Jarak Jauh – sertifikat akses jarak jauh, urutan byte VARBINARY
- Alamat – alamat tempat tinggal atau alamat pendaftaran, baris NVARCHAR(MAX)
Kemudian, untuk menjaga selektivitas awal, kita perlu mengimplementasikan algoritma berikut:
- Ekstrak semua nilai unik untuk setiap bidang dan simpan hasilnya dalam tabel sementara atau variabel tabulasi;
- Hasilkan nilai pseudorandom untuk setiap nilai unik. Nilai pseudorandom ini tidak boleh berbeda secara signifikan dalam panjang dan ukuran dari nilai aslinya. Simpan hasilnya di tempat yang sama di mana kita menyimpan hasil poin 1. Setiap nilai yang baru dibuat harus memiliki korelasi nilai unik saat ini.
- Ganti semua nilai dalam tabel dengan nilai baru dari poin 2.
Pada awalnya, kami mendepersonalisasi nama depan dan belakang kandidat. Kami berasumsi bahwa nama belakang dan nama depan selalu ada, dan panjangnya tidak kurang dari dua karakter di setiap bidang.
Pertama, kami memilih nama yang unik. Kemudian, itu menghasilkan garis pseudorandom untuk setiap nama. Panjang nama tetap sama; karakter pertama dalam huruf besar, dan karakter lainnya dalam huruf kecil. Kami menggunakan fungsi skalar [test].[GetRandString] yang dibuat sebelumnya untuk menghasilkan garis pseudorandom dengan panjang tertentu sesuai dengan kriteria karakter yang ditentukan.
Kemudian, kami memperbarui nama-nama di tabel kandidat sesuai dengan nilai unik mereka. Itu sama untuk nama belakang.
Kami mendepersonalisasi bidang DocNumber. Ini adalah nomor ID-card (paspor). Dua karakter pertama menunjukkan seri dokumen, dan tujuh digit terakhir adalah nomor dokumen. Tanda hubung ada di antara mereka. Kemudian kami melakukan operasi sanitasi.
Kami mengumpulkan semua nomor dokumen unik dan menghasilkan garis pseudorandom untuk masing-masing nomor. Format baris adalah 'XX-XXXXXXX,' di mana X adalah digit dalam kisaran 0 hingga 9. Di sini, kami menggunakan fungsi skalar [test] [GetRandString] yang dibuat sebelumnya untuk menghasilkan garis pseudorandom dengan panjang yang ditentukan sesuai dengan set parameter karakter.
Setelah itu, kolom [DocNumber] diperbarui di tabel kandidat [dbo].[Employee].
Kami mendepersonalisasi bidang DocDate (tanggal penerbitan kartu ID) dan bidang BirthDate (tanggal lahir kandidat).
First, we select all the unique pairs made of “date of birth &date of the ID-card issue.” For each such pair, we create a pseudorandom date for the date of birth. The pseudorandom date of the ID-card issue is made according to that “date of birth” – the date of the document’s issue must not be earlier than the date of birth.
After that, these data are updated in the respective fields of the candidates’ table [dbo].[Employee].
And, we update the remaining fields of the table.
The CountRequest value stands for the number of requests made for that candidate by companies during the resume search.
The PaymentAmount is the final amount of the resume promotion service fee paid. We calculate these numbers similarly to the previous fields.
Note that it generates a pseudorandom integer for the first case and a pseudorandom decimal for the second case. In both cases, the pseudorandom number generation occurs in the range of “two times less than original” to “two times more than original.” The selectivity of values in the fields is not changed too much.
After that, it writes the values into the fields of the candidates’ table [dbo].[Employee].
Further, we collect unique values of the RemoteAccessCertificate field for the remote access certificate. We generate a pseudorandom byte sequence for each such value. The length of the sequence must be the same as the original. Here, we use the previously created [test].[GetRandVarbinary] scalar function to generate the pseudorandom byte sequence of the specified length.
Then recording into the respective field [RemoteAccessCertificate] of the [dbo].[Employee] candidates’ table takes place.
The last step is the collection of the unique addresses from the [Address] field. For each value, we generate a pseudorandom line of the same length as the original. Note that if it was NULL originally, it must be NULL in the generated field. It allows you to keep NULL and don’t replace it with an empty line. It minimizes the selectivity values’ mismatch in this field between the production database and the altered data.
We use the previously created [test].[GetRandString] scalar function to generate the pseudorandom line of the specified length according to the characters’ parameters defined.
It then records the data into the respective [Address] field of the candidates’ table [dbo].[Employee].
This way, we get the full script for depersonalization and altering of the confidential data.
Finally, we get the database with altered personal and confidential data. The algorithms we used make it impossible to restore the original data from the altered data. Also, the values’ selectivity, length, and size aren’t changed significantly. So, the three criteria for the personal and secret data altering scripts are ensured.
We won’t review the criterion 4 separately here. Our database contains all the data subject to change in one candidates’ table [dbo].[Employee]. The data conformity is needed within this table only. Thus, criterion 4 is also here. However, we need to remember this criterion 4 claiming that all interrelations must remain the same in the altered data.
We often see other conditions for personal and confidential data altering algorithms, but we won’t review them here. Besides, the four criteria described above are always present. In many cases, it is enough to estimate the functionality of the algorithm suitable to use it.
Now, we need to make a backup of the created database, check it by restoring on another instance, and transfer that copy into the necessary environment for development and testing. For this, we examine the full database backup creation.
Full database backup creation
We can make a database backup with construction BACKUP DATABASE as in our example.
Make a compressed full backup of the database JobEmplDB_Test. The checksum calculation takes place in the file E:\Backup\JobEmplDB_Test.bak. Further, we check the backup created.
Then, we check the backup created by restoring the database for it. Let’s examine the database restoring.
Restoring the database
You can restore the database with the help of RESTORE DATABASE construction in the following way:
USE [master]
RESTORE DATABASE [JobEmplDB_Test]
FROM  DISK = N'E:\Backup\JobEmplDB_Test.bak' WITH  FILE = 1,
MOVE N'JobEmplDB' TO N'E:\DBData\JobEmplDB.mdf',
MOVE N'JobEmplDB_log' TO N'F:\DBLog\JobEmplDB_log.ldf',
NOUNLOAD,
REPLACE,
STATS = 5;
GO
We restore the JobEmplDB_Test database of the E:\Backup\JobEmplDB_Test.bak backup. The files will be overwritten, and the data file will be transferred into the file E:\DBData\JobEmplDB.mdf , while the transactions log file will be moved into F:\DBLog\JobEmplDB_log.ldf .
After we successfully check how the database is restored from the backup, we forward the backup to the development and testing environments. It will be restored again with the same method as described above.
We’ve examined the first approach to the data populating into the database for testing and development. This approach implies copying and altering the data from the production database. Now, we’ll examine the second approach – the synthetic data generation.
Synthetic data generation
The General algorithm for the synthetic data generation is following:
- Make a new empty database or clear a previously created database by purging all data.
- Create or renew a scheme in the newly created database – the same as that of the production databases.
- Copy of renew guidelines and regulations from the production database and transfer them into the new database.
- Generate synthetic data into the necessary tables of the new database.
- Make a backup of a new database.
- Deliver and restore the new backup in the necessary environment.
We already have the JobEmplDB_Test database to practice, and we have reviewed the means of creating a schema in the new database. Let’s focus on the tasks that are specific to this approach.
Clean up the database with the data purge
To clear the database off all its data, we need to do the following:
- Keep the definitions of all external keys.
- Disable all limitations and triggers.
- Delete all external keys.
- Clear the tables using the TRUNCATE construction.
- Restore all the external keys deleted in point 3.
- Enable all the limitations disabled in point 2.
You can save the definitions of all external keys with the following script:
1. The external keys’ definitions are saved in the tabulation variable @tbl_create_FK
2. You can disable the limitations and triggers with the following script:
EXEC sp_MSforeachtable "ALTER TABLE ? NOCHECK CONSTRAINT ALL";
EXEC sp_MSforeachtable "ALTER TABLE ? DISABLE TRIGGER ALL";
To enable the limitations and triggers, you can use the following script:
EXEC sp_MSforeachtable "ALTER TABLE ? WITH CHECK CHECK CONSTRAINT ALL";
EXEC sp_MSforeachtable "ALTER TABLE ? ENABLE TRIGGER ALL";
Here, we use the saved procedure sp_MSforeachtable that applies the construction to all the database’s tables.
3. To delete external keys, use the special script. Here, we receive the information about the external keys through the INFORMATION_SCHEMA.TABLE_CONSTRAINTS system presentation. We delete external keys through the cursor, one by one, using the formed dynamic script T-SQL, transferring the request into the system saved procedure sp_executesql .
4. To clear the tables with the TRUNCATE construction, use the dedicated script. The script works in the same way as above, but it receives the data for tables, and then it clears the tables one by one through the cursor, using the TRUNCATE construction.
5. Restoring the external keys is possible with the below script (earlier, we saved the external keys’ definitions in the tabulation variable @tbl_create_FK):
DECLARE @tsql NVARCHAR(4000);

DECLARE FK_Create CURSOR LOCAL FOR SELECT
	[Script]
FROM @tbl_create_FK;

OPEN FK_Create;

FETCH NEXT FROM FK_Create INTO @tsql;

WHILE (@@fetch_status = 0)
BEGIN
	EXEC sp_executesql @tsql = @tsql;
	FETCH NEXT FROM FK_Create INTO @tsql;
END

CLOSE FK_Create;
DEALLOCATE FK_Create;
The script works in the same way as the two other scripts we mentioned above. But it restores the external keys’ definitions through the cursor, one for each iteration.
A particular case of data purging in the database is the current script. To get this output, we need the below construction in the scripts:
EXEC sp_executesql @tsql = @tsql;Before this construction, or instead of it, we need to write the generated construction output. It is necessary to call it manually or via the dynamic T-SQL query. We do it via the system saved procedure sp_executesql.
Instead of the below code fragment in all cases:
WHILE (@@fetch_status = 0)
BEGIN
	EXEC sp_executesql @tsql = @tsql;
...

We write:

WHILE (@@fetch_status = 0)
BEGIN
	PRINT @tsql;

	EXEC sp_executesql @tsql = @tsql;
...
Or:
WHILE (@@fetch_status = 0)
BEGIN
	PRINT @tsql;
...
The first case implies both the output of constructions and their execution. The second case if for the output only – it is helpful for the scripts’ debugging.
Thus, we get the general database cleaning script.
Copy guidelines and references from the production database to the new one
Here you can use the T-SQL scripts. Our example database of the recruitment service includes 5 guidelines:
- [dbo].[Company] – companies
- [dbo].[Skill] – skills
- [dbo].[Position] – positions (occupation)
- [dbo].[Project] – projects
- [dbo].[ProjectSkill] – project and skills’ correlations
The “skills” table [dbo].[Skill] serves to show how to make a script for the data insertion from the production database into the test database.
We form the following script:
SELECT 'SELECT '+CAST([SkillID] AS NVARCHAR(255))+' AS [SkillID], '+''''+[SkillName]+''''+' AS [SkillName] UNION ALL'
  FROM [dbo].[Skill]
ORDER BY [SkillID];
We execute it in a copy of the production database that is usually available in read-only mode. It is a replica of the production database.
Hasilnya adalah:
Now, wrap the result up into the script for the data adding as here. We have a script for the skills’ guideline compilation. The scripts for other guidelines are made in the same way.
However, it is much easier to copy the guidelines’ data through the data export and import in SSMS. Or, you can use the data import and export wizard.
Generate synthetic data
We’ve determined the pseudorandom values’ generation for lines, numbers, and byte sequences. It took place when we examined the implementation of the data sanitization and the confidential data altering algorithms for approach 1. Those implemented functions and scripts are also used for the synthetic data generation.
The recruitment service database requires us to fill the synthetic data in two tables only:
- [dbo].[Employee] – candidates
- [dbo].[JobHistory] – a candidate’s work history (experience), the resume itself
We can fill the candidates’ table [dbo].[Employee] with synthetic data using this script.
At the beginning of the script, we set the following parameters:
- @count – the number of lines to be generated
- @LengthFirstName – the name’s length
- @LengthLastName – the last name’s length
- @StartBirthDate – the lower limit of the date for the date of birth
- @FinishBirthDate – the upper limit of the date for the date of birth
- @StartCountRequest – the lower limit for the field [CountRequest]
- @FinishCountRequest – the upper limit for the field [CountRequest]
- @StartPaymentAmount – the lower limit for the field [PaymentAmount]
- @FinishPaymentAmount – the upper limit for the field [PaymentAmount]
- @LengthRemoteAccessCertificate – the byte sequence’s length for the certificate
- @LengthAddress – the length for the field [Address]
- @count_get_unique_DocNumber – the number of attempts to generate the unique document’s number [DocNumber]
The script complies with the uniqueness of the [DocNumber] field’s value.
Now, let’s fill the [dbo].[JobHistory] table with synthetic data as follows.
The start date of work [StartDate] is later than the issuing date of the candidate’s document [DocDate]. The end date of work [FinishDate] is later than the start date of work [StartDate].
It is important to note that the current script is simplified, as it does not deal with parameters of the generated data selectivity configuration.
Make a full database backup
We can make a database backup with the construction BACKUP DATABASE, using our script.
We create a full compressed backup of the database JobEmplDB_Test. The checksum is calculated into the file E:\Backup\JobEmplDB_Test.bak. It also ensures further testing of the backup.
Let’s check the backup by restoring the database from it. We need to examine the database restoring then.
Restore the database
You can restore the database with the help of the RESTORE DATABASE construction, as shown below:
USE [master]
RESTORE DATABASE [JobEmplDB_Test]
FROM  DISK = N'E:\Backup\JobEmplDB_Test.bak' WITH  FILE = 1,
MOVE N'JobEmplDB' TO N'E:\DBData\JobEmplDB.mdf',
MOVE N'JobEmplDB_log' TO N'F:\DBLog\JobEmplDB_log.ldf',
NOUNLOAD,
REPLACE,
STATS = 5;
GO
We restore the database JobEmplDB_Test from the backup E:\Backup\JobEmplDB_Test.bak. The files are overwritten, and the data file is transferred to the file E:\DBData\JobEmplDB.mdf. The transaction log file is transferred to file F:\DBLog\JobEmplDB_log.ldf.
After checking the database restoring from the backup successfully, we transfer the backup to the necessary environments. It will be used for testing and development, and further deployment through the database restoring, as described above.
This way, we’ve examined the second approach to filling the database in with data for testing and development purposes. It is the synthetic data generation approach.
Data generation tools (for external resources)
When we have a job to fill in the database with data for testing and development purposes, it can be much faster and easier with the help of specialized tools. Let’s review the most popular and powerful data generation tools and explore their practical usage.
Full list of tools
DATPROF
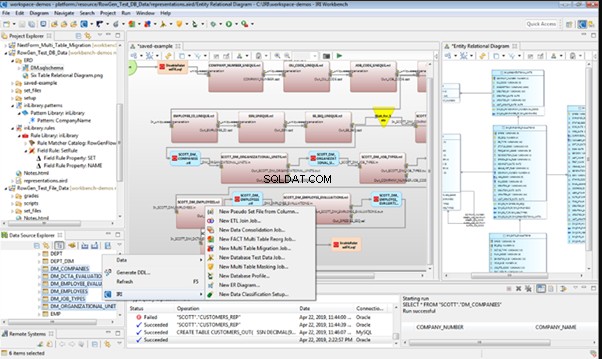
IRI RowGen
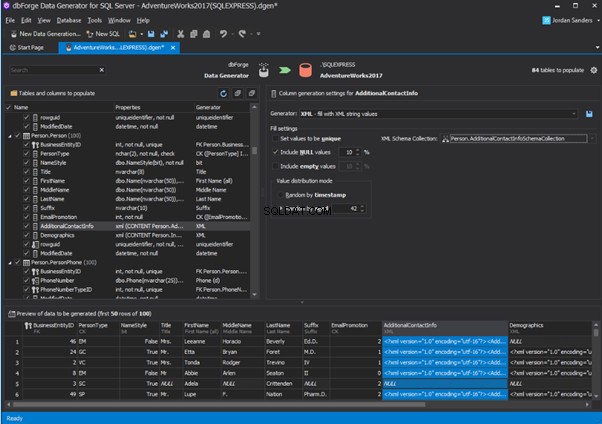
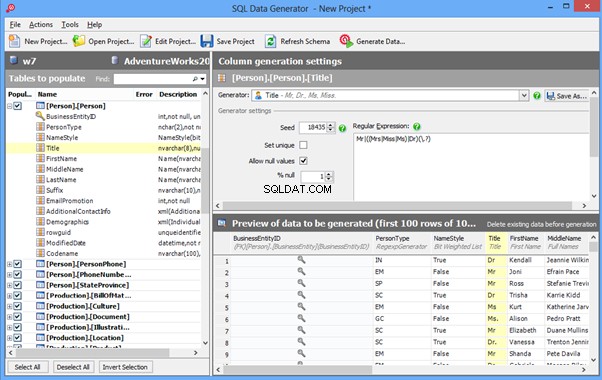
Data Generator for SQL Server
Redgate SQL Data Generator
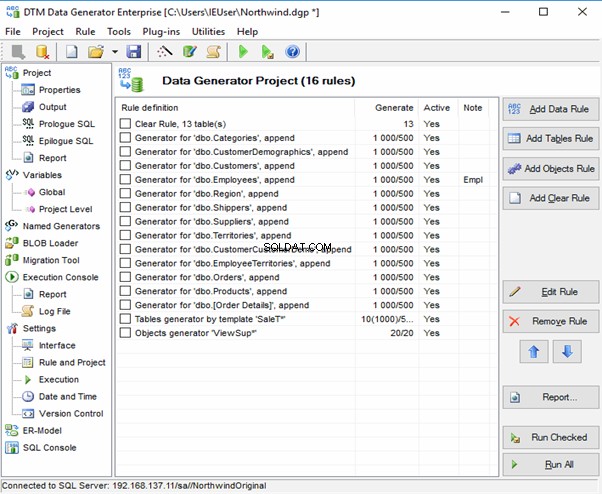
DTM Data Generator
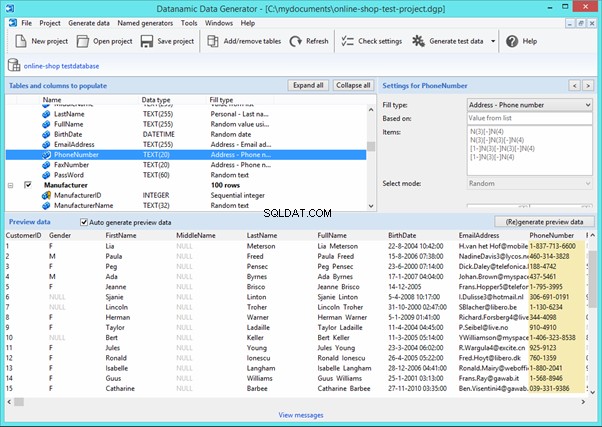
Datanamic Data Generator MultiDB
Now, let’s examine one of these tools more precisely.
An overview of the employees’ generation by the Data Generator for SQL Server
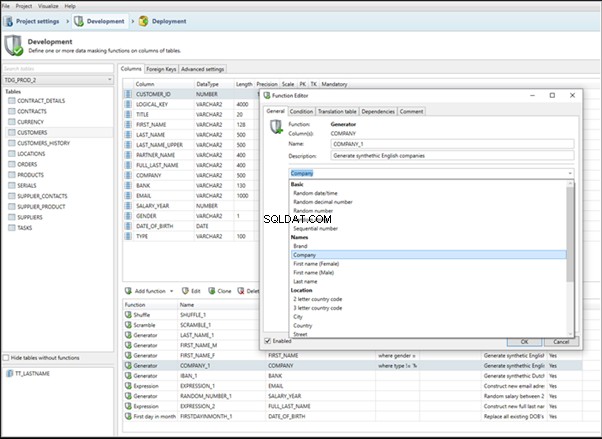
The Data Generator for SQL Server utility is embedded in SSMS, and also it is a part of dbForge Studio. We reviewed this utility here. Let’s now examine how it works for synthetic data generation. As examples, we use the [dbo].[Employee] and the [dbo].[JobHistory] tables.
This generator can quickly generate first and last names of candidates for the [FirstName] and [LastName] fields respectively:
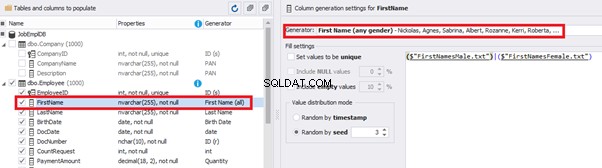
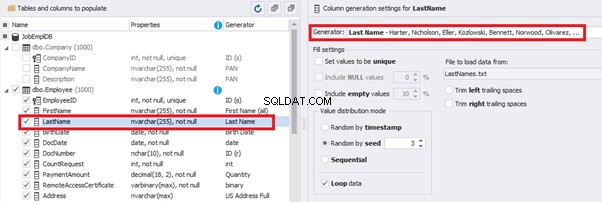
Note that FirstName requires choosing the “First Name” value in the “Generator” section. For LastName, you need to select the “Last Name” value from the “Generator” section.
It is important to note that the generator automatically determines which generation type it needs to apply to every field. The settings above were set by the generator itself, without manual correction.
You can configure distribution of values for the date of birth [BirthDate]:
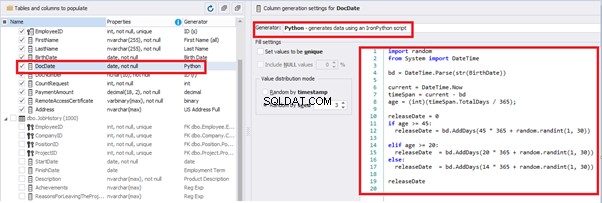
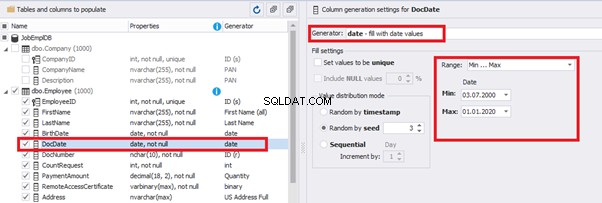
Set the distribution for the document’s date of issue [DocDate] through the Phyton generator using the below script:
import random
from System import DateTime
# receive the value from the Birthday field
bd = DateTime.Parse(str(BirthDate))
# receive the current date
current = DateTime.Now
# calculate the age in years
timeSpan = current - bd
age = (int)(timeSpan.TotalDays / 365);
# passport’s date of issue
releaseDate = 0
if age >= 45:
releaseDate = bd.AddDays(45 * 365 + random.randint(1, 30))
# randomize the issue during the month
elif age >= 20:
  releaseDate  = bd.AddDays(20 * 365 + random.randint(1, 30))
 # randomize the issue during the month
else:
  releaseDate  = bd.AddDays(14 * 365 + random.randint(1, 30))
# randomize the issue during the month
releaseDate
This way, the [DocDate] configuration will look as follows:
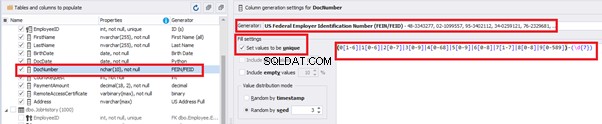
For the document’s number [DocNumber], we can select the necessary type of unique data generation, and edit the generated data format, if needed:
E.g., instead of the format
(0[1-6]|1[0-6]|2[0-7]|3[0-9]|4[0-68]|5[0-9]|6[0-8]|7[1-7]|8[0-8]|9[0-589])-(\d{7})We can set the following format:
(\d{2})-(\d{7})This format means that the line will be generated in format XX-XXXXXXX (X – is a digit in the range of 0 to 9).
We set up the generator for [CountRequest] and [PaymentAmount] fields in the same way, according to the generated data type:
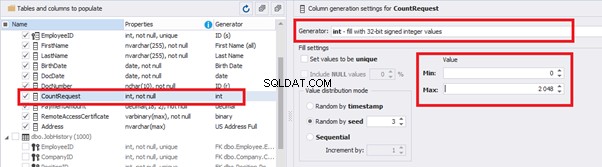
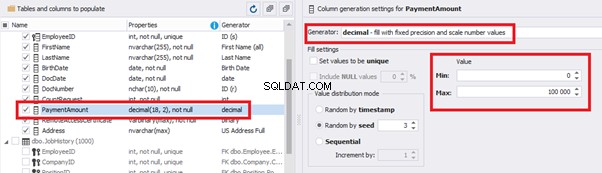
In the first case, we set the values’ range of 0 to 2048 for [CountRequest]. In the second case, it is the range of 0 to 100000 for [PaymentAmount].
We configure generation for [RemoteAccessCertificate] and [Address] fields in the same way:
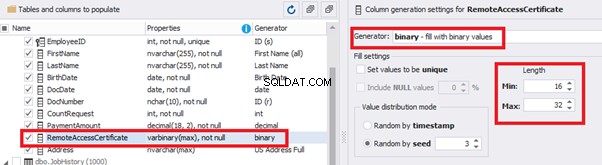
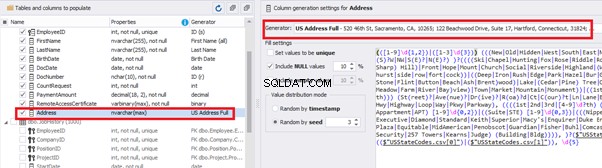
In the first case, we limit the byte sequence [RemoteAccessCertificate] with the range of lengths of 16 to 32. In the second case, we select values for [Address] as real addresses. It makes the generated values looking like the real ones.
This way, we’ve configured the synthetic data generation settings for the candidates’ table [dbo].[Employee]. Let’s now set up the synthetic data generation for the [dbo].[JobHistory] table.
We set it to take the data for the [EmployeeID] field from the candidates’ table [dbo].[Employee] in the following way:
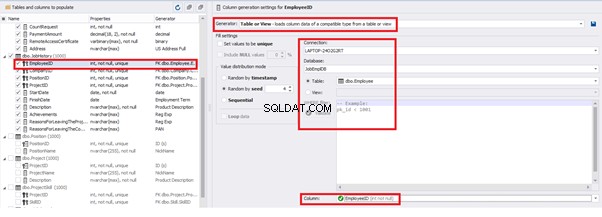
We select the generator’s type from the table or presentation. We then define the sample of MS SQL Server, the database, and the table to take the data from. We can also configure filters in the “WHERE filter” section, and select the [EmployeeID] field.
Here we suppose that we generate the “employees” first, and then we generate the data for the [dbo].[JobHistory] table, basing on the filled [dbo].[Employee] reference.
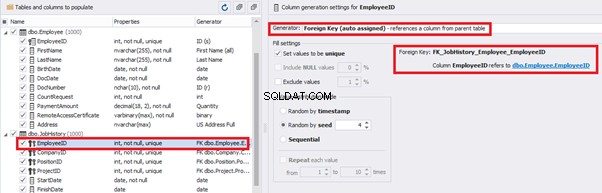
However, if we need to generate the data for both [dbo].[Employee] and [dbo].[JobHistory] at the same time, we need to select “Foreign Key (manually assigned) – references a column from the parent table,” referring to the [dbo].[Employee].[EmployeeID] column:
Similarly, we set up the data generation for the following fields.
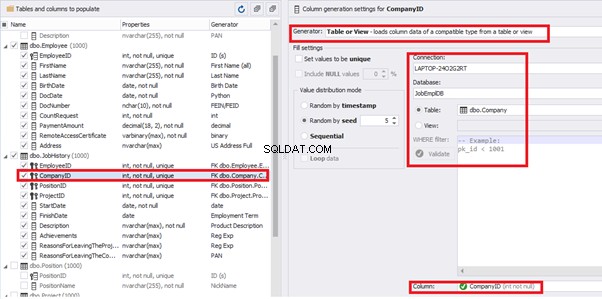
[CompanyID] – from [dbo].[Company], the “companies” table:
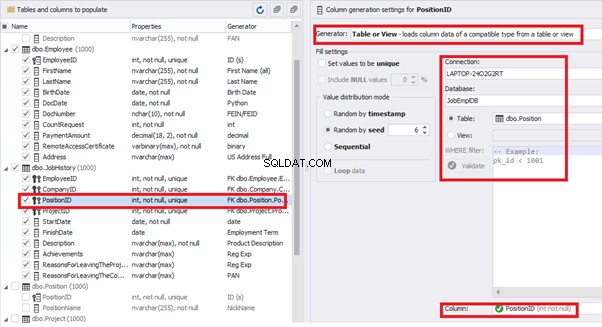
[PositionID] – from the table of positions [dbo].[Position]:
[ProjectID] – from the table of projects [dbo].[Project]:

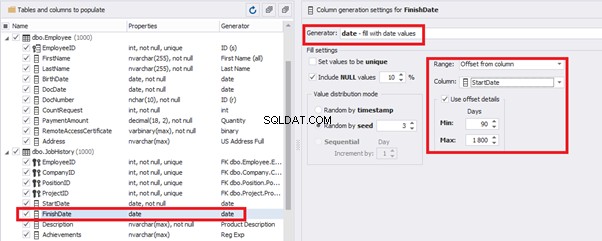
The tool cannot link the columns from different tables and shift them in some way. However, the generator can shift the date within one table – the “date” generator – fill with date values with Range – Offset from the column. Also, it can use data from a different table, but without any transformation (Table or View, SQL query, Foreign key generators).
That’s why we resolve the dates’ problem (BirthDate
E.g., we limit the BirthDate with the 40-50 years’ interval. Then, we restrict the DocDate with 20-40 years’ interval. The StartDate is, respectively, limited with 25-35 years’ interval, and we set up the FinishDate with the offset from StartDate.
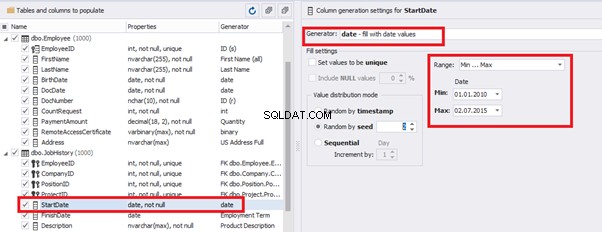
We set up the date of birth:
Set up the date of the document’s issue
Then, the StartDate will match the age from 35 to 45:
The simple offset generator sets FinishDate:
The result is, a person has worked for three months till the current date.
Also, to configure the date of the working end, we can use a small Python script:
This way, we receive the below configuration for the dates of work end [FinishDate] data generation:
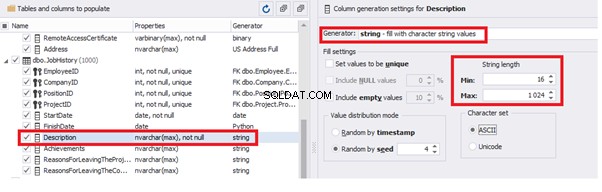
Similarly, we fill in the rest of fields. We set the generator type – string, and set the range for generated lines’ lengths:
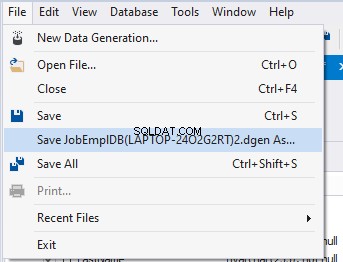
Also, you can save the data generation project as dgen-file consisting of:
We can save all these settings:it is enough to keep the project’s file and work with the database further, using that file:
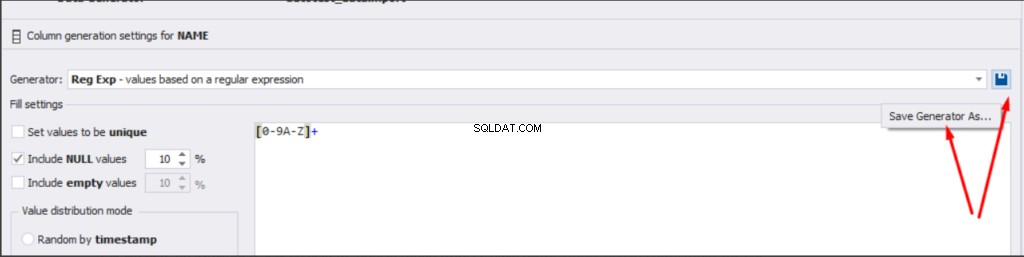
There is also the possibility to both save the new generators from scratch and save the custom settings in a new generator:
Thus, we’ve configured the synthetic data generation settings used for the jobs’ history table [dbo].[JobHistory].
We have examined two approaches to filling the data in the database for testing and development:
We’ve defied the objects for each approach and each script implementation. These objects are here. We’ve also provided scripts for changing the data from the production database and synthetic data generation. An example is the database of recruitment services. In the end, we’ve examined popular data generation tools and explored one of these tools in detail.
SQL SERVER – How to Disable and Enable All Constraint for Table and Database 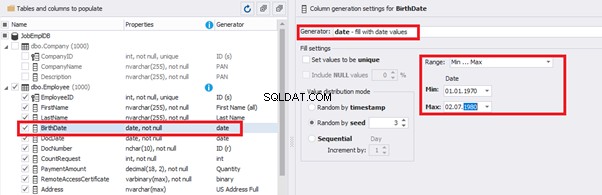
import random
from System import DateTime

bd = DateTime.Parse(str(StartDate))

releaseDate = bd.AddDays(random.randint(1, 30))

releaseDate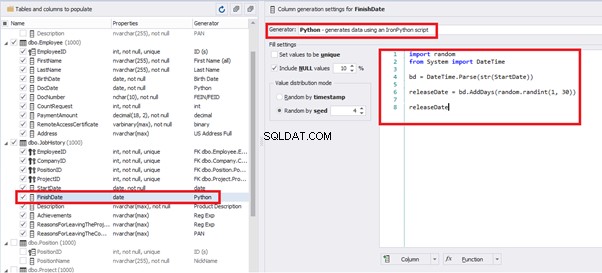
Kesimpulan
Referensi
Microsoft TechNet Wiki
Top 10 Best Test Data Generation Tools In 2020
SQL Server Documentation