1 Pengenalan Tutorial MS Access 2010, 2013, 2016 dan 2019
Selamat datang di tutorial MS Access. Tutorial ini dirancang untuk membuat pengguna aktif dan berjalan dengan MS Access (selanjutnya cukup "Access") dengan cepat. Empat modul dasar Access ditunjukkan:Tabel, Formulir, Laporan, dan Kueri. Sebuah contoh bisnis dibahas terlebih dahulu yang memberikan latar belakang untuk mengembangkan database sederhana.
Diasumsikan bahwa pengguna tutorial ini mahir dalam bekerja dengan Microsoft Windows XP/Vista/Win7/Win10, dll dan dengan MS Excel. Ini termasuk penggunaan keyboard dan mouse. Tutorial ini didasarkan pada Microsoft Access yang merupakan bagian dari suite Microsoft Office Professional yang juga mencakup MS Excel, MS Word, dan MS Powerpoint.
Tutorial ini mencakup MS Access 2007, 2010, 2013, 2016 dan 2019 yang memiliki antarmuka umum ("bilah pita" di bagian atas) yang berbeda dari versi sebelumnya. Jika Anda tertarik untuk bekerja dengan MS Access '97 atau 2000, silakan kunjungi Tutorial Microsoft Access – Meliputi halaman web MS Access '97 dan 2000.
Tutorial dimulai dengan gambaran singkat tentang Database Relasional . Mayoritas sistem manajemen basis data yang digunakan saat ini didasarkan pada apa yang disebut model basis data relasional. Access adalah sistem manajemen basis data relasional. Kami kemudian menjelaskan contoh bisnis dan memberikan garis besar untuk database dan aplikasi yang ingin kami kembangkan. Di bagian berikutnya, kami memberikan petunjuk langkah demi langkah untuk membuat tabel, formulir entri data, laporan, dan kueri untuk aplikasi.
1.1 Audiens yang Dituju
Tutorial ini ditujukan untuk siswa yang baru memulai sistem manajemen database MS Access.
1.2 Pengetahuan Prasyarat
Tutorial ini mengasumsikan siswa sudah familiar dengan operasi dasar komputer pribadi dan Windows 2000, Windows XP, Windows Vista atau Windows 7. Keterampilan khusus yang diperlukan untuk tutorial ini adalah:
- Penggunaan mouse dan keyboard
- Membuka dan menyimpan file di hard disk dan di memory stick USB (thumb drive) misalnya
- Mengelola file secara umum termasuk perbedaan antara huruf drive, hard disk, dll.
- Menjalankan program dari menu Start Windows
- Meminimalkan, memaksimalkan, dan mengubah ukuran jendela
Siswa harus memiliki stik memori USB (thumb drive) atau perangkat memori portabel lain yang tersedia untuk menyimpan file mereka yang akan dibuat selama tutorial ini.
1.3 Menjalankan Microsoft Access di Apple Mac
Salah satu masalah yang mungkin dihadapi beberapa siswa adalah kenyataan bahwa MS Access hanya berjalan di bawah sistem operasi Windows (seperti Windows XP, Vista atau Windows 7). Jika Anda memiliki MacBook, iMac, atau sistem Apple lainnya yang menjalankan MacOS yang menggunakan CPU Intel, ada beberapa alternatif yang dapat Anda coba. Banyak komputer Apple modern yang menggunakan CPU Intel dapat menjalankan sistem operasi Windows. Perhatikan bahwa Anda memerlukan salinan resmi sistem operasi Windows untuk melakukan ini. Ada dua cara utama untuk mencapai ini:
- Anda dapat mengatur Mac Anda ke “Dual Boot” baik MacOS X maupun Windows. Salah satu produk yang dapat mengaktifkan ini adalah perangkat lunak Apple BootCamp.
- Anda dapat menjalankan OS Windows “berdampingan” dengan Mac OS X menggunakan komputer “virtual” seperti VirtualBox
Daftar Isi
- 1 Pengenalan Tutorial MS Access
- 1.1 Audiens yang Dituju
- 1.2 Pengetahuan Prasyarat
- 1.3 Menjalankan Microsoft Access di Apple Mac
- 2 Ikhtisar Singkat Basis Data Relasional dan Aplikasi Basis Data
- 3 Contoh Bisnis
- 4 Memulai Microsoft Access
- 4.1 Tinjauan Memulai Microsoft Access
- 5 Membuat dan Melihat Tabel
- 5.1 Membuat Tabel Menggunakan Tampilan Desain
- 5.2 Latihan:Membuat Tabel
- 5.3 Melihat dan Menambahkan Data ke Tabel
- 5.4 Latihan:Menambahkan Data ke Tabel
- 5.5 Membuat Hubungan Antar Tabel
- 5.6 Tinjauan Membuat dan Melihat Tabel
- 6 Membuat dan Menjalankan Query
- 6.1 Kueri Tabel Tunggal
- 6.2 Latihan:Kueri Tabel Tunggal
- 6.3 Beberapa Kueri Tabel
- 6.4 Latihan:Beberapa Kueri Tabel
- 6.5 Tinjauan Membuat dan Menjalankan Kueri
- 7 Membuat dan Menjalankan Formulir Entri Data
- 7.1 Membuat Formulir Tabel Tunggal menggunakan Wizard
- 7.2 Latihan:Membuat Formulir Tabel Tunggal
- 7.3 Tinjauan Membuat dan Menjalankan Formulir Entri Data
- 8 Membuat dan Menjalankan Laporan
- 8.1 Membuat Laporan Tabel Tunggal menggunakan wizard
- 8.2 Latihan:Membuat Laporan Tabel Tunggal
- 8.3 Tinjauan Membuat dan Menjalankan Laporan
- 9 Membuat dan Menjalankan Formulir Master/Detail (Formulir dengan Subformulir)
- 10 Membuat dan Menjalankan Switchboard
- 11 Membuat dan Menjalankan Formulir Navigasi
- 11.1 Latihan:Memodifikasi Formulir Navigasi
- 11.2 Menyetel Formulir Navigasi sebagai Default
- 12 Ringkasan Tutorial dan Topik Lanjutan
Halaman berikutnya memberikan pengenalan singkat tentang Database Relasional.
2 Ikhtisar Singkat Basis Data Relasional dan Aplikasi Basis Data
Basis data pertama yang diimplementasikan selama 1960-an dan 1970-an didasarkan pada file data datar atau model data hierarkis atau jaringan. Metode penyimpanan data ini relatif tidak fleksibel karena strukturnya yang kaku dan sangat bergantung pada program aplikasi untuk melakukan pemrosesan yang paling rutin sekalipun.
Pada akhir 1970-an, model database relasional yang berasal dari komunitas penelitian akademis menjadi tersedia dalam implementasi komersial seperti IBM DB2 dan Oracle. Model data relasional menentukan data yang disimpan dalam relasi yang memiliki beberapa hubungan di antara mereka (karenanya namanya relasional ).
Dalam database relasional seperti Sybase, MySQL, Oracle, IBM DB2, MS SQL Server dan MS Access, data disimpan dalam tabel terdiri dari satu atau lebih kolom (Access menyebut kolom sebagai bidang ). Data yang disimpan di setiap kolom harus dari satu tipe data seperti Karakter (kadang-kadang disebut "string"), Nomor atau Tanggal. Kumpulan nilai dari setiap kolom tabel disebut record atau baris dalam tabel.
Tabel yang berbeda dapat memiliki kolom yang sama. Fitur ini digunakan untuk secara eksplisit menentukan hubungan antara dua tabel. Nilai yang muncul di kolom A dalam satu tabel dibagikan dengan tabel lain.
Di bawah ini adalah dua contoh tabel dalam database relasional untuk bank lokal:
Tabel Pelanggan
| IDPelanggan | Nama Depan | Nama Belakang | Alamat Jalan | Kota | Negara | Zip |
|---|---|---|---|---|---|---|
| Nomor | Karakter | Karakter | Karakter | Karakter | Karakter | Karakter |
| 1001 | Joseph | Smith | 123 Lexington | Smithville | KY | 91232 |
| 1002 | Alberta | Jones | 12 Davis Ave. | Smithville | KY | 91232 |
| 1003 | Nathanial | Kapak | 443 Grinder Ln. | Broadville | GA | 81992 |
| 1004 | Paulina | Pembangun | 661 Parker Rd. | Streetville | GA | 81990 |
Tabel Akun
| IDPelanggan | Nomor Akun | Jenis Akun | Tanggal Dibuka | Saldo |
|---|---|---|---|---|
| Nomor | Nomor | Karakter | Tanggal | Nomor |
| 1001 | 9987 | Memeriksa | 10/12/1989 | 40000.00 |
| 1001 | 9980 | Penghematan | 10/12/1989 | 20000.00 |
| 1002 | 8811 | Penghematan | 01/05/1992 | 1000.00 |
| 1003 | 4422 | Memeriksa | 01/12/1994 | 6000,00 |
| 1003 | 4433 | Penghematan | 01/12/1994 | 9000.00 |
| 1004 | 3322 | Penghematan | 22/08/1994 | 500.00 |
| 1004 | 1122 | Memeriksa | 13/11/1988 | 800.00 |
Tabel Pelanggan memiliki 7 kolom (ID Pelanggan, Nama Depan, Nama Belakang, Alamat Jalan, Kota, Negara Bagian dan Kode Pos) dan 4 baris (atau catatan) data. Tabel Accounts memiliki 5 kolom (CustomerID, AccountNumber, AccountType, DateOpened dan Balance) dengan 7 baris data.
Setiap kolom sesuai dengan salah satu dari tiga tipe data dasar :Karakter, Nomor atau Tanggal. Tipe data untuk kolom menunjukkan tipe nilai data yang mungkin disimpan di kolom tersebut.
- Nomor – hanya dapat menyimpan angka, mungkin dengan titik desimal. Bisa positif atau negatif.
- Karakter – dapat menyimpan angka, huruf, dan tanda baca. Access memanggil tipe data ini Teks .
- Tanggal – hanya dapat menyimpan data tanggal dan waktu.
Dalam beberapa implementasi database ada tipe data lain seperti Gambar (untuk gambar atau data lainnya). Namun, ketiga tipe data di atas paling umum digunakan.
Perhatikan bahwa dua tabel berbagi kolom ID Pelanggan dan nilai kolom ID Pelanggan di tabel Pelanggan sama dengan nilai di kolom ID Pelanggan di tabel Akun. hubungan ini memungkinkan kami untuk menentukan bahwa Pelanggan Nathanial Axe memiliki Rekening Giro dan Tabungan yang dibuka pada hari yang sama:1 Desember 1994.
Nama lain yang diberikan untuk hubungan semacam itu adalah Master/Detail . Dalam hubungan master / detail, satu catatan master (seperti Pelanggan 1003, Nathanial Axe) dapat memiliki banyak catatan detail (dua akun) yang terkait dengannya.
Dalam hubungan Master / Detail, rekaman Master mungkin ada tanpa Detail apa pun. Namun, tidak mungkin memiliki catatan Detail tanpa catatan Master yang cocok. Misalnya, Pelanggan mungkin tidak memiliki informasi akun sama sekali. Namun, informasi akun apa pun harus dikaitkan dengan satu Pelanggan.
Setiap tabel juga harus memiliki kolom khusus yang disebut Kunci yang digunakan untuk mengidentifikasi baris atau record dalam tabel secara unik. Nilai dalam kolom kunci (atau kolom) tidak boleh diduplikasi. Pada tabel di atas, CustomerID adalah kunci untuk tabel Pelanggan sedangkan AccountNumber adalah kunci untuk tabel Akun.
3 Contoh Bisnis
Di bagian ini, kami akan menguraikan contoh bisnis yang akan digunakan sebagai dasar untuk contoh di seluruh tutorial. Dalam organisasi, tugas menganalisis bisnis dan menentukan struktur database yang sesuai (tabel dan kolom) biasanya dilakukan oleh Analis Sistem . Analis Sistem akan mengumpulkan informasi tentang bagaimana bisnis beroperasi dan akan membentuk model dari kebutuhan penyimpanan data. Dari model ini, programmer database akan membuat tabel database dan kemudian bekerja dengan pengembang aplikasi untuk mengembangkan aplikasi database lainnya.
Untuk tutorial ini, kami akan mempertimbangkan bisnis perbankan sederhana. Bank memiliki banyak nasabah yang membuka dan memelihara satu atau lebih rekening. Untuk setiap Pelanggan, kami mencatat nama dan alamat mereka. Kami juga memberi mereka ID Pelanggan yang unik. Kami menetapkan pengenal unik ini untuk kenyamanan dan akurasi. Jauh lebih mudah untuk mengidentifikasi satu pelanggan menggunakan ID Pelanggan mereka daripada dengan mencari nama dan alamat lengkap mereka. Selain itu, bank dapat memiliki dua nasabah dengan nama yang sama (misalnya, Bill Smith). Dalam kasus seperti itu, CustomerID unik selalu dapat digunakan untuk membedakannya.
Dengan cara yang sama, semua akun diberi nomor akun unik. Rekening dapat berupa rekening giro atau rekening tabungan. Rekening tabungan memperoleh bunga tetapi satu-satunya transaksi yang diperbolehkan adalah setoran dan penarikan. Rekening giro tidak mendapatkan bunga. Kami mempertahankan tanggal pembukaan akun. Ini membantu kami melacak pelanggan kami dan dapat berguna untuk tujuan pemasaran. Terakhir, kami menjaga saldo akun saat ini.
Pada bagian sebelumnya, kami memberikan struktur dan beberapa contoh data untuk tabel Pelanggan dan tabel Akun. Ini akan digunakan untuk mendukung bagian penyimpanan data dari aplikasi Perbankan kami.
Aplikasi Basis Data
Dalam aplikasi database apapun, masing-masing tabel memerlukan sarana untuk memasukkan data ke dalamnya dan untuk mengambil dan memodifikasi data di lain waktu. Cara utama untuk memasukkan data ke dalam tabel adalah dengan menggunakan formulir entri data. Cara utama untuk mendapatkan kembali data dari tabel atau untuk menampilkan data dalam tabel adalah dengan menggunakan kueri atau laporan. Dalam aplikasi database lengkap, semua formulir dan laporan ditautkan bersama dalam Formulir Navigasi – satu halaman yang akan memiliki tautan ke setiap bagian aplikasi. Aplikasi database besar mungkin memiliki lusinan formulir dan laporan entri data.
Untuk tutorial ini, kita akan membuat formulir entri data untuk setiap tabel, kueri untuk setiap tabel, dan laporan untuk setiap tabel.
Di bagian berikut, pertama-tama kami akan memperkenalkan cara memulai Access dan cara membuat database baru.
4 Memulai Microsoft Access
Seperti kebanyakan program Windows, Access dapat dijalankan dengan menavigasi menu Start di sudut kiri bawah Desktop Windows.
Untuk memulai Access, klik tombol Start, lalu menu Programs, lalu pindah ke menu Microsoft Office dan terakhir klik item menu Microsoft Access. Menu MS Office Professional ditampilkan di bawah ini.
Perhatikan bahwa susunan menu ini dapat bervariasi tergantung pada bagaimana MS Office diinstal pada PC yang Anda gunakan.
Setelah Access berjalan, layar awal akan ditampilkan:
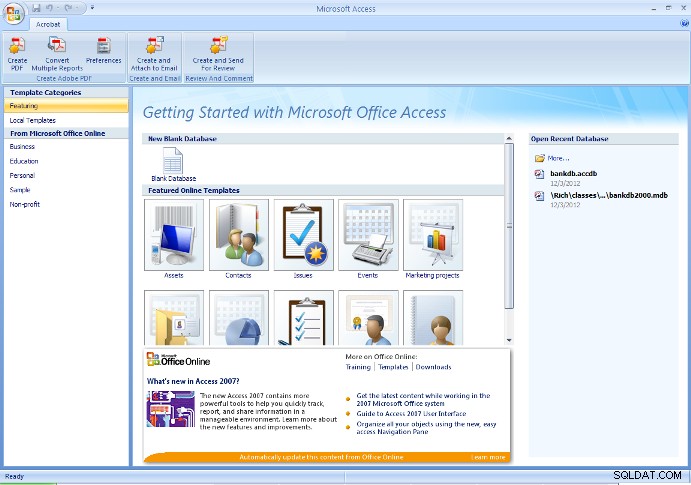
Dari layar awal ini, pengguna dapat membuat database baru (baik kosong atau dengan beberapa tabel yang dibuat dengan wizard database), atau membuka database yang sudah ada.
Secara umum, pertama kali seseorang memulai sebuah proyek, database baru yang kosong harus dibuat. Setelah itu, gunakan Buka database yang ada opsi untuk membuka kembali database yang dibuat sebelumnya.
Peringatan – Jika sebelumnya Anda telah membuat database, lalu membuatnya lagi menggunakan nama yang sama, Anda akan menimpa semua pekerjaan yang telah Anda lakukan.
Untuk tujuan tutorial ini, jika Anda akan melalui langkah-langkah ini untuk pertama kalinya, pilih opsi untuk membuat database baru yang kosong seperti yang ditunjukkan pada gambar di atas.
Di Access 2007, klik tombol Office bundar di sudut kiri atas dan pilih Baru dari menu tarik-turun. Isi Nama File sebagai bankdb.accdb dan klik tombol Create untuk membuat database seperti pada gambar di bawah ini.
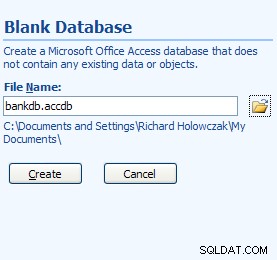
Layar Basis Data Baru untuk Access 2007
Dalam nama file di atas, bankdb adalah nama yang dipilih untuk database khusus ini dan .accdb adalah ekstensi nama file yang diberikan untuk Microsoft DataBase 2007, File 2010 dan 2013.
Disarankan untuk menjaga nama database (bankdb dalam contoh di atas) relatif pendek dan tidak menggunakan spasi atau tanda baca lain dalam nama database. Selain itu, nama database harus mencerminkan isi database.
Setelah database baru dibuat, layar Access utama berikut akan muncul:
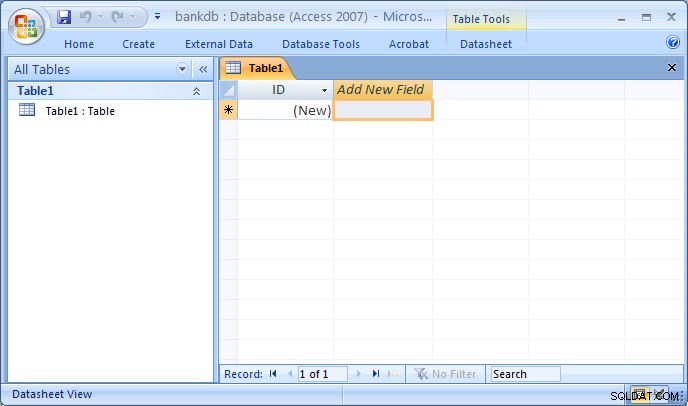
Tata letak layar untuk MS Access 2007 sangat berbeda dari versi sebelumnya. Sebagian besar tab di bagian atas layar telah diatur ulang. Selain itu, layar utama default setelah membuat database baru secara otomatis beralih ke tampilan Desain untuk membuat tabel baru.
Tab berikut akan muncul di bagian atas layar:
- Tab Beranda – Kontrol untuk mengubah font, melakukan kueri, menyalin/menempel/memotong data, dll.
- Buat tab – Kontrol untuk membuat tabel, formulir, laporan, dll.
- Tab Data Eksternal – Kontrol untuk memuat data dari sumber data lain ke MS Access.
- tab Alat Basis Data – Kontrol untuk mengelola database (keamanan, switchboard, dll.)
- Tab desain – Ini akan muncul saat mendesain tabel, formulir, laporan baru, dll.
Perhatikan bahwa antarmuka untuk Access 2007, 2010 dan 2013 semuanya serupa meskipun versi yang Anda gunakan mungkin tampak sedikit berbeda dari gambar yang disertakan dalam tutorial ini.
4.1 Tinjauan Memulai Microsoft Access
Untuk memulai Microsoft Access:
- Gunakan tombol Mulai pada bilah tugas untuk membuka:Program -> MS Office -> Microsoft Access
- Untuk membuat database baru, pilih Blank Database dan tentukan nama file baru untuk database. Pastikan untuk menggunakan nama deskriptif untuk database baru. Klik tombol OK untuk membuat database baru.
- Untuk membuka database yang ada, pilih Buka Database yang Ada , sorot File Lainnya… dan klik tombol OK. Kemudian arahkan ke drive, sorot file database yang ada di hard disk atau drive USB dan klik tombol OK lagi untuk membuka database.
Untuk keluar dari Access, tarik menu File (atau menu Office) ke bawah dan pilih item menu Keluar.
5 Membuat dan Melihat Tabel
Tabel adalah unit utama penyimpanan data di Access. Ingat bahwa tabel terdiri dari satu atau lebih kolom (atau bidang ) dan kolom tertentu dapat muncul di lebih dari satu tabel untuk menunjukkan hubungan antar tabel.
Dari contoh bisnis yang dibahas sebelumnya, kami menyimpulkan bahwa dua tabel akan cukup untuk menyimpan data tentang Pelanggan dan Rekening bank mereka . Kami sekarang memberikan petunjuk langkah demi langkah untuk membuat dua tabel ini di Access.
Ada beberapa cara untuk membuat tabel di Access. Access menyediakan penyihir yang memandu pengguna melalui pembuatan tabel dengan menyarankan nama untuk tabel dan kolom. Cara utama lainnya untuk membuat tabel adalah dengan menggunakan Design View untuk menentukan kolom (bidang) dan tipe datanya secara manual.
Meskipun menggunakan wizard adalah cara cepat untuk membuat tabel, pengguna memiliki sedikit kendali atas nama kolom (bidang) dan tipe data. Dalam tutorial ini, kami akan menjelaskan langkah-langkah membuat tabel menggunakan Design View . Siswa didorong untuk bereksperimen sendiri dengan menggunakan wizard Buat Tabel.
5.1 Membuat Tabel Menggunakan Tampilan Desain
Untuk membuat tabel di Access menggunakan Design View, lakukan langkah-langkah berikut:
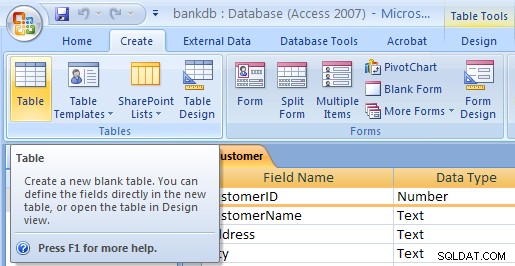
- Di Access 2007, 2010 dan 2013, tab Buat Tabel Baru seharusnya sudah disorot dan tabel baru bernama table1 telah dibuat. Jika tidak, klik Buat tab dan klik pada Tabel ikon. Kemudian tarik Tampilan menu dan pilih Tampilan Desain .

- Tampilan Desain Tabel akan muncul. Isi Nama Bidang , Jenis Data dan Deskripsi untuk setiap kolom/bidang dalam tabel. Kolom CustomerID diisi di bawah ini:
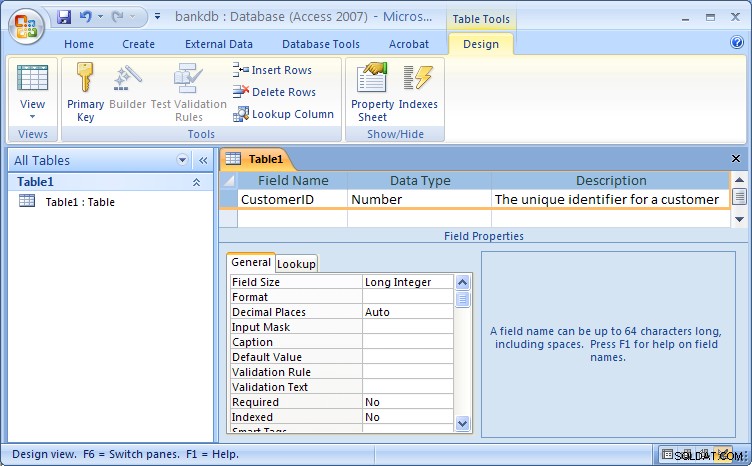
Tampilan Desain Tabel untuk Access 2007Perhatikan bahwa nama default yang diberikan untuk tabel adalah Table1 . Pada langkah selanjutnya, kami akan menetapkan nama yang sesuai untuk tabel ini.
Isi informasi untuk kolom sebagai berikut:
Nama Bidang Jenis Data Deskripsi ID Pelanggan Nomor Identifier Unik untuk Pelanggan Nama Depan Teks Nama Depan Pelanggan Nama Belakang Teks Nama Belakang Pelanggan Alamat Jalan Teks Alamat Jalan Pelanggan Kota Teks Kota Pelanggan Negara Bagian Teks Negara asal Pelanggan Zip Teks Kode Pos Pelanggan Gambar yang menunjukkan tampilan desain dengan definisi tabel baru yang diisi diberikan di bawah ini:

Langkah selanjutnya adalah menentukan Kunci untuk tabel dan menyimpan tabel.
- Sekarang semua bidang telah ditentukan untuk tabel, Kunci Utama harus ditentukan. Ingatlah bahwa Kunci Utama akan digunakan untuk mengidentifikasi catatan dalam tabel secara unik (dalam hal ini Pelanggan). Sorot ID Pelanggan bidang dan klik tombol Kunci Utama pada bilah tombol
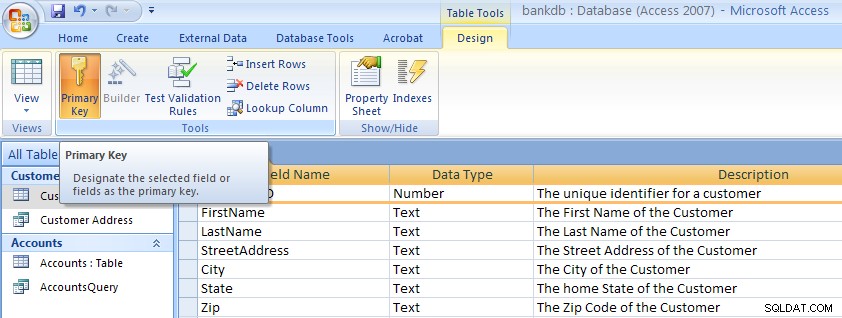 Perhatikan bahwa kunci kecil muncul di sebelah nama bidang di sisi kiri. Catatan:Untuk menghapus kunci utama , cukup ulangi prosedur ini untuk menonaktifkan kunci utama.
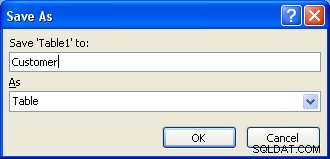
- Sebagai langkah terakhir, tabel harus disimpan. Tarik ke bawah menu Office dan pilih item menu Save As. Sebuah kotak dialog akan muncul di mana nama tabel baru harus ditentukan. Perhatikan bahwa Access memberikan nama default seperti Tabel1 atau Tabel2 . Cukup ketik nama default ini dengan nama tabel. Untuk contoh ini, beri nama tabel:Pelanggan Kemudian klik tombol OK.
Pada titik ini, tabel Pelanggan baru telah dibuat dan disimpan.
Catatan tentang penamaan bidang (Kolom) di MS Access
Saat mendefinisikan bidang (kolom) untuk tabel, penting untuk menggunakan nama bidang yang memberikan pemahaman yang jelas tentang konten data kolom. Misalnya, apakah bidang CNO menunjukkan Nomor Pelanggan atau Nomor Penampung?
Nama bidang di Access dapat berisi hingga 64 karakter dan dapat berisi spasi. Namun, penggunaan spasi pada nama bidang dan nama tabel sangat tidak disarankan . Jika Anda ingin membuat nama bidang lebih mudah dibaca, pertimbangkan untuk menggunakan karakter garis bawah untuk memisahkan kata. Namun pastikan tidak ada spasi yang muncul sebelum atau sesudah garis bawah.
Tabel berikut merangkum beberapa cara berbeda untuk memberi nama bidang:
| Deskripsi | Buruk | Bagus |
|---|---|---|
| Pengidentifikasi unik untuk pelanggan | IDK | ID Pelanggan atau ID_Pelanggan |
| Deskripsi produk | PDESC | Deskripsi Produk |
| Nomor telepon rumah karyawan | Karyawan_rumah_nomor_telepon | Telepon Rumah |
| Nomor rekening bank | BA# | Nomor Akun |
5.2 Latihan:Membuat Tabel
Buat Akun tabel dengan mengikuti langkah yang sama yang digunakan untuk membuat tabel Pelanggan.
- Klik tab Buat lalu klik Tabel tombol.
- Tarik menu Lihat ke bawah dan pilih Desain. Tampilan Desain Tabel akan muncul. Isi Nama Bidang , Jenis Data dan Deskripsi untuk setiap kolom/bidang dalam tabel Akun.
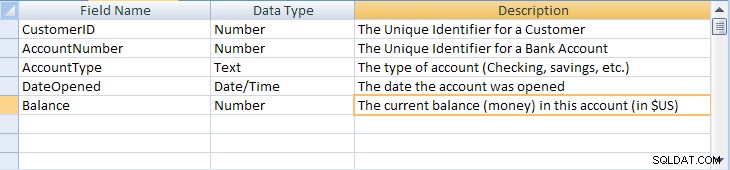
Nama Bidang Jenis Data Deskripsi ID Pelanggan Nomor Identifier Unik untuk Pelanggan Nomor Akun Nomor Pengidentifikasi Unik untuk Rekening Bank Jenis Akun Teks Jenis rekening (giro, tabungan, dll) Tanggal Dibuka Tanggal Tanggal akun dibuka Saldo Nomor Saldo saat ini (uang) di akun ini (dalam $US) Gambar yang menunjukkan tampilan desain dengan definisi tabel baru yang diisi diberikan di bawah ini:
- Tentukan Kunci Utama untuk tabel Akun. Klik AccountNumber bidang dengan Kanan tombol mouse dan pilih Kunci Utama dari menu pop-up.
- Simpan tabel Akun baru dengan menarik menu File dan memilih item menu Simpan. Isi dengan nama tabel:Akun Kemudian klik tombol OK.
Perhatikan bahwa ada sejumlah langkah tambahan yang dapat dilakukan untuk meningkatkan dan memperindah tabel di MS Access termasuk menentukan nilai default, membuat nilai pencarian, dan menutupi input data untuk mengikuti pola tertentu. Detailnya tidak penting untuk tutorial saat ini tetapi jika tertarik, lihat halaman Desain Tabel MS Access Tingkat Lanjut yang ditautkan di sini.
5.3 Melihat dan Menambahkan Data ke Tabel
Data dapat ditambahkan, dihapus atau diubah dalam tabel menggunakan tampilan seperti spreadsheet sederhana. Untuk menampilkan tampilan data satu tabel ini, sorot nama tabel, lalu klik dua kali pada nama tabel.
Dalam tampilan tabel Pelanggan ini, yang ditunjukkan pada gambar di bawah ini, bidang (kolom) muncul di bagian atas jendela dan baris atau catatan muncul di bawah. Tampilan ini mirip dengan bagaimana spreadsheet akan dirancang.
Catatan di bagian bawah jendela jumlah catatan ditampilkan. Dalam hal ini, karena tabel baru saja dibuat, hanya satu record kosong yang muncul.
Untuk menambahkan data ke tabel, cukup ketik nilai untuk setiap bidang (kolom). Tekan tombol Tab untuk berpindah antar bidang dalam catatan. Gunakan tombol panah atas dan bawah untuk berpindah antar record. Masukkan data seperti yang diberikan di bawah ini:
| IDPelanggan | Nama Depan | Nama Belakang | Alamat Jalan | Kota | Negara | Zip |
|---|---|---|---|---|---|---|
| 1001 | Joseph | Smith | 123 Lexington | Smithville | KY | 91232 |
| 1002 | Alberta | Jones | 12 Davis Ave. | Smithville | KY | 91232 |
| 1003 | Nathanial | Kapak | 443 Grinder Ln. | Broadville | GA | 81992 |
| 1004 | Paulina | Pembangun | 661 Parker Rd. | Streetville | GA | 81990 |

Untuk menyimpan data baru, tarik ke bawah menu Office dan pilih Simpan.
Untuk menavigasi ke catatan lain dalam tabel, gunakan bilah navigasi di bagian bawah layar:
Untuk mengubah data yang ada, cukup navigasikan ke catatan minat dan tab ke bidang yang sesuai. Gunakan tombol panah dan tombol hapus atau spasi mundur untuk mengubah data yang ada.
Untuk menghapus catatan, navigasikan terlebih dahulu ke catatan yang diminati. Kemudian tarik menu Edit ke bawah dan pilih item menu Hapus.
Untuk menutup tabel dan kembali ke layar utama Access, tarik menu File ke bawah dan pilih item menu Tutup.
5.4 Latihan:Menambahkan Data ke Tabel
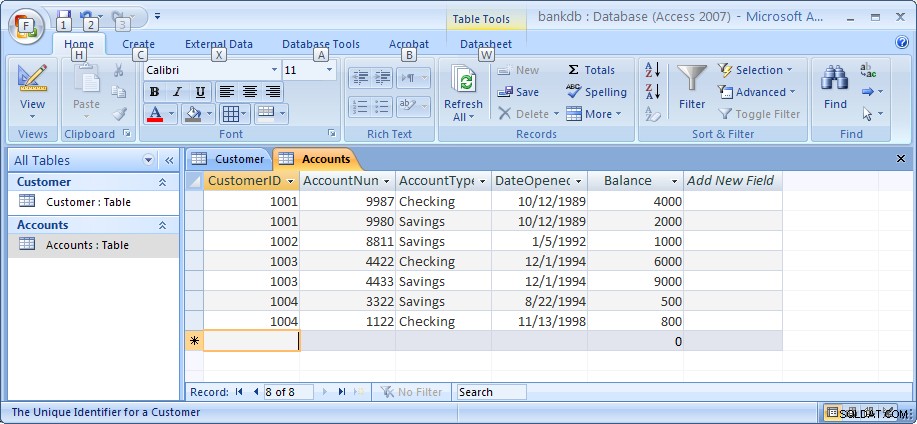
Untuk latihan ini, buka tabel Akun dan tambahkan data untuk tujuh akun yang ditunjukkan di bagian 2. Pastikan untuk memasukkan data persis seperti yang ditunjukkan termasuk kapitalisasi data di bidang Jenis Akun. mis., ketik Tabungan alih-alih tabungan atau TABUNGAN.
Perhatikan bahwa saat memasukkan tanggal, ketikkan empat digit penuh untuk tahun tersebut. Secara default, Access menampilkan semua 4 digit tahun (versi Access yang lebih lama hanya menampilkan dua digit).
Pastikan untuk menyimpan data setelah Anda selesai. Gambar di bawah ini menunjukkan tabel Akun dan data yang seharusnya muncul saat Anda selesai dengan latihan ini.
Pada titik ini dalam tutorial, kami telah membuat dua tabel, Pelanggan dan Akun, dan menambahkan data ke masing-masing tabel. Di bagian berikutnya, kami akan membahas cara membuat kueri dan melaporkan data dalam tabel dan cara membuat formulir entri data yang mudah digunakan menggunakan wizard Access.
Catatan:Tutorial saya tentang Desain Tabel Tingkat Lanjut MS Access dapat ditemukan di tautan ini. Anda mungkin ingin memeriksanya setelah menyelesaikan sisa tutorial ini.
5.5 Membuat Hubungan Antar Tabel
Ingat bahwa salah satu karakteristik utama dari database relasional adalah kenyataan bahwa semua tabel terkait satu sama lain. Dalam database Bank sejauh ini, tabel Pelanggan terkait dengan tabel Akun berdasarkan bidang ID Pelanggan yang muncul di kedua tabel. Access memiliki cara untuk membuat hubungan ini eksplisit menggunakan layar Hubungan. Access menggunakan informasi ini saat mendesain laporan, formulir, dan kueri yang memerlukan lebih dari satu tabel untuk ditampilkan.
Untuk memulai, pastikan tabel Akun dan tabel Pelanggan ditutup. Access akan menghentikan pembuatan hubungan apa pun jika tabel saat ini dibuka. Untuk menutup tabel, klik kanan nama tabel di tab di atas tabel dan pilih item menu tutup, atau klik X kecil di kanan atas tabel.

Selanjutnya, tampilkan layar Relasi dengan mengklik tab Database Tools kemudian klik tombol Relasi seperti gambar di bawah ini. 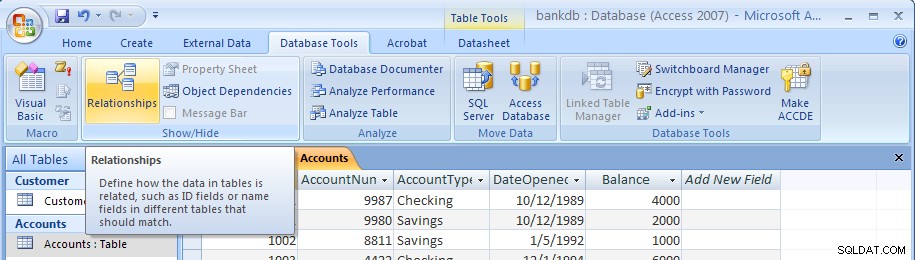
Layar Hubungan kosong akan muncul sebagai berikut:
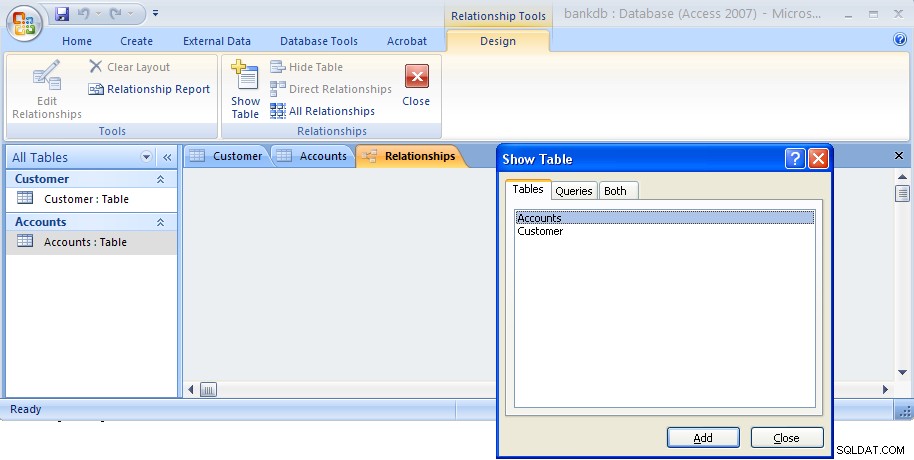
Kotak dialog Perlihatkan Tabel akan muncul secara default. Sorot tabel Pelanggan dan tabel Akun seperti yang ditunjukkan di bawah ini, lalu klik tombol Tambah.

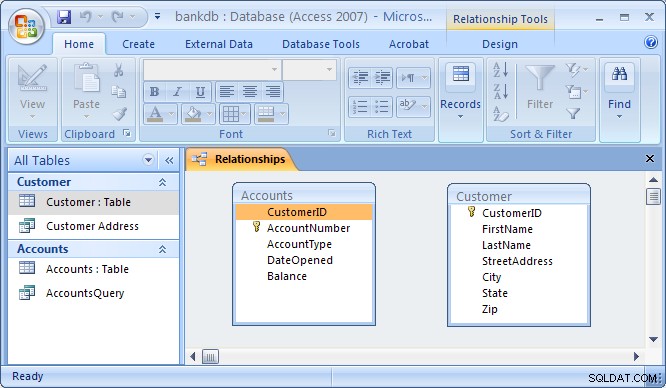
Kemudian klik tombol Tutup untuk menutup kotak dialog ini. Layar Hubungan sekarang akan muncul kembali dengan dua tabel yang ditampilkan seperti di bawah ini:
Untuk menghubungkan tabel Pelanggan dengan tabel Akun untuk membentuk hubungan, klik bidang ID Pelanggan di tabel Pelanggan dan seret ke atas bidang ID Pelanggan pada tabel Akun. Setelah melepaskan tombol mouse, kotak dialog Edit Hubungan akan muncul seperti di bawah ini:
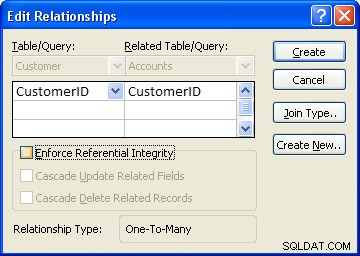
Access akan melakukan yang terbaik untuk menentukan Jenis Hubungan (hampir selalu memilih Satu-ke-Banyak ). Untuk contoh ini, Access mengetahui bahwa ID Pelanggan adalah kunci dari tabel Pelanggan sehingga memilih bidang ini sebagai sisi "Satu". This makes the Accounts table the “Many” side as One customer may have Many accounts.
One additional step to be taken is the check off the box labeled “Enforce Referential Integrity”. This option puts constraints into effect such that an Accounts record can not be created without a valid Customer record, and Access will also prevent a user from deleting a Customer record if a related Accounts record exists. At this point, click on the Create button to create the relationship. The Relationships screen should reappear with the new relationship in place as follows:
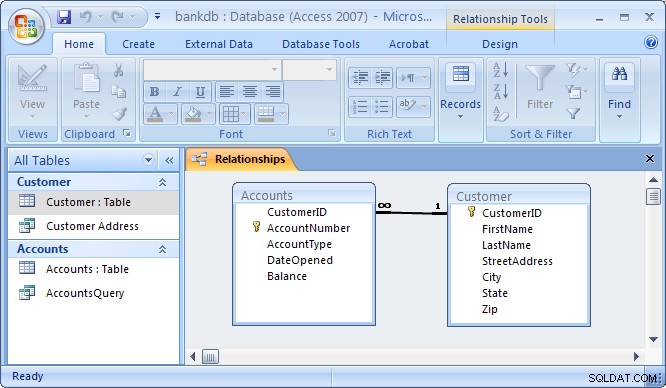
Note the symbols “1” (indicating the “One” side) and the infinity symbol (indicating the “Many” side) on the relationship. Close the relationships screen and select Yes to save the changes to the Relationships layout.
If the relationship does not appear in the above fashion, highlight it and press the delete key to delete it. Then go back to the table design view and make certain that the CustomerID field is designated as the key of the Customers table. Then go back to the Relationships screen and try to recreate the relationship.
5.6 Review of Creating and Viewing Tables
Creating a new table requires the following steps:
- Click on the Tables tab on the Access main screen
- Click on the New button.
- Choose the Design View and click the OK button.
- Fill in the name, data type and description of each of the fields in the table.
- Designate a primary key by clicking on one of the fields with the right mouse button and then choose Primary Key from the pop-up menu.
- Save the table by pulling down the File menu and choosing Save.
- Close the new table by pulling down the File menu and choosing Close.
To change the design of an existing table (e.g., to add, change or delete a field):
- Click on the Tables tab on the Access main screen
- Highlight the name of the table to be modified and click on the Design button.
- Make the necessary changes.
- Save the table by pulling down the File menu and choosing Save.
- Close the table by pulling down the File menu and choosing Close.
To add, delete or change data in an existing table:
- Click on the Tables tab on the Access main screen
- Highlight the name of the table to be modified and click on the Open button.
- Make the necessary changes to the data.
- Save the table data by pulling down the File menu and choosing Save.
- Close the table by pulling down the File menu and choosing Close.
To create or edit relationships between tables:
- Pull down the Tools menu and select the Relationships menu item.
- To display tables, right click and choose Add Tables
- To create new relationships, drag a key field from one table and drop it on the associated field in another table
- To edit an existing relationship, double click on the relationship line.
- To delete an existing relationship, click on the relationship line and press the delete key.
6 Creating and Running Queries
Queries are a fundamental means of accessing and displaying data from tables. Queries can access a single table or multiple tables. Examples of queries for our bank database might include:
- Which Customers live in Georgia ?
- Which Accounts have less than a $500 balance ?
- What is the total amount of money deposited by each Cusomter?
- Which Checking account has the largest balance?
Queries can be used to carry out other tasks such as for creating formatted reports and data entry forms, and for exporting subsets of data to Excel or another software program.
In this section, we show how to use the Access Wizards to create queries for a single table and for multiple tables.
6.1 Single Table Queries
In this section, we demonstrate how to query a single table. Single table queries are useful to gain a view of the data in a table that:
- only displays certain fields (columns) in the output
- sorts the records in a particular order
- performs some statistics on the records such as calculating the sum of data values in a column or counting the number of records, or
- filters the records by showing only those records that match some criteria. For example, show only those bank customers living in GA.
Creating a query can be accomplished by using either the query design view or the Query wizard. In the following example, we will use the query wizard to create a query.
To create a new query, click on the Create tab. Then click on the Query wizard button.
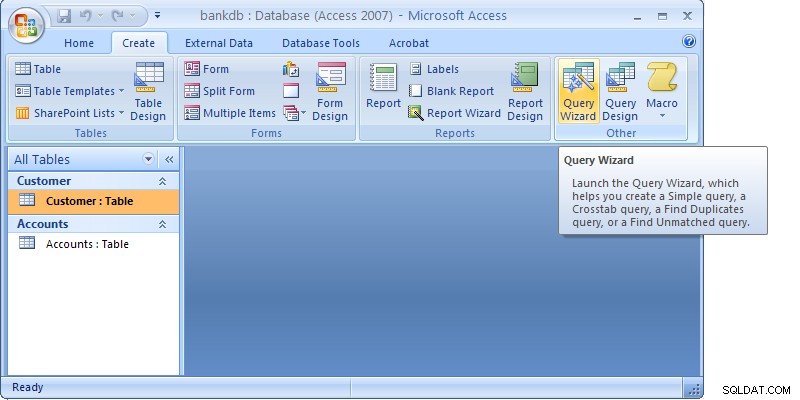
When the Query wizard appears, highlight the Simple Query Wizard selection and click on the OK button.
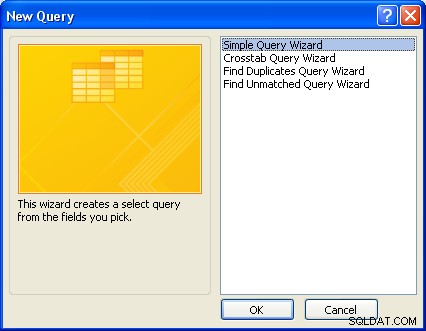
The first step in the Simple Query wizard is to specify the table for the query and which fields (columns) should be displayed in the query output. Three main sections of this step are:
- Tables/Queries – A pick list of tables or queries you have created.
- Available Fields – Those fields from the table that can be displayed.
- Selected Fields – Those fields from the table that will be displayed.
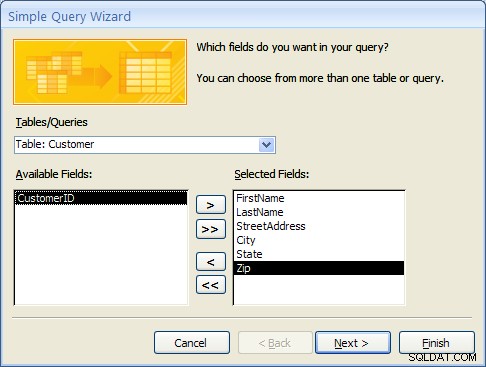
For this example, pull down the Tables/Queries list and choose the Customer table. Notice that the available fields change to list only those fields in the Customer table. This step is shown below:

From the list of Available fields on the left, move the FirstName, LastName, StreetAddress, City and State fields over to the Selected Fields area on the right. Highlight one of the fields and then click on the right arrow button  in the center between the two areas. Repeat this for each of the four fields to be displayed. When done with this step, the wizard should appear as below:
Click on the Next button to move to the next and final step in the Simple Query wizard.
In the final step, give your new query a name. For this example, name the query:Customer Address
At this point, the wizard will create the new query with the option to either:
- Open the query to view information – that is, the wizard will execute the query and show the data.
- Modify the query design – the wizard will switch to the Design View to allow further modification of the query.
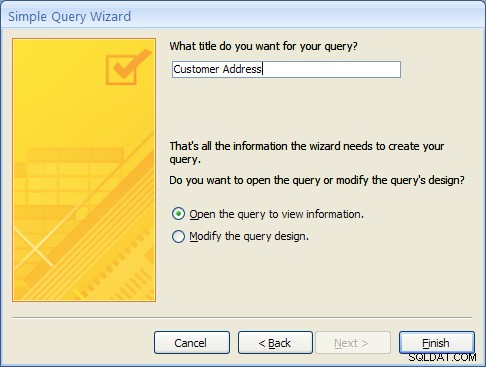
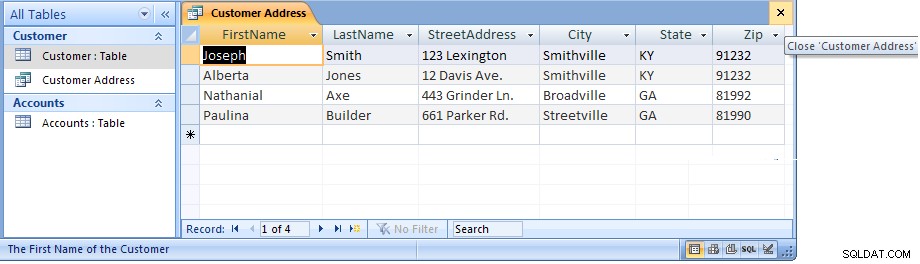
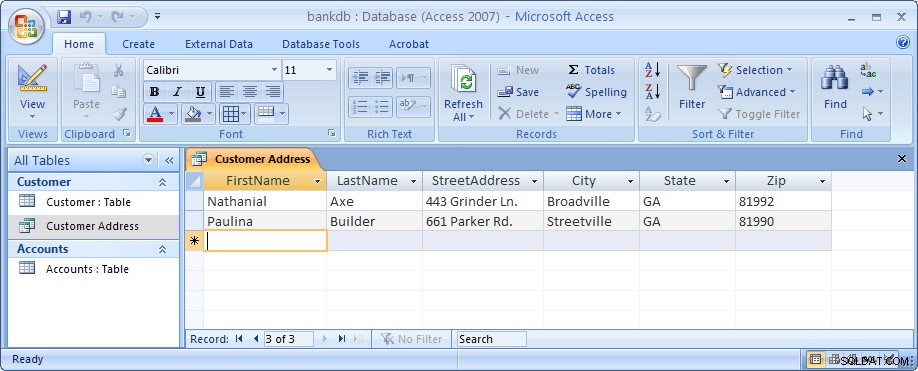
For this example, choose Open the query to view information and click on the Finish button. When this query executes, only the customer’s name, address, city and state fields appear, however, all of the rows appear as shown in the figure below:

Close this query by clicking on the X in the upper right corner of the query results as shown in the figure below:
The Access main screen showing the Queries tab should appear. Note the new query Customer Address appears under the Customers table.
6.1 Single Table Queries (Continued)
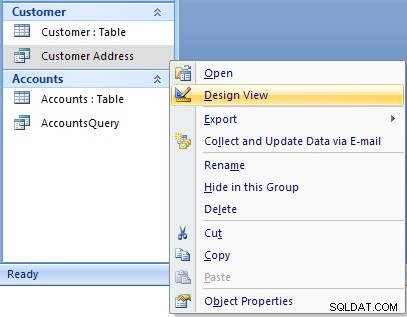
In the following example, we will modify the Customer Address query to only display customers in a certain state. To accomplish this, we will make use of the Query Design View.
Open up the Customer Address query in the design view by right-clicking on the name of the query. Then select the Design View menu item as shown below.
The design view will appear as in the figure below:
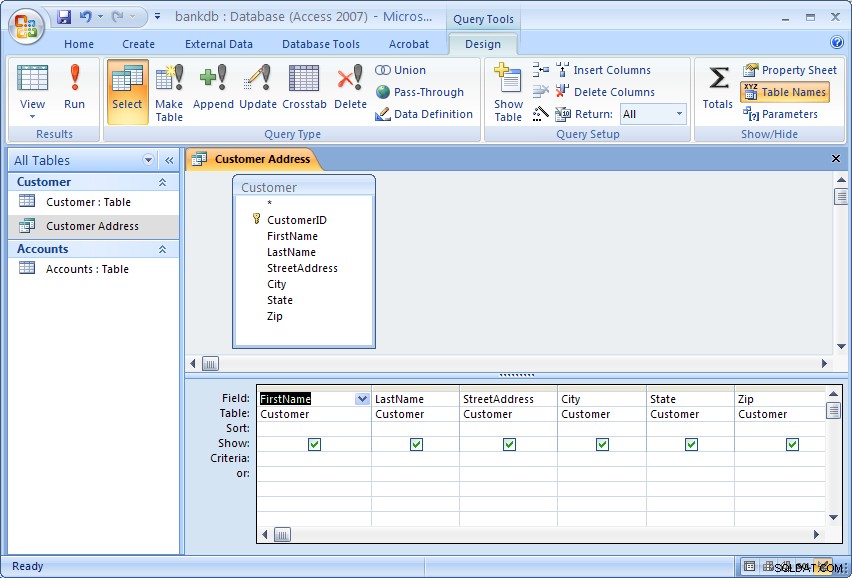
The Query Design view has two major sections. In the top section, the table(s) used for the query are displayed along with the available fields. In the bottom section, those fields that have been selected for use in the query are displayed.
Each field has several options associated with it:
- Field – The name of the field from the table
- Table – The table the field comes from
- Sort – The order in which to sort on this field (Ascending, Descending or Not Sorted)
- Show – Whether or not to display this field in the query output
- Criteria – Indicates how to filter the records in the query output.
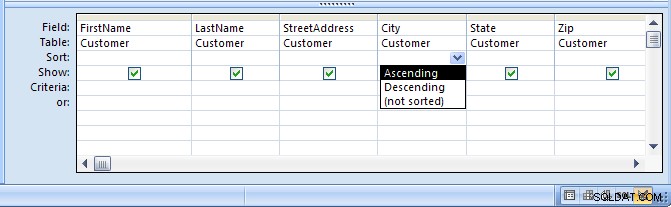
For this example, we will filter the records to only display those customers living in the State of Georgia (GA). We will also sort the records on the City field.
To sort the records on the City field, click in the Sort area beneath the City field. Choose Ascending from the list as shown in the figure below:
To filter the output to only display Customers in Georgia, click in the Criteria area beneath the State field and type the following statement: ='GA'
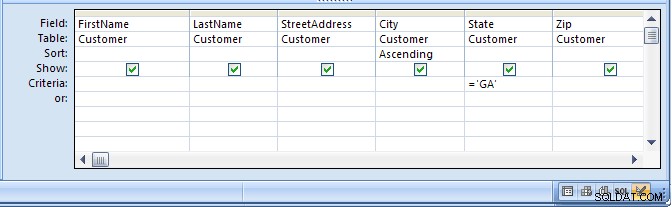
The ='GA' statement tells Access to only show those records where the value of the State field is equal to ‘GA’. Note the use of single quotes to surround the characters.
Run the query by clicking on the Run button (with the large red exclamation point). The output is shown in the figure below:
Finally, save and close this query to return to the Access main screen.
6.2 Exercise:Single Table Queries
For this exercise, use the Simple Query wizard to create a query on the Accounts table showing just the AccountNumber, AccountType and Balance fields.
- From the Access main screen, click on the Create tab. Then click on the Query Wizard button.
- Choose the Simple Query wizard option and click on the OK button.
- Under Table/Queries:choose the Accounts table. Then move the AccountNumber, AccountType and Balance fields over to the Selected fields area. Then click the Next button.
- In the next panel, you will be asked to choose between a detail or summary query. Choose detailed query and click on the Next button.
- Name the new Query :AccountsQuery and click on the Finish button.
The output is shown below:

Close this query by pulling down the Office menu and choosing Close.
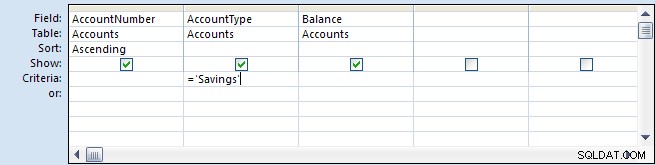
In the next part of the exercise, we will modify the query to sort the output on the account number and only display the Savings accounts.
- From the Queries tab on the Access main screen, highlight the AccountsQuery and click on the Design button.
- Change the Sort order for the AccountNumber field to Ascending.Add the following statement to the Criteria:are under the AccountType field:=‘Savings’
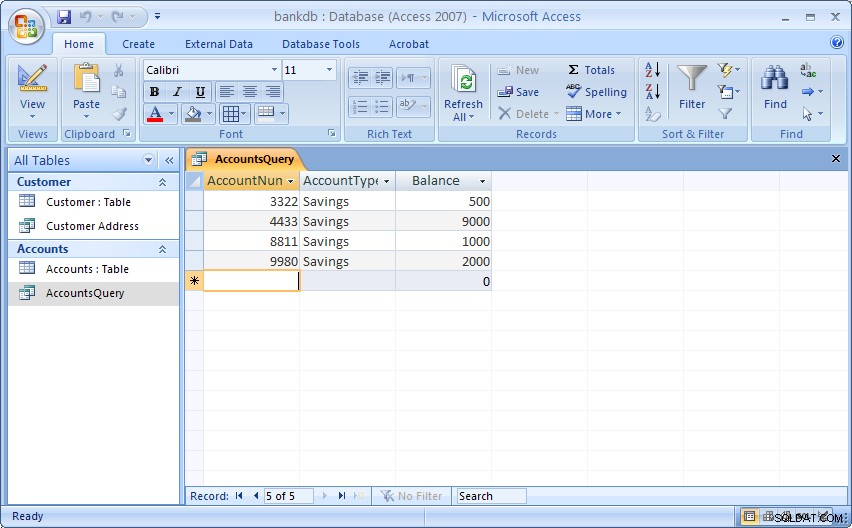
- Run the query by double-clicking on the AccountsQuery name. The output is shown below:
- Finally, save and close the query to return to the Access main screen.
6.3 Multiple Table Queries
Up to this point, queries involving only one table have been demonstrated. It is almost a given that queries will need to involve more than one table. For this example, assume that a manager would like to see a list of all of the customers and the type of account(s) that each one maintains at the bank. Such a query requires data from both the Customers table as well as the Accounts table. In such queries, Access will rely on the Relationships established between tables to guide how the data will be assembled to satisfy the query.
Before proceeding with these next instructions, make certain the One-to-Many relationship between the Customers and Accounts table has been created (see section 5.5 Creating Relationships for a review of this process).
To start the process of creating a multiple table query, highlight the Create tab and click on the Query Wizard button to create a new query. Select the “Simple Query Wizard” option as was done previously.
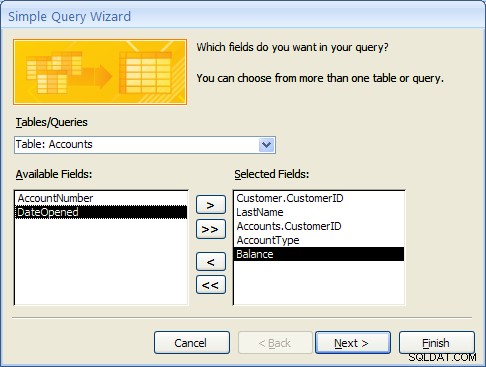
When the simple query wizard appears, select the CustomerID and LastName fields from the Customers table, then switch the Tables/Queries selection to the Accounts table and select the CustomerID, AccountType and Balance fields from the Accounts table. The result from this step is down below:
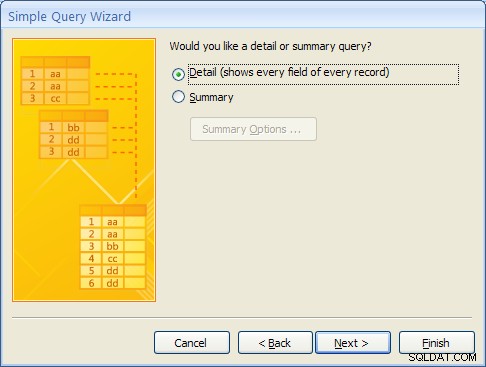
Click the Next button to continue. In the next step of the wizard, an option will appear to provide some level of Summary. For this example, leave the default at “Detail …” as shown below and then click on the Next button.
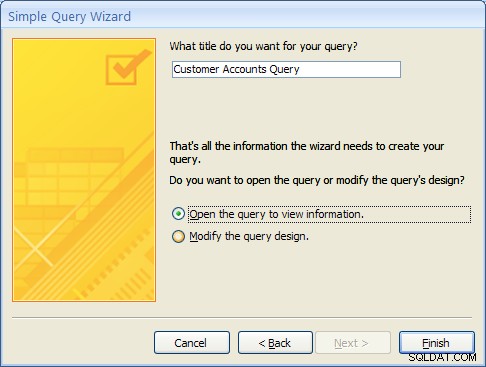
In the final step of the wizard, name the query “Customer Accounts Query” and click on the Finish button. The multiple table query results should appear as follows:
MS Access knows how to line up (or “join”) the accounts table to the Customer table for this query due to the relationship that was created when the tables were first defined.
As with single table queries demonstrated previously, one can change the query definition in design view by adding filters (e.g., show account information for all customers in ‘GA’).
6.4 Exercise:Multiple Table Queries
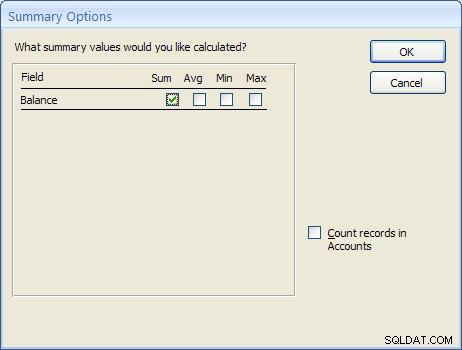
For this exercise, create a new query called “Accounts Summary Query” that joins the Customers table (include the CustomerID and LastName fields) with the Accounts table (include the Balance field only). In the second step of the wizard, click on the Summary choice (instead of Details) and then click on the Summary Options… button. Check off all of the Summary option boxes such as Sum , AVG , Min and Max as shown in the figure below:
The resulting query should appear as follows:
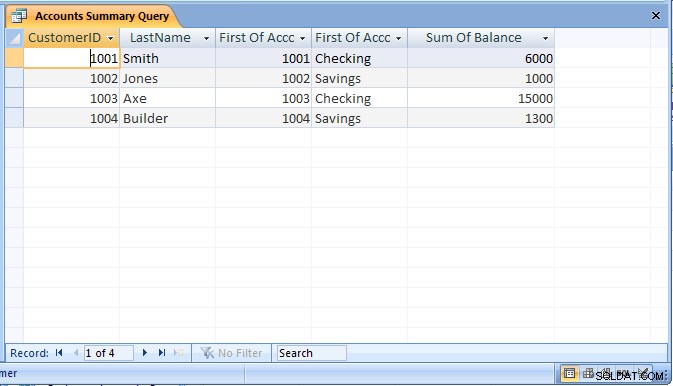
Be sure to save the query as “Accounts Summary Query”.
6.5 Review of Creating and Running Queries
In this section, the basic steps for creating and running queries were introduced. The query wizard can be used to create simple queries that access a single table. It is also possible to then modify the query to sort or filter the records.
Creating a query using the query wizard:
- From the Access main screen, click on the Queries tab. Then click on the New button.
- From the Queries tab on the main Access screen, click on the New button and choose the Simple Query wizard option.
- Under Table/Queries:choose the appropriate table for the query and then indicate which fields in the table will appear in the query output.If querying more than one table, change the Table/Queries:selection to display additional tables and select the necessary fields.
- If the table contains numeric fields, either detailed or summary information may be specified for the query.
- Finally, name the new query and click on the Finish button.
As a final note, Forms and Reports can be created based on existing queries.
7 Creating and Running a Data Entry Form
Data entry forms are the primary means of entering data into tables in the database. In a previous section, we described how to add data to a table using a spreadsheet-like view of the data. Data entry forms offer a more user-friendly interface by adding labels for each field and other helpful information.
Access provides several different ways of creating data entry forms. These include:
- Creating the forms by hand using a Design View
- Creating a default form based on all of the fields available in a table or a query
- Creating a form based on a number of different wizards that walk the user through the forms creation process.
As with queries, a data entry form can be based on a single table or it can work on multiple tables at the same time.
In this section, we cover the basic steps for using a wizard to create a data entry form based on a single table. After this exercise, a multiple-table form is demonstrated.
7.1 Creating a Single Table Form using the Wizard
In this example, we will create a simple data entry form for the Customer table. To begin the process, click on the Create tab on the Access main screen. As with the other components in Access, there are buttons for creating a New form, Open an existing form and Design an existing form. For this example, click on the New button to create a new form.
Several buttons for creating a new form will appear. For this tutorial, choose the Form wizard.
In the first step of the Form wizard, we need to specify the fields from the Customer table that will appear on the form. In this case, we want all of the fields to appear. Move each of the fields from the Available Fields side over to the Selected Fields side as in the following figure. Then click on the Next button.

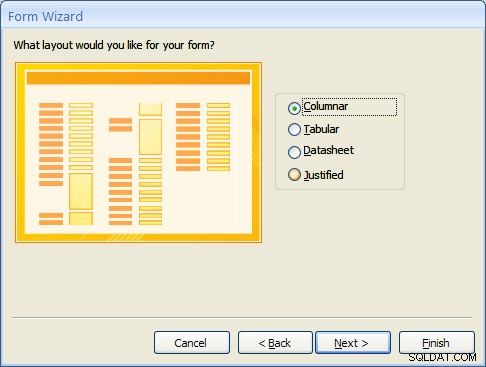
Forms can have several different layouts or arrangement of the labels and fields on the screen.
- Columnar – Places the labels to the left of each field. This is similar to a paper form. This layout is suitable for viewing data one record at a time.
- Tabular – Places the field labels at the top of the screen and the records are displayed below. This is similar to how a spreadsheet would display the data and is suitable for displaying multiple records of data at a time.
- Datasheet – The data appears in the same fashion as when viewing or adding data to a table.
- Justified – Places the labels above each field with the fields spread out on the form. This is suitable for viewing a single record at a time as with the columnar layout.
For this example, choose the columnar layout as shown in the figure below and click on the Next button.
At this point, MS Access 2007 and 2010/2013 versions are a bit different. Access 2007 will show several sample display styles that determine how the form will appear, including elements such as fonts, colors and the background used in the form. Access 2010 and 2013 skips this step in this wizard and provides styles that can be applied to the form in Design mode. For this example, for MS Access 2007, select the Office style as shown below and click on the Next button.

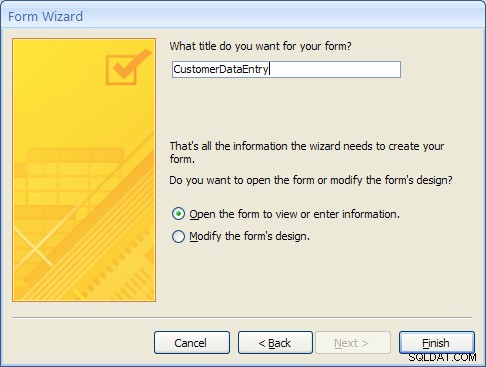
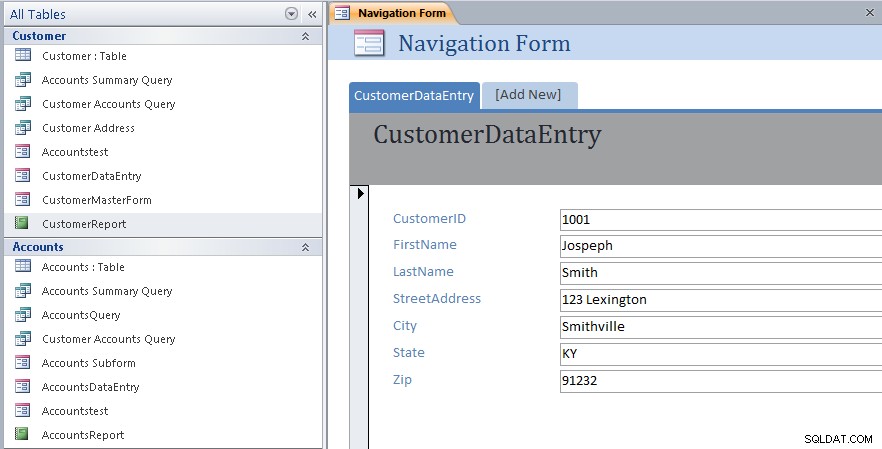
As a final step, give this new form the name:CustomerDataEntry and then click on the Finish button as shown below:
The new form will be created by the wizard and then opened. It should appear as in the figure below:
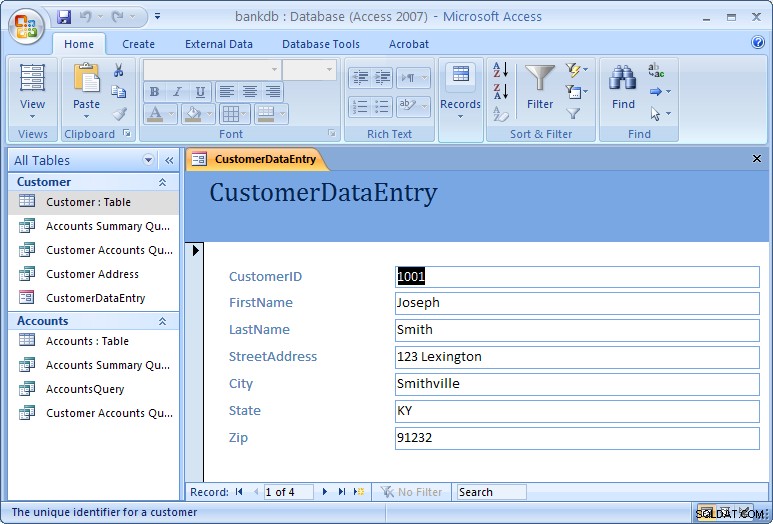
Use the tab key to navigate between fields in the form. To move to the next or previous record, use the record navigation bar at the bottom of the form:
The buttons on the navigation bar perform the following functions:
 | Go to the first record. |
 | Go to the previous record. |
 | Go to the next record. |
 | Go to the last record.  Go past the last record to add a new record. Go past the last record to add a new record. |
To close the form and return to the Access main screen, pull down the File menu and choose Close.
To open the form at any time, highlight the form name under the Forms tab on the Access main screen and click on the Open button.
One quick final note on forms. When the form is created, MS Access looks at how the table is designed and creates the form based on the properties of the table. If you make any changes to the table, you will need to re-create the form again in order to see those table changes reflected in the form. One example where this might happen is is if you change a column in your table from a text box to a combo box, or if you add or remove any columns from your table.
7.2 Exercise:Creating a Single Table Form
For this exercise, we will create a data entry form for the Accounts table created in a previous exercise.
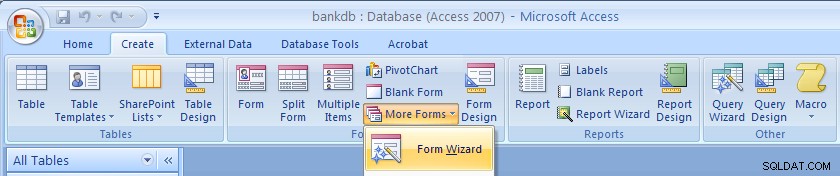
- Click on the Create tab on the Access main screen and then click on the More Forms… button and the “Forms Wizard” to create a new form.
- Select the Accounts table and all of the available fields and click on the Next button.
- Choose a Tabular layout and click on the Next button.
- For Access 2007 choose the Office style and click on the Next button.
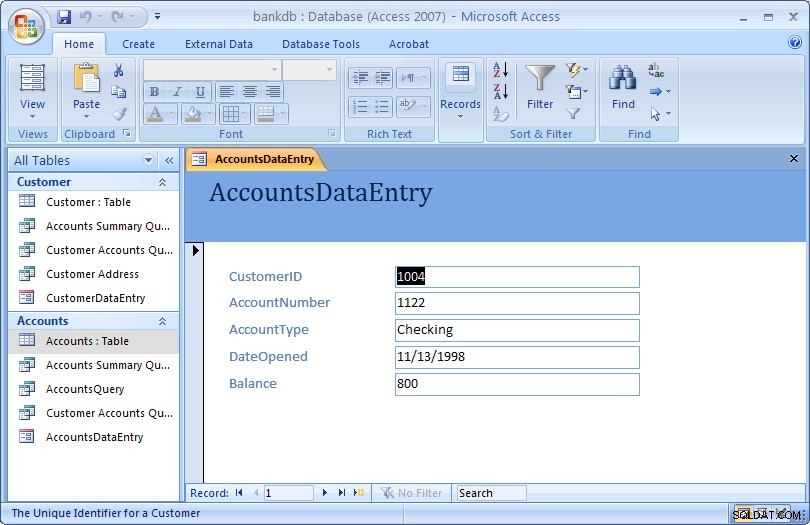
- Name the form:AccountsDataEntry Then click on the Finish button to create, save and view the new form.
The new form is shown in the figure below:
Close the form and return to the Access main screen, by pulling down the File (or Office) menu and choosing Close.
7.3 Review of Creating and Running a Data Entry Form
The basic steps for creating a simple data entry form are:
- Choose a table and a form wizard
- Specify the fields (columns) that will appear in the form
- Specify the layout for the form
- Specify the style (fonts/colors, etc.) for the form
- Save, create and run the new form
In this section we covered the basic steps required to create and run a data entry form. Access provides wizards which are adept at building simple forms with a minimal amount of work. More advanced work on forms would concentrate on using the Design View to change a form’s appearance and to add or remove fields and labels once a form is created. A more advanced tutorial on MS Access Forms Design is linked here.
8 Creating and Running a Report
Reports are similar to queries in that they retrieve data from one or more tables and display the records. Unlike queries, however, reports add formatting to the output including fonts, colors, backgrounds and other features. Reports are often printed out on paper rather than just viewed on the screen. They can also be attached to e-mail and exported and posted as web pages.
As with data entry forms, there are a number of ways to create reports in MS Access:
- A report can be created “by hand” in Design view
- A default report can be created automatically based on all of the firleds for a given table.
- A report can be created using the Create Report wizard.
In this section, we cover how to create simple reports using the Report wizard.
8.1 Creating a Single Table Report using the Wizard
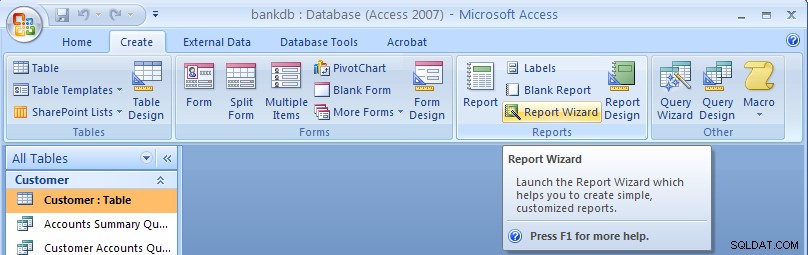
In this example, we will create a simple report for a single table using the Report wizard. As with the Queries and Forms, we begin by selecting the Create tab from the Access main screen.
To create a new report, click on the Report Wizard button.
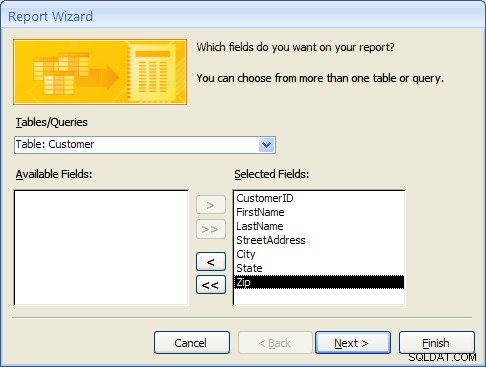
In the next step of the Report wizard, is used to specify the fields from the Customer table that will appear on the report. In this case, we want all of the fields to appear. Move each of the fields from the Available Fields side over to the Selected Fields side as in the following figure. Then click on the Next button.
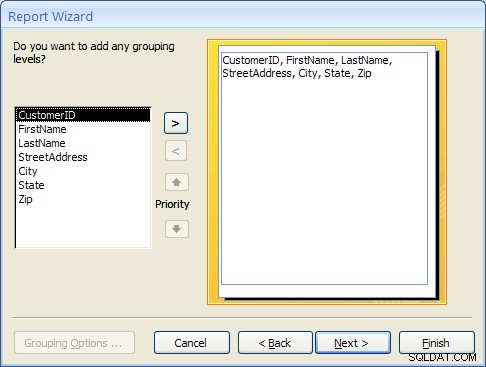
In the next step, we have the opportunity to add Grouping Levels to the report. A grouping level is where several records have the same value for a given field and we only display the value for the first records. In this case, we will not use any grouping levels so simply click on the Next button as shown below.
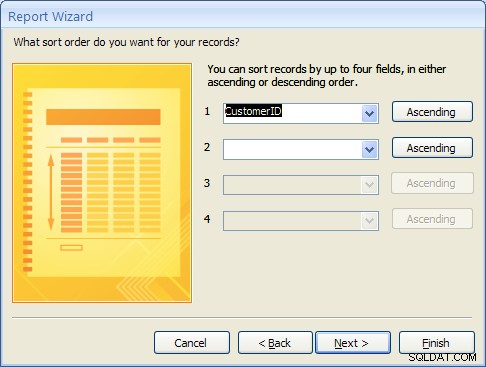
In the next step, the sorting order of the report can be specified. For this example, we will sort the records on the CustomerID field. To achieve this, pull down the list box next to the number 1:and choose the CustomerID field as shown in the figure below. Then click on the Next button.
8.1 Creating a Single Table Report using the Wizard (Continued)
The next step is to specify the layout of the report. The three options are:
- Columnar – Places the labels to the left of each field. This is similar to a paper form.
- Tabular – Places the field labels at the top of the report page and the records are displayed below. This is similar to how a spreadsheet would display the data.
- Justified – Places the labels above each field with the fields spread out on the report page.
Generally, reports use the tabular layout. For this example, choose Tabular layout and set the page Orientation to Landscape so that all of the fields will fit across one page. This is shown in the figure below. Click on the Next button to continue.

In the next step, the style of the report can be selected. For this example, choose the Office style and click on the Next button to continue.

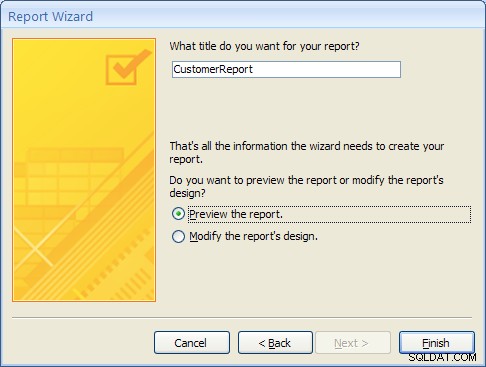
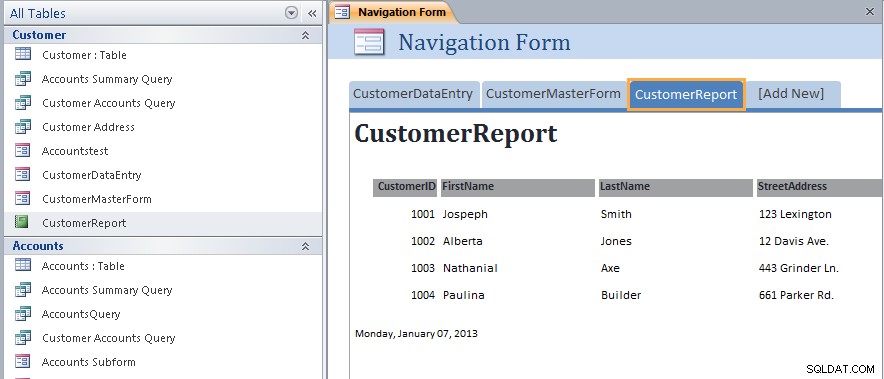
Finally, give a name for the new report:CustomerReport and then click on the Finish button to create, save and display the new report.
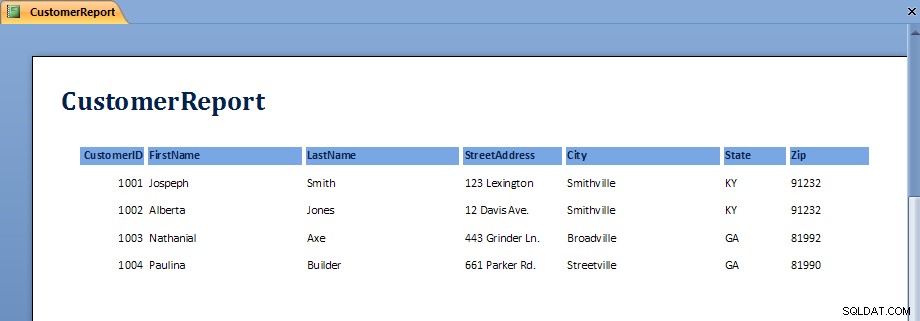
The output from the report is shown in the figure below. Note that on some screens, the last field, Zip, may not display without scrolling over to the right.
Once the report is displayed, it can be viewed, printed or transferred into Microsoft Word or Microsoft Excel. The button bar across the top of the screen has the following functions:
 | Print the report |
 | Zoom into a region of the report |
 | Display the report as one, two or multiple pages |
 | Zoom into or out of the report |
 | Transfer the report into MS Word |
 | Close the report |
To close the report and return to the Access main screen, click on the Close button.
8.2 Exercise:Creating a Single Table Report
For this exercise, we will create a report showing all of the Accounts information.
- From the Access main screen, click on the Create tab and Click on the Report wizard.
- Select all of the fields in the Accounts table by moving them all over to the Selected Fields side and then click Next
- Group the report by CustomerID by clicking on the CustomerID field and then clicking on the right arrow button. This is shown in the following figure:
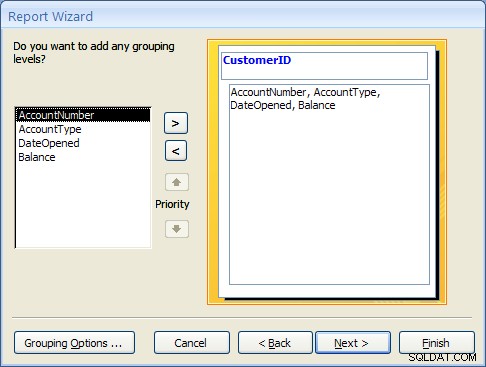
Click on the Next button to continue. - Choose to sort the report on the AccountNumber field. Note that a new button will appear called Summary Options.
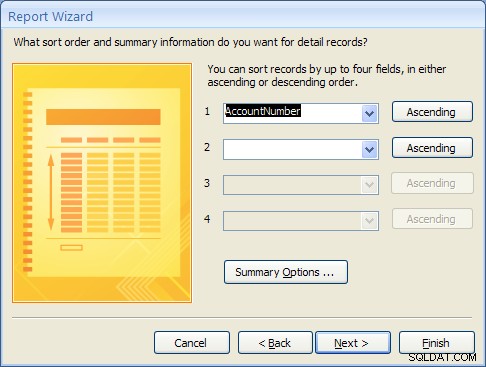
Click on the Summary Options button. Choose the Balance field and select the Sum option. Choose the option to show both Detail and Summary data. Then click on the OK button.

Click on the Next button. - Choose a Block layout and click on the Next button.
- Choose the Corporate style and the click on the Next button.
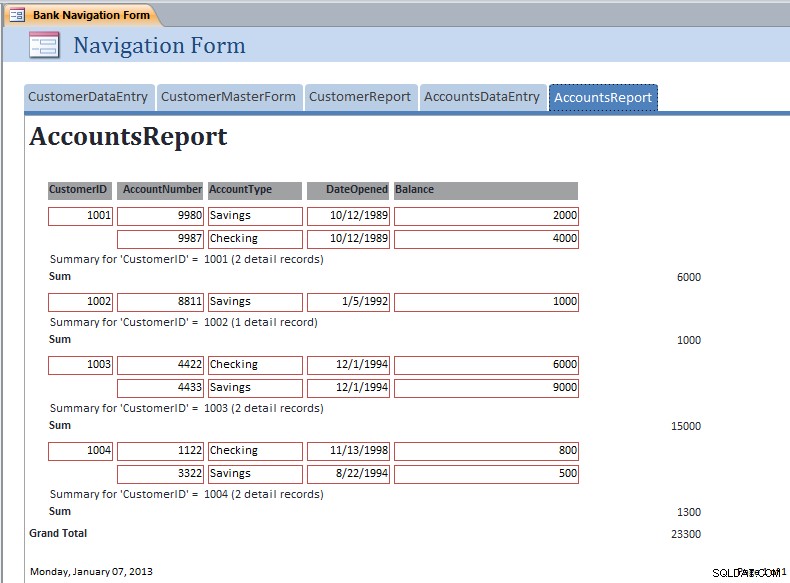
- Finally, name the report:AccountsReport and click on the Finish button to create, save and run the report.
The output from the AccountsReport is shown below:
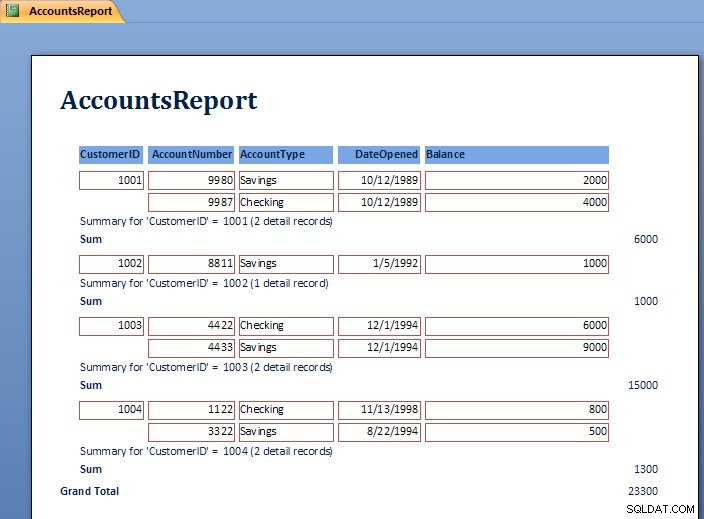
Note the Grouping at the level of the CustomerID and the Sum for each customer’s balances.
To close the report and return to the Access main screen, pull down the File menu and choose Close.
8.3 Review of Creating and Running a Report
As can be seen in the report exercise, there are many ways to create reports to show summation, sorting and layout of the data. Further study of Reports will show how to modify the layout using the Design View. Students are encouraged to work with the Report wizards to create different styles and types of reports.
9 Creating and Running a Master/Detail Form
Master/Detail forms are used to display data from two tables at the same time. MS Access calls the “details” a “subform”. The forms are linked according to the relationship between the tables. Recall that in the example database, the CustomerID is used to link the Customer table (Master) to the Accounts table (Detail). In this section a master / detail form for the Customer and Accounts tables will be created.
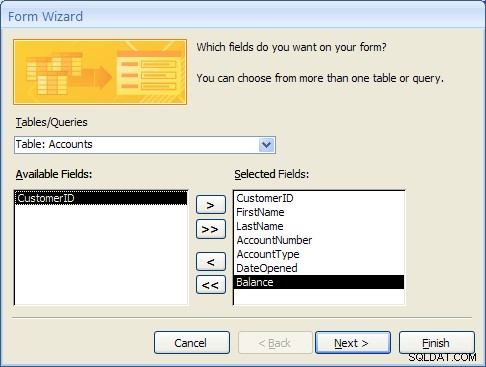
- From the Access main screen, click on the Create tab and Click on the “More Forms…” section and finally the “Forms Wizard”.Select the Customer table first and move the CustomerID, FirstName and LastName fields to the Selected Fields list.Next, select the Accounts table and move the AccountNumber, AccountType, DateOpened and Balance fields to the Selected Fields list as shown below.
Click the Next… button to move to the next step. - At this point MS Access detects that this form will involve data from two different tables. The first prompt asks how the form should be organized at the top or “Master” level. The “by Customer” selection should be highlighted.The second prompt asks how the forms should be created. For this example, select “Form with Subform(s)” as shown below and click the Next… button to move to the next step.
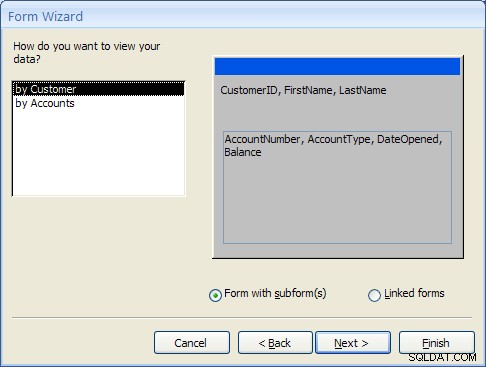
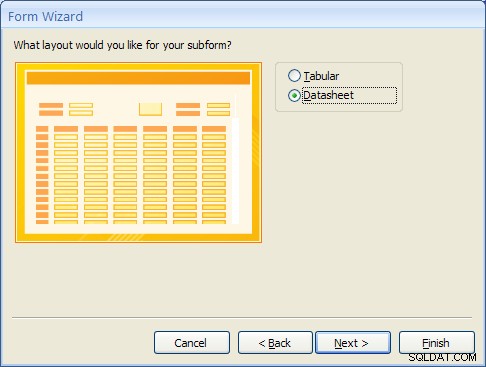
- The Subform is the form that will display the detailed data from the Accounts table. Selecting the “Datasheet” layout will make it easy for the user to view the multiple accounts a Customer may have. Select “Datasheet” and click the Next… button to move to the next step.
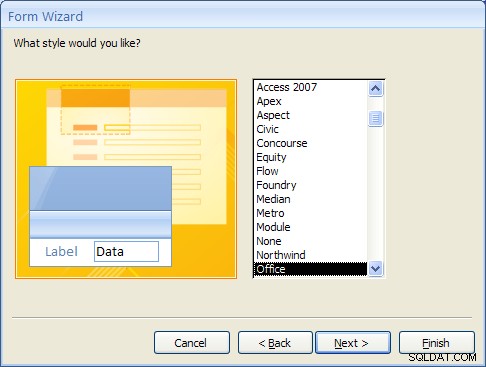
- For Access 2007, select the Office style and click the Next… button to move to the next step. (This step will not appear in MS Access 2010 or 2013).
- Finally, give the main form the name “CustomerMasterForm” and the Subform the name “Accounts Subform”.
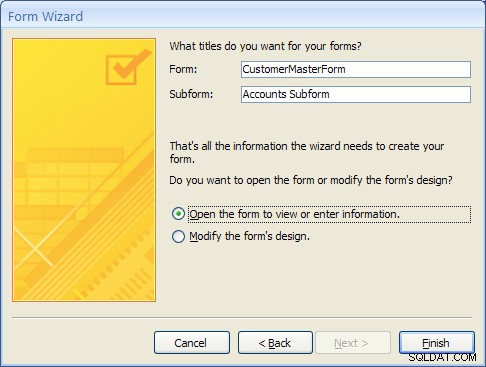
- After clicking on the Finish button the new Master/Detail form will appear as shown below.
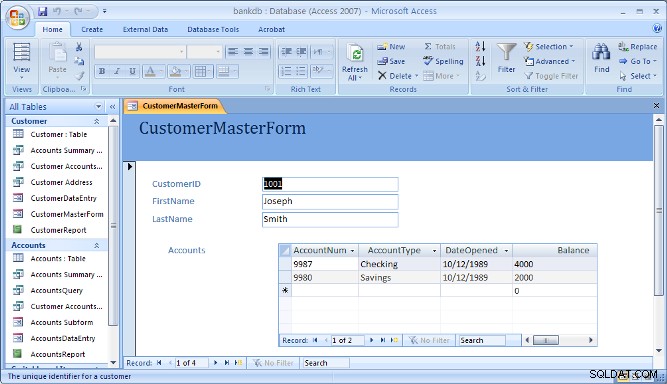
Note that the navigation bar at the bottom of the form is used to navigate through the records in the Master (or top) part of the form.
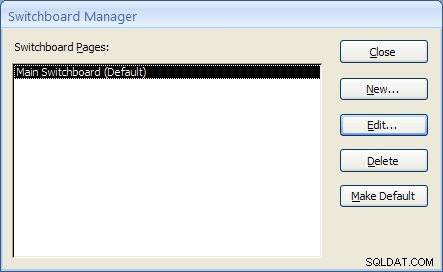
10 Creating and Running a Switchboard
A Switchboard is a type of form that displays a menu of items that a user can click on to launch data entry forms, reports, queries and other actions in the database. A switchboard is typically created after all of the forms and reports for a database application have been completed. It can be used to guide the user to an appropriate set of forms and reports.
Note that starting with Access 2010, Switchboards are not available by default (you will need to add this to the ribbon bar manually using the Options). Access 2010 and 2013 make use of the Navigation Forms.
In this section, a default switchboard will be created.
- From the Access main screen, click on the Database Tools tab and Click on the Switchboard Manager as shown in the figure below.

If this is the first switchboard made for this database, you will be prompted to create a new one as shown below. Click the Yes button.

- The Switchboard manager will appear as shown below:
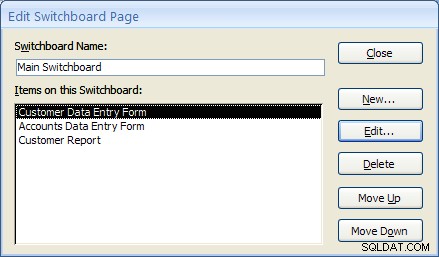
- Click on the Edit menu to edit the “Main Switchboard”. The Edit Switchboard Page will appear as shown below:
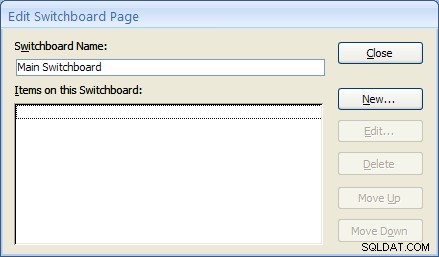
- Add a new switchboard item by clicking on the New… button. The Edit Switchboard Item form will appear as shown below. Fill in the fields as follows:
Text: Customer Data Entry Form Command: Select Open Form in Edit Mode from the drop down list. Form: Select the “CustomerDataEntry” form from the drop down list. 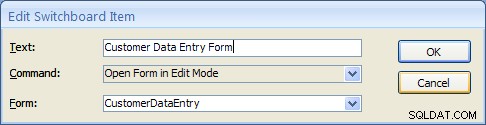
Click on the OK button to save this new Switchboard item.
- Repeat the above step two more times to add Switchboard items for the Accounts DataEntry form and the Customer Report.
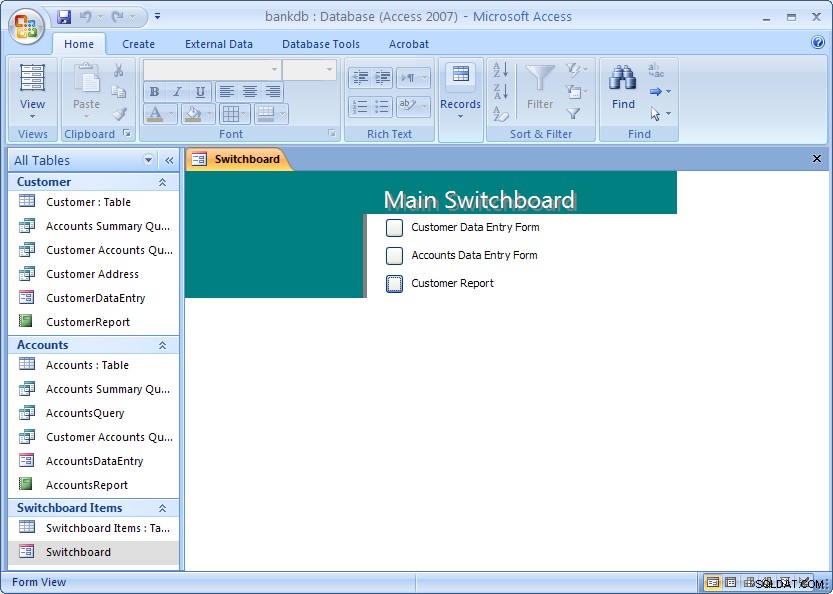
Once completed, click the Close button. Then click the Close button once more to close the Switchboard manager. - From the main MS Access screen look for a new section labeled Switchboard items. To view the switchboard, double-click on name “Switchboard”.
The next section covers creating a Navigation Form which is the recommended navigation screen for MS Access 2007, 2010 and newer versions.
11 Creating and Running a Navigation Form
MS Access 2010 introduced a new form called a Navigation Form. Navigation forms take the place of Switchboards but provide much the same functionality. Namely, they are designed to give the user the ability to run forms and reports without having to hunt through all of the different menus and lists objects. Typically a database application will have one main Navigation form that will appear when the database is opened.
In this section, the basic steps for creating and running a Navigation Form in MS Access 2010 will be demonstrated.
A Navigation Form is another type of form in MS Access 2010 and 2013
- To get started, click on the Create tab on the Access 2010 or 2013 ribbon bar. Under the section for Forms look for the item labeled Navigation Form. Note that this may be located on the button labeled Other Forms.
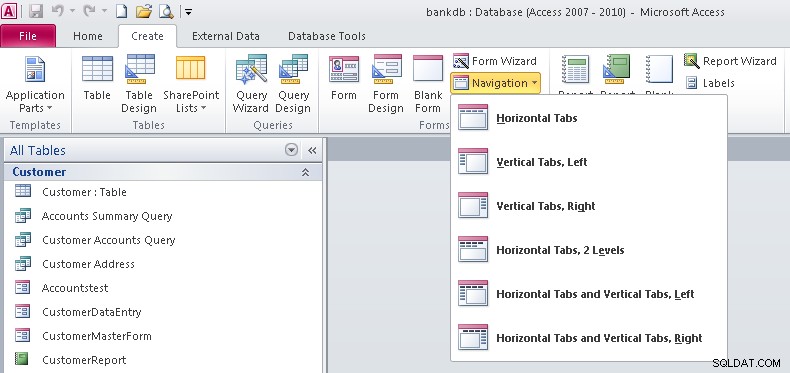
- Note that there are 6 different default styles of Navigation Forms. Each one places the buttons in a different configuration on the screem. Buttons can be aligned across the top, either side or some combination.For this tutorial select the Horizontal Tabs configuration which appears as the first item on the list.
- At this point a new Navigation Form will be created with a row of tabs across the top. The first tab will be labeled [Add New]
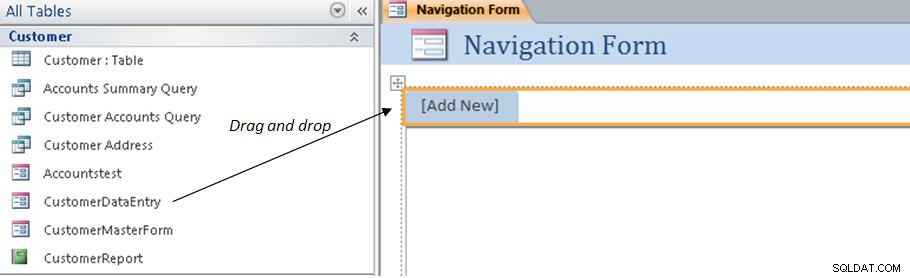
- To add items to the Navigation form, drag the items from the list on the left over to the spot on the Navigation Form labeled [Add New]. This is shown by the arrow in the above figure. For example, drag over the CustomerDataEntry form to the Navigation Form. The result is shown below.
- Next drag and drop the CustomerMasterForm as shown below.

- Next drag and drop the CustomerReport as shown below.
- At this point we have created a new navigation Form and added three items along the top of the page. Save the Navigation Form by right-clicking on the name of the form and choosing Save as shown below:
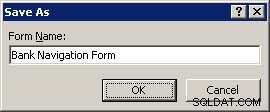
- Name the Navigation Form:Bank Navigation Form and click the OK button.
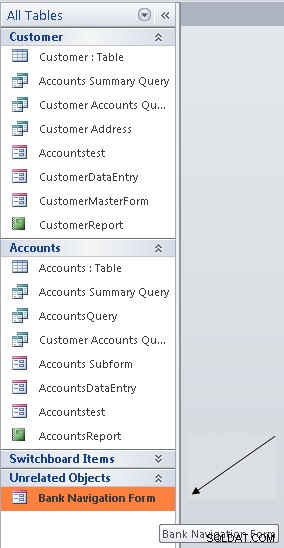
- Close up the Navigation Form by right-clicking again on the name of the form and choosing Close menu item.At this point the new Navigation Form has been created and saved. The next step will be to view the Navigation Form and navigate the different forms and reports linked to it.
- To view the Navigation Form, look for the Unrelated Objects group on the left side of the screen. Double click on the Bank Navigation Form item as shown below:
The Navigation Form will appear: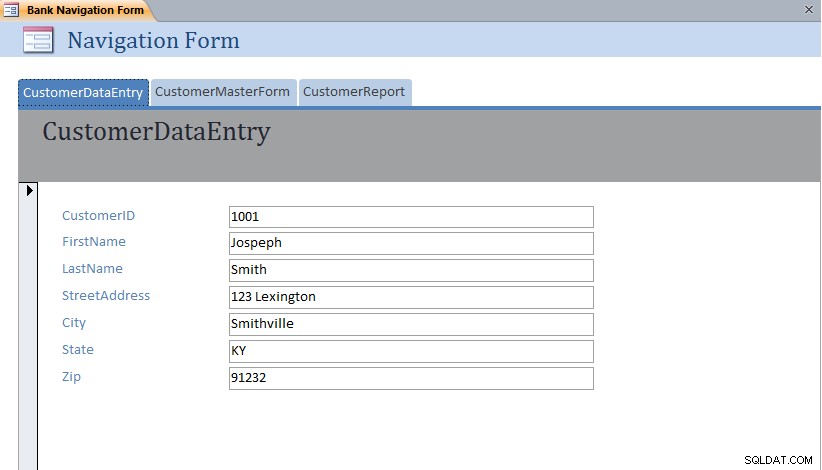 Note that each form or report can be displayed simply by clicking on the different tabs across the top of the Navigation Form.
11.1 Exercise:Modifying a Navigation Form
For this exercise, edit the Bank Navigation Form in Layout View and add the following new items to the Navigation Form:
- AccountsDataEntry
- AccountsReport
The resulting Navigation Form should appear as below with the AccountsReport opened:
11.2 Setting the Navigation Form as the Default
MS Access 2007 and 2010 (as well as earlier versions) have the ability to set a default form that will open up automatically once the MS Access data file is opened. This is especially useful for end users so that they always see the same form when they open up the database.
To set the Default Form, pull down the File menu and select the Options menu item.

The Database Options form will appear. Click on the Current Database item on the left hand side.
Under the Application Options heading, look for the Display Form:prompt and set this to the Bank Navigation Form as shown below:
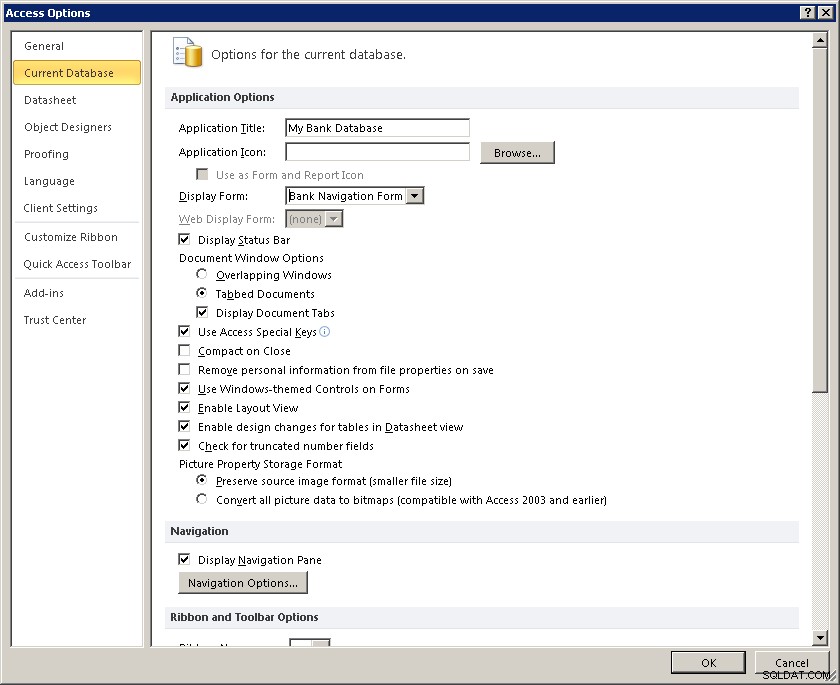
Click on the OK button to close up the Database Options screen.
The next time this database (bankdb.accdb) is opened, the Bank Navigation Form will open up.
12 Tutorial Summary
In this tutorial, we have covered the basics for creating an Access database including tables with data, queries to retrieve data, forms to enter data and reports to display and summarize data.
Students are encouraged to further their Access knowledge and skills by working through more advanced tutorials such as Advanced Access Database Table Design and Advanced Access Forms Design, and by reading the on-line help and Access documentation.
You may also be interested in this tutorial that covers up-sizing the Access database to Microsoft SQL Server using the Microsoft SQL Server Migration Assistant.