Semua program memproses data dalam satu bentuk atau lainnya, dan banyak yang harus dapat menyimpan dan mengambil data itu dari satu pemanggilan ke pemanggilan berikutnya. Python, SQLite, dan SQLAlchemy memberikan fungsionalitas database program Anda, memungkinkan Anda untuk menyimpan data dalam satu file tanpa memerlukan server database.
Anda dapat mencapai hasil serupa menggunakan file datar dalam berbagai format, termasuk CSV, JSON, XML, dan bahkan format khusus. File datar sering kali merupakan file teks yang dapat dibaca manusia—meskipun bisa juga berupa data biner—dengan struktur yang dapat diuraikan oleh program komputer. Di bawah ini, Anda akan mempelajari penggunaan database SQL dan file datar untuk penyimpanan dan manipulasi data, serta mempelajari cara memutuskan pendekatan mana yang tepat untuk program Anda.
Dalam tutorial ini, Anda akan mempelajari cara menggunakan:
- File datar untuk penyimpanan data
- SQL untuk meningkatkan akses ke data persisten
- SQLite untuk penyimpanan data
- SQLAlkimia untuk bekerja dengan data sebagai objek Python
Anda bisa mendapatkan semua kode dan data yang akan Anda lihat dalam tutorial ini dengan mengklik link di bawah ini:
Unduh kode contoh: Klik di sini untuk mendapatkan kode yang akan Anda gunakan untuk mempelajari tentang manajemen data dengan SQLite dan SQLAlchemy dalam tutorial ini.
Menggunakan File Datar untuk Penyimpanan Data
File datar adalah file yang berisi data tanpa hierarki internal dan biasanya tanpa referensi ke file eksternal. File datar berisi karakter yang dapat dibaca manusia dan sangat berguna untuk membuat dan membaca data. Karena mereka tidak harus menggunakan lebar bidang tetap, file datar sering menggunakan struktur lain untuk memungkinkan program mengurai teks.
Misalnya, file comma-separated value (CSV) adalah baris teks biasa di mana karakter koma memisahkan elemen data. Setiap baris teks mewakili baris data, dan setiap nilai yang dipisahkan koma adalah bidang di dalam baris tersebut. Pembatas karakter koma menunjukkan batas antara nilai data.
Python unggul dalam membaca dari dan menyimpan ke file. Mampu membaca file data dengan Python memungkinkan Anda untuk memulihkan aplikasi ke keadaan yang berguna saat Anda menjalankannya kembali di lain waktu. Mampu menyimpan data dalam file memungkinkan Anda untuk berbagi informasi dari program antara pengguna dan situs tempat aplikasi berjalan.
Sebelum sebuah program dapat membaca file data, ia harus dapat memahami data tersebut. Biasanya, ini berarti file data perlu memiliki beberapa struktur yang dapat digunakan aplikasi untuk membaca dan mengurai teks dalam file.
Di bawah ini adalah file CSV bernama author_book_publisher.csv , digunakan oleh program contoh pertama dalam tutorial ini:
first_name,last_name,title,publisher
Isaac,Asimov,Foundation,Random House
Pearl,Buck,The Good Earth,Random House
Pearl,Buck,The Good Earth,Simon & Schuster
Tom,Clancy,The Hunt For Red October,Berkley
Tom,Clancy,Patriot Games,Simon & Schuster
Stephen,King,It,Random House
Stephen,King,It,Penguin Random House
Stephen,King,Dead Zone,Random House
Stephen,King,The Shining,Penguin Random House
John,Le Carre,"Tinker, Tailor, Soldier, Spy: A George Smiley Novel",Berkley
Alex,Michaelides,The Silent Patient,Simon & Schuster
Carol,Shaben,Into The Abyss,Simon & Schuster
Baris pertama menyediakan daftar bidang yang dipisahkan koma, yang merupakan nama kolom untuk data yang mengikuti baris yang tersisa. Baris lainnya berisi data, dengan setiap baris mewakili satu record.
Catatan: Meskipun penulis, buku, dan penerbit semuanya nyata, hubungan antara buku dan penerbit adalah fiksi dan dibuat untuk tujuan tutorial ini.
Selanjutnya, Anda akan melihat beberapa keuntungan dan kerugian menggunakan file datar seperti CSV di atas untuk bekerja dengan data Anda.
Kelebihan File Datar
Bekerja dengan data dalam file datar dapat dikelola dan mudah diterapkan. Memiliki data dalam format yang dapat dibaca manusia berguna tidak hanya untuk membuat file data dengan editor teks, tetapi juga untuk memeriksa data dan mencari inkonsistensi atau masalah.
Banyak aplikasi dapat mengekspor versi file datar dari data yang dihasilkan oleh file tersebut. Misalnya, Excel dapat mengimpor atau mengekspor file CSV ke dan dari spreadsheet. File datar juga memiliki keuntungan karena mandiri dan dapat dipindahtangankan jika Anda ingin berbagi data.
Hampir setiap bahasa pemrograman memiliki alat dan pustaka yang membuat bekerja dengan file CSV lebih mudah. Python memiliki csv . bawaan modul dan modul pandas yang kuat tersedia, membuat bekerja dengan file CSV menjadi solusi yang ampuh.
Kerugian Flat Files
Keuntungan bekerja dengan file datar mulai berkurang saat data menjadi lebih besar. File besar masih dapat dibaca manusia, tetapi mengeditnya untuk membuat data atau mencari masalah menjadi tugas yang lebih sulit. Jika aplikasi Anda akan mengubah data dalam file, maka salah satu solusinya adalah membaca seluruh file ke dalam memori, membuat perubahan, dan menulis data ke file lain.
Masalah lain dengan menggunakan file datar adalah Anda harus secara eksplisit membuat dan memelihara hubungan apa pun antara bagian data Anda dan program aplikasi di dalam sintaks file. Selain itu, Anda harus membuat kode di aplikasi Anda untuk menggunakan hubungan tersebut.
Komplikasi terakhir adalah bahwa orang yang ingin Anda bagikan file data Anda juga perlu mengetahui dan bertindak berdasarkan struktur dan hubungan yang telah Anda buat dalam data. Untuk mengakses informasi, pengguna tersebut perlu memahami tidak hanya struktur data tetapi juga alat pemrograman yang diperlukan untuk mengaksesnya.
Contoh File Datar
Contoh program examples/example_1/main.py menggunakan author_book_publisher.csv file untuk mendapatkan data dan hubungan di dalamnya. File CSV ini menyimpan daftar penulis, buku yang mereka terbitkan, dan penerbit untuk setiap buku.
Catatan: File data yang digunakan dalam contoh tersedia di project/data direktori. Ada juga file program di project/build_data direktori yang menghasilkan data. Aplikasi itu berguna jika Anda mengubah data dan ingin kembali ke status yang diketahui.
Untuk mendapatkan akses ke file data yang digunakan di bagian ini dan sepanjang tutorial, klik tautan di bawah ini:
Unduh kode contoh: Klik di sini untuk mendapatkan kode yang akan Anda gunakan untuk mempelajari tentang manajemen data dengan SQLite dan SQLAlchemy dalam tutorial ini.
File CSV yang disajikan di atas adalah file data yang cukup kecil yang hanya berisi beberapa penulis, buku, dan penerbit. Anda juga harus memperhatikan beberapa hal tentang data:
-
Penulis Stephen King dan Tom Clancy muncul lebih dari sekali karena beberapa buku yang mereka terbitkan terwakili dalam data.
-
Penulis Stephen King dan Pearl Buck memiliki buku yang sama yang diterbitkan oleh lebih dari satu penerbit.
Bidang data yang diduplikasi ini membuat hubungan antara bagian lain dari data. Satu penulis dapat menulis banyak buku, dan satu penerbit dapat bekerja dengan banyak penulis. Penulis dan penerbit berbagi hubungan dengan masing-masing buku.
Hubungan dalam author_book_publisher.csv file diwakili oleh bidang yang muncul beberapa kali di baris yang berbeda dari file data. Karena redundansi data ini, data mewakili lebih dari satu tabel dua dimensi. Anda akan melihat lebih banyak hal ini saat menggunakan file tersebut untuk membuat file database SQLite.
Contoh program examples/example_1/main.py menggunakan hubungan yang disematkan di author_book_publisher.csv file untuk menghasilkan beberapa data. Ini pertama menyajikan daftar penulis dan jumlah buku masing-masing telah ditulis. Ini kemudian menunjukkan daftar penerbit dan jumlah penulis yang masing-masing telah menerbitkan buku.
Itu juga menggunakan treelib modul untuk menampilkan hierarki pohon penulis, buku , dan penerbit.
Terakhir, ini menambahkan buku baru ke data dan menampilkan kembali hierarki pohon dengan buku baru di tempatnya. Berikut main() fungsi titik masuk untuk program ini:
 1def main():
 2    """The main entry point of the program"""
 3    # Get the resources for the program
 4    with resources.path(
 5        "project.data", "author_book_publisher.csv"
 6    ) as filepath:
 7        data = get_data(filepath)
 8
 9    # Get the number of books printed by each publisher
10    books_by_publisher = get_books_by_publisher(data, ascending=False)
11    for publisher, total_books in books_by_publisher.items():
12        print(f"Publisher: {publisher}, total books: {total_books}")
13    print()
14
15    # Get the number of authors each publisher publishes
16    authors_by_publisher = get_authors_by_publisher(data, ascending=False)
17    for publisher, total_authors in authors_by_publisher.items():
18        print(f"Publisher: {publisher}, total authors: {total_authors}")
19    print()
20
21    # Output hierarchical authors data
22    output_author_hierarchy(data)
23
24    # Add a new book to the data structure
25    data = add_new_book(
26        data,
27        author_name="Stephen King",
28        book_title="The Stand",
29        publisher_name="Random House",
30    )
31
32    # Output the updated hierarchical authors data
33    output_author_hierarchy(data)
Kode Python di atas mengambil langkah-langkah berikut:
- Baris 4 sampai 7 baca
author_book_publisher.csvfile ke dalam panda DataFrame. - Baris 10 sampai 13 cetak jumlah buku yang diterbitkan oleh setiap penerbit.
- Baris 16 sampai 19 cetak jumlah penulis yang terkait dengan setiap penerbit.
- Baris 22 menampilkan data buku sebagai hierarki yang diurutkan berdasarkan penulis.
- Baris 25 hingga 30 tambahkan buku baru ke struktur dalam memori.
- Baris 33 menampilkan data buku sebagai hierarki yang diurutkan berdasarkan penulis, termasuk buku yang baru ditambahkan.
Menjalankan program ini menghasilkan output berikut:
$ python main.py
Publisher: Simon & Schuster, total books: 4
Publisher: Random House, total books: 4
Publisher: Penguin Random House, total books: 2
Publisher: Berkley, total books: 2

Publisher: Simon & Schuster, total authors: 4
Publisher: Random House, total authors: 3
Publisher: Berkley, total authors: 2
Publisher: Penguin Random House, total authors: 1

Authors
├── Alex Michaelides
│   └── The Silent Patient
│       └── Simon & Schuster
├── Carol Shaben
│   └── Into The Abyss
│       └── Simon & Schuster
├── Isaac Asimov
│   └── Foundation
│       └── Random House
├── John Le Carre
│   └── Tinker, Tailor, Soldier, Spy: A George Smiley Novel
│       └── Berkley
├── Pearl Buck
│   └── The Good Earth
│       ├── Random House
│       └── Simon & Schuster
├── Stephen King
│   ├── Dead Zone
│   │   └── Random House
│   ├── It
│   │   ├── Penguin Random House
│   │   └── Random House
│   └── The Shining
│       └── Penguin Random House
└── Tom Clancy
    ├── Patriot Games
    │   └── Simon & Schuster
    └── The Hunt For Red October
        └── Berkley
Hirarki penulis di atas disajikan dua kali dalam output, dengan tambahan The Stand Stephen karya Stephen King , diterbitkan oleh Random House. Output aktual di atas telah diedit dan hanya menampilkan output hierarki pertama untuk menghemat ruang.
main() memanggil fungsi lain untuk melakukan sebagian besar pekerjaan. Fungsi pertama yang dipanggil adalah get_data() :
def get_data(filepath):
    """Get book data from the csv file"""
    return pd.read_csv(filepath)
Fungsi ini mengambil jalur file ke file CSV dan menggunakan panda untuk membacanya ke dalam DataFrame panda, yang kemudian diteruskan kembali ke pemanggil. Nilai kembalian dari fungsi ini menjadi struktur data yang diteruskan ke fungsi lain yang membentuk program.
get_books_by_publisher() menghitung jumlah buku yang diterbitkan oleh setiap penerbit. Seri panda yang dihasilkan menggunakan fungsionalitas Pandas GroupBy untuk mengelompokkan menurut penerbit dan kemudian mengurutkan berdasarkan ascending bendera:
def get_books_by_publisher(data, ascending=True):
    """Return the number of books by each publisher as a pandas series"""
    return data.groupby("publisher").size().sort_values(ascending=ascending)
get_authors_by_publisher() pada dasarnya melakukan hal yang sama dengan fungsi sebelumnya, tetapi untuk penulis:
def get_authors_by_publisher(data, ascending=True):
    """Returns the number of authors by each publisher as a pandas series"""
    return (
        data.assign(name=data.first_name.str.cat(data.last_name, sep=" "))
        .groupby("publisher")
        .nunique()
        .loc[:, "name"]
        .sort_values(ascending=ascending)
    )
add_new_book() membuat buku baru di pandas DataFrame. Kode memeriksa untuk melihat apakah penulis, buku, atau penerbit sudah ada. Jika tidak, maka ia akan membuat buku baru dan menambahkannya ke pandas DataFrame:
def add_new_book(data, author_name, book_title, publisher_name):
    """Adds a new book to the system"""
    # Does the book exist?
    first_name, _, last_name = author_name.partition(" ")
    if any(
        (data.first_name == first_name)
        & (data.last_name == last_name)
        & (data.title == book_title)
        & (data.publisher == publisher_name)
    ):
        return data
    # Add the new book
    return data.append(
        {
            "first_name": first_name,
            "last_name": last_name,
            "title": book_title,
            "publisher": publisher_name,
        },
        ignore_index=True,
    )
output_author_hierarchy() menggunakan for bersarang loop untuk beralih melalui tingkat struktur data. Kemudian menggunakan treelib modul untuk menampilkan daftar hierarki penulis, buku yang mereka terbitkan, dan penerbit yang menerbitkan buku tersebut:
def output_author_hierarchy(data):
    """Output the data as a hierarchy list of authors"""
    authors = data.assign(
        name=data.first_name.str.cat(data.last_name, sep=" ")
    )
    authors_tree = Tree()
    authors_tree.create_node("Authors", "authors")
    for author, books in authors.groupby("name"):
        authors_tree.create_node(author, author, parent="authors")
        for book, publishers in books.groupby("title")["publisher"]:
            book_id = f"{author}:{book}"
            authors_tree.create_node(book, book_id, parent=author)
            for publisher in publishers:
                authors_tree.create_node(publisher, parent=book_id)

    # Output the hierarchical authors data
    authors_tree.show()
Aplikasi ini bekerja dengan baik dan menggambarkan kekuatan yang tersedia untuk Anda dengan modul pandas. Modul ini menyediakan fungsionalitas yang sangat baik untuk membaca file CSV dan berinteraksi dengan data.
Mari dorong dan buat program yang berfungsi identik menggunakan Python, versi database SQLite dari penulis dan data publikasi, dan SQLAlchemy untuk berinteraksi dengan data tersebut.
Menggunakan SQLite untuk Mempertahankan Data
Seperti yang Anda lihat sebelumnya, ada data yang berlebihan di author_book_publisher.csv mengajukan. Misalnya, semua informasi tentang The Good Earth milik Pearl Buck terdaftar dua kali karena dua penerbit berbeda telah menerbitkan buku.
Bayangkan jika file data ini berisi lebih banyak data terkait, seperti alamat dan nomor telepon penulis, tanggal penerbitan dan ISBN untuk buku, atau alamat, nomor telepon, dan mungkin pendapatan tahunan untuk penerbit. Data ini akan diduplikasi untuk setiap item data akar, seperti penulis, buku, atau penerbit.
Dimungkinkan untuk membuat data dengan cara ini, tetapi itu akan sangat berat. Pikirkan tentang masalah menjaga file data ini tetap terkini. Bagaimana jika Stephen King ingin mengubah namanya? Anda harus memperbarui beberapa catatan yang berisi namanya dan memastikan tidak ada kesalahan ketik.
Lebih buruk dari duplikasi data adalah kerumitan menambahkan hubungan lain ke data. Bagaimana jika Anda memutuskan untuk menambahkan nomor telepon untuk penulis, dan mereka memiliki nomor telepon untuk rumah, kantor, ponsel, dan mungkin lebih? Setiap hubungan baru yang ingin Anda tambahkan untuk setiap item akar akan mengalikan jumlah catatan dengan jumlah item dalam hubungan baru tersebut.
Masalah ini adalah salah satu alasan bahwa ada hubungan dalam sistem basis data. Topik penting dalam rekayasa basis data adalah normalisasi basis data , atau proses memecah data untuk mengurangi redundansi dan meningkatkan integritas. Ketika struktur basis data diperluas dengan tipe data baru, menormalkannya terlebih dahulu akan meminimalkan perubahan pada struktur yang ada.
Basis data SQLite tersedia dalam Python, dan menurut halaman beranda SQLite, basis data ini digunakan lebih dari gabungan semua sistem basis data lainnya. Ia menawarkan sistem manajemen basis data relasional (RDBMS) berfitur lengkap yang bekerja dengan satu file untuk memelihara semua fungsionalitas basis data.
Ini juga memiliki keuntungan karena tidak memerlukan server database terpisah untuk berfungsi. Format file database adalah lintas platform dan dapat diakses oleh semua bahasa pemrograman yang mendukung SQLite.
Semua ini adalah informasi yang menarik, tetapi bagaimana relevansinya dengan penggunaan file datar untuk penyimpanan data? Anda akan mengetahuinya di bawah!
Membuat Struktur Basis Data
Pendekatan brute force untuk mendapatkan author_book_publisher.csv data ke dalam database SQLite akan membuat tabel tunggal yang cocok dengan struktur file CSV. Melakukan hal ini akan mengabaikan banyak kekuatan SQLite.
Basis data relasional menyediakan cara untuk menyimpan data terstruktur dalam tabel dan membangun hubungan antara tabel tersebut. Mereka biasanya menggunakan Structured Query Language (SQL) sebagai cara utama untuk berinteraksi dengan data. Ini adalah penyederhanaan yang berlebihan dari apa yang disediakan RDBMS, tetapi itu sudah cukup untuk tujuan tutorial ini.
Database SQLite menyediakan dukungan untuk berinteraksi dengan tabel data menggunakan SQL. File database SQLite tidak hanya berisi data, tetapi juga memiliki cara standar untuk berinteraksi dengan data. Dukungan ini disematkan dalam file, artinya bahasa pemrograman apa pun yang dapat menggunakan file SQLite juga dapat menggunakan SQL untuk bekerja dengannya.
Berinteraksi Dengan Database Dengan SQL
SQL adalah bahasa deklaratif digunakan untuk membuat, mengelola, dan menanyakan data yang terdapat dalam database. Bahasa deklaratif menjelaskan apa harus dicapai daripada bagaimana itu harus dicapai. Anda akan melihat contoh pernyataan SQL nanti saat membuat tabel database.
Menstrukturkan Basis Data Dengan SQL
Untuk memanfaatkan kekuatan SQL, Anda harus menerapkan beberapa normalisasi database ke data di author_book_publisher.csv mengajukan. Untuk melakukannya, Anda akan memisahkan penulis, buku, dan penerbit ke dalam tabel database terpisah.
Secara konseptual, data disimpan dalam database dalam struktur tabel dua dimensi. Setiap tabel terdiri dari baris data , dan setiap catatan terdiri dari kolom, atau bidang , berisi data.
Data yang terdapat dalam bidang adalah tipe yang telah ditentukan sebelumnya, termasuk teks, bilangan bulat, float, dan banyak lagi. File CSV berbeda karena semua bidang adalah teks dan harus diurai oleh program agar tipe datanya ditetapkan.
Setiap record dalam tabel memiliki kunci utama didefinisikan untuk memberikan catatan pengidentifikasi unik. Kunci utama mirip dengan kunci dalam kamus Python. Mesin database itu sendiri sering menghasilkan kunci utama sebagai nilai integer yang bertambah untuk setiap record yang dimasukkan ke dalam tabel database.
Meskipun kunci utama sering dibuat secara otomatis oleh mesin basis data, itu tidak harus demikian. Jika data yang disimpan dalam bidang unik di semua data lain dalam tabel di bidang itu, maka itu bisa menjadi kunci utama. Misalnya, tabel yang berisi data tentang buku dapat menggunakan ISBN buku sebagai kunci utama.
Membuat Tabel Dengan SQL
Berikut cara membuat tiga tabel yang mewakili penulis, buku, dan penerbit dalam file CSV menggunakan pernyataan SQL:
CREATE TABLE author (
    author_id INTEGER NOT NULL PRIMARY KEY,
    first_name VARCHAR,
    last_name VARCHAR
);

CREATE TABLE book (
    book_id INTEGER NOT NULL PRIMARY KEY,
    author_id INTEGER REFERENCES author,
    title VARCHAR
);

CREATE TABLE publisher (
    publisher_id INTEGER NOT NULL PRIMARY KEY,
    name VARCHAR
);
Perhatikan tidak ada operasi file, tidak ada variabel yang dibuat, dan tidak ada struktur untuk menampungnya. Pernyataan hanya menjelaskan hasil yang diinginkan:pembuatan tabel dengan atribut tertentu. Mesin database menentukan bagaimana melakukan ini.
Setelah Anda membuat dan mengisi tabel ini dengan data penulis dari author_book_publisher.csv file, Anda dapat mengaksesnya menggunakan pernyataan SQL. Pernyataan berikut (juga disebut kueri ) menggunakan karakter wildcard (* ) untuk mendapatkan semua data di author tabel dan keluarkan:
SELECT * FROM author;
Anda dapat menggunakan sqlite3 alat baris perintah untuk berinteraksi dengan author_book_publisher.db file database di project/data direktori:
$ sqlite3 author_book_publisher.db
Setelah alat baris perintah SQLite berjalan dengan database terbuka, Anda dapat memasukkan perintah SQL. Berikut perintah SQL di atas dan outputnya, diikuti dengan .q perintah untuk keluar dari program:
sqlite> SELECT * FROM author;
1|Isaac|Asimov
2|Pearl|Buck
3|Tom|Clancy
4|Stephen|King
5|John|Le Carre
6|Alex|Michaelides
7|Carol|Shaben

sqlite> .q
Perhatikan bahwa setiap penulis hanya ada satu kali dalam tabel. Tidak seperti file CSV, yang memiliki banyak entri untuk beberapa penulis, di sini, hanya satu catatan unik per penulis yang diperlukan.
Memelihara Basis Data Dengan SQL
SQL menyediakan cara untuk bekerja dengan database dan tabel yang ada dengan memasukkan data baru dan memperbarui atau menghapus data yang ada. Berikut adalah contoh pernyataan SQL untuk menyisipkan penulis baru ke dalam author tabel:
INSERT INTO author
    (first_name, last_name)
VALUES ('Paul', 'Mendez');
Pernyataan SQL ini memasukkan nilai 'Paul ‘ dan ‘Mendez ' ke dalam kolom masing-masing first_name dan last_name dari author meja.
Perhatikan bahwa author_id kolom tidak ditentukan. Karena kolom tersebut adalah kunci utama, mesin database menghasilkan nilai dan menyisipkannya sebagai bagian dari eksekusi pernyataan.
Memperbarui catatan dalam tabel database adalah proses yang tidak rumit. Misalnya, Stephen King ingin dikenal dengan nama penanya, Richard Bachman. Berikut pernyataan SQL untuk memperbarui catatan database:
UPDATE author
SET first_name = 'Richard', last_name = 'Bachman'
WHERE first_name = 'Stephen' AND last_name = 'King';
Pernyataan SQL menempatkan satu record untuk 'Stephen King' menggunakan pernyataan kondisional WHERE first_name = 'Stephen' AND last_name = 'King' lalu perbarui first_name dan last_name bidang dengan nilai-nilai baru. SQL menggunakan tanda sama dengan (= ) sebagai operator perbandingan dan operator penugasan.
Anda juga dapat menghapus catatan dari database. Berikut adalah contoh pernyataan SQL untuk menghapus record dari author tabel:
DELETE FROM author
WHERE first_name = 'Paul'
AND last_name = 'Mendez';
Pernyataan SQL ini menghapus satu baris dari author tabel di mana first_name sama dengan 'Paul' dan last_name sama dengan 'Mendez' .
Hati-hati saat menghapus catatan! Kondisi yang Anda tetapkan harus sespesifik mungkin. Persyaratan yang terlalu luas dapat menyebabkan penghapusan lebih banyak rekaman daripada yang Anda inginkan. Misalnya, jika kondisi hanya didasarkan pada baris first_name = 'Paul' , maka semua penulis dengan nama depan Paul akan dihapus dari database.
Catatan: Untuk menghindari penghapusan catatan yang tidak disengaja, banyak aplikasi tidak mengizinkan penghapusan sama sekali. Sebaliknya, catatan memiliki kolom lain untuk menunjukkan apakah sedang digunakan atau tidak. Kolom ini mungkin bernama active dan berisi nilai yang mengevaluasi True atau False, yang menunjukkan apakah record harus disertakan saat mengkueri database.
Misalnya, kueri SQL di bawah ini akan mendapatkan semua kolom untuk semua catatan aktif di some_table :
SELECT
  *
FROM some_table
WHERE active = 1;
SQLite tidak memiliki tipe data Boolean, jadi active kolom diwakili oleh bilangan bulat dengan nilai 0 atau 1 untuk menunjukkan status record. Sistem database lain mungkin atau mungkin tidak memiliki tipe data Boolean asli.
Sangat mungkin untuk membangun aplikasi database dengan Python menggunakan pernyataan SQL langsung dalam kode. Melakukannya akan mengembalikan data ke aplikasi sebagai daftar daftar atau daftar kamus.
Menggunakan SQL mentah adalah cara yang dapat diterima untuk bekerja dengan data yang dikembalikan oleh kueri ke database. Namun, alih-alih melakukannya, Anda akan langsung beralih menggunakan SQLAlchemy untuk bekerja dengan database.
Membangun Hubungan
Fitur lain dari sistem basis data yang mungkin Anda anggap lebih kuat dan berguna daripada persistensi dan pengambilan data adalah hubungan . Database yang mendukung hubungan memungkinkan Anda untuk memecah data menjadi beberapa tabel dan membuat koneksi di antara mereka.
Data di author_book_publisher.csv file mewakili data dan hubungan dengan menduplikasi data. Database menangani ini dengan memecah data menjadi tiga tabel—author , book , dan publisher —dan membangun hubungan di antara mereka.
Setelah mendapatkan semua data yang Anda inginkan ke dalam satu tempat di file CSV, mengapa Anda ingin memecahnya menjadi beberapa tabel? Bukankah lebih banyak pekerjaan untuk membuat dan menyatukan kembali? Itu benar sampai batas tertentu, tetapi keuntungan memecah data dan menyatukannya kembali menggunakan SQL dapat membuat Anda menang!
Hubungan Satu-ke-Banyak
Sebuah satu-ke-banyak Hubungannya seperti hubungan pelanggan yang memesan barang secara online. Satu pelanggan dapat memiliki banyak pesanan, tetapi setiap pesanan dimiliki oleh satu pelanggan. author_book_publisher.db database memiliki hubungan satu-ke-banyak dalam bentuk penulis dan buku. Setiap penulis dapat menulis banyak buku, tetapi setiap buku ditulis oleh satu penulis.
Seperti yang Anda lihat pada pembuatan tabel di atas, implementasi entitas terpisah ini adalah menempatkan masing-masing ke dalam tabel database, satu untuk penulis dan satu untuk buku. Tetapi bagaimana hubungan satu-ke-banyak antara dua tabel ini diimplementasikan?
Ingat, setiap tabel dalam database memiliki bidang yang ditunjuk sebagai kunci utama untuk tabel itu. Setiap tabel di atas memiliki field kunci utama yang diberi nama menggunakan pola ini:<table name>_id .
book tabel yang ditunjukkan di atas berisi bidang, author_id , yang mereferensikan author meja. author_id bidang menetapkan hubungan satu-ke-banyak antara penulis dan buku yang terlihat seperti ini:
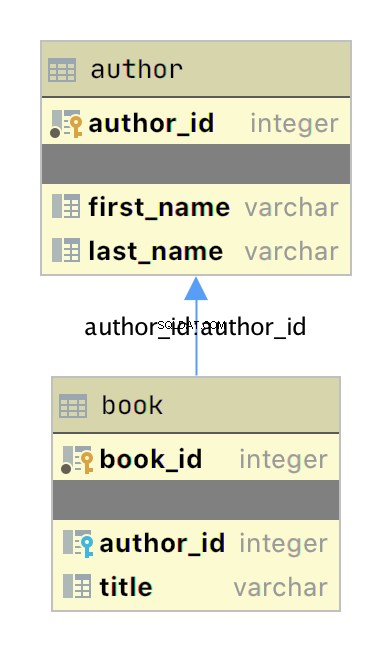
Diagram di atas adalah diagram hubungan entitas (ERD) sederhana yang dibuat dengan aplikasi JetBrains DataGrip yang menampilkan tabel author dan book sebagai kotak dengan kunci utama dan bidang data masing-masing. Dua item grafis menambahkan informasi tentang hubungan:
-
Ikon kunci kuning dan biru kecil menunjukkan kunci utama dan kunci asing untuk tabel, masing-masing.
-
Panah yang menghubungkan
bookkeauthormenunjukkan hubungan antar tabel berdasarkanauthor_idkunci asing dibooktabel.
Saat Anda menambahkan buku baru ke book tabel, data menyertakan author_id nilai untuk penulis yang ada di author meja. Dengan cara ini, semua buku yang ditulis oleh seorang penulis memiliki hubungan pencarian kembali ke penulis unik tersebut.
Sekarang setelah Anda memiliki tabel terpisah untuk penulis dan buku, bagaimana Anda menggunakan hubungan di antara keduanya? SQL mendukung apa yang disebut JOIN operasi, yang dapat Anda gunakan untuk memberi tahu database cara menghubungkan dua atau lebih tabel.
Kueri SQL di bawah ini bergabung dengan author dan book tabel bersama menggunakan aplikasi baris perintah SQLite:
sqlite> SELECT
   ...> a.first_name || ' ' || a.last_name AS author_name,
   ...> b.title AS book_title
   ...> FROM author a
   ...> JOIN book b ON b.author_id = a.author_id
   ...> ORDER BY a.last_name ASC;
Isaac Asimov|Foundation
Pearl Buck|The Good Earth
Tom Clancy|The Hunt For Red October
Tom Clancy|Patriot Games
Stephen King|It
Stephen King|Dead Zone
Stephen King|The Shining
John Le Carre|Tinker, Tailor, Soldier, Spy: A George Smiley Novel
Alex Michaelides|The Silent Patient
Carol Shaben|Into The Abyss
Kueri SQL di atas mengumpulkan informasi dari penulis dan tabel buku dengan menggabungkan tabel menggunakan hubungan yang dibuat antara keduanya. Rangkaian string SQL memberikan nama lengkap penulis ke alias author_name . Data yang dikumpulkan oleh kueri diurutkan dalam urutan menaik berdasarkan last_name lapangan.
Ada beberapa hal yang perlu diperhatikan dalam pernyataan SQL. Pertama, penulis disajikan dengan nama lengkap mereka dalam satu kolom dan diurutkan berdasarkan nama belakang mereka. Juga, penulis muncul dalam output beberapa kali karena hubungan satu-ke-banyak. Nama penulis digandakan untuk setiap buku yang mereka tulis di database.
Dengan membuat tabel terpisah untuk penulis dan buku dan menetapkan hubungan di antara keduanya, Anda telah mengurangi redundansi dalam data. Sekarang Anda hanya perlu mengedit data penulis di satu tempat, dan perubahan itu muncul di kueri SQL apa pun yang mengakses data.
Hubungan Banyak-ke-Banyak
Banyak-ke-banyak hubungan ada di author_book_publisher.db database antara penulis dan penerbit serta antara buku dan penerbit. Satu penulis dapat bekerja dengan banyak penerbit, dan satu penerbit dapat bekerja dengan banyak penulis. Demikian pula, satu buku dapat diterbitkan oleh banyak penerbit, dan satu penerbit dapat menerbitkan banyak buku.
Menangani situasi ini dalam database lebih terlibat daripada hubungan satu-ke-banyak karena hubungan berjalan dua arah. Many-to-many relationships are created by an association table acting as a bridge between the two related tables.
The association table contains at least two foreign key fields, which are the primary keys of each of the two associated tables. This SQL statement creates the association table relating the author and publisher tables:
CREATE TABLE author_publisher (
    author_id INTEGER REFERENCES author,
    publisher_id INTEGER REFERENCES publisher
);
The SQL statements create a new author_publisher table referencing the primary keys of the existing author and publisher tables. The author_publisher table is an association table establishing relationships between an author and a publisher.
Because the relationship is between two primary keys, there’s no need to create a primary key for the association table itself. The combination of the two related keys creates a unique identifier for a row of data.
As before, you use the JOIN keyword to connect two tables together. Connecting the author table to the publisher table is a two-step process:
JOINtheauthortable with theauthor_publishermeja.JOINtheauthor_publishertable with thepublishertable.
The author_publisher association table provides the bridge through which the JOIN connects the two tables. Here’s an example SQL query returning a list of authors and the publishers publishing their books:
 1sqlite> SELECT
 2   ...> a.first_name || ' ' || a.last_name AS author_name,
 3   ...> p.name AS publisher_name
 4   ...> FROM author a
 5   ...> JOIN author_publisher ap ON ap.author_id = a.author_id
 6   ...> JOIN publisher p ON p.publisher_id = ap.publisher_id
 7   ...> ORDER BY a.last_name ASC;
 8Isaac Asimov|Random House
 9Pearl Buck|Random House
10Pearl Buck|Simon & Schuster
11Tom Clancy|Berkley
12Tom Clancy|Simon & Schuster
13Stephen King|Random House
14Stephen King|Penguin Random House
15John Le Carre|Berkley
16Alex Michaelides|Simon & Schuster
17Carol Shaben|Simon & Schuster
The statements above perform the following actions:
-
Line 1 starts a
SELECTstatement to get data from the database. -
Line 2 selects the first and last name from the
authortable using theaalias for theauthortable and concatenates them together with a space character. -
Line 3 selects the publisher’s name aliased to
publisher_name. -
Line 4 uses the
authortable as the first source from which to retrieve data and assigns it to the aliasa. -
Line 5 is the first step of the process outlined above for connecting the
authortable to thepublishermeja. It uses the aliasapfor theauthor_publisherassociation table and performs aJOINoperation to connect theap.author_idforeign key reference to thea.author_idprimary key in theauthortable. -
Line 6 is the second step in the two-step process mentioned above. It uses the alias
pfor thepublishertable and performs aJOINoperation to relate theap.publisher_idforeign key reference to thep.publisher_idprimary key in thepublishertable. -
Line 7 sorts the data by the author’s last name in ascending alphabetical order and ends the SQL query.
-
Lines 8 to 17 are the output of the SQL query.
Note that the data in the source author and publisher tables are normalized, with no data duplication. Yet the returned results have duplicated data where necessary to answer the SQL query.
The SQL query above demonstrates how to make use of a relationship using the SQL JOIN keyword, but the resulting data is a partial re-creation of the author_book_publisher.csv CSV data. What’s the win for having done the work of creating a database to separate the data?
Here’s another SQL query to show a little bit of the power of SQL and the database engine:
 1sqlite> SELECT
 2   ...> a.first_name || ' ' || a.last_name AS author_name,
 3   ...> COUNT(b.title) AS total_books
 4   ...> FROM author a
 5   ...> JOIN book b ON b.author_id = a.author_id
 6   ...> GROUP BY author_name
 7   ...> ORDER BY total_books DESC, a.last_name ASC;
 8Stephen King|3
 9Tom Clancy|2
10Isaac Asimov|1
11Pearl Buck|1
12John Le Carre|1
13Alex Michaelides|1
14Carol Shaben|1
The SQL query above returns the list of authors and the number of books they’ve written. The list is sorted first by the number of books in descending order, then by the author’s name in alphabetical order:
-
Line 1 begins the SQL query with the
SELECTkeyword. -
Line 2 selects the author’s first and last names, separated by a space character, and creates the alias
author_name. -
Line 3 counts the number of books written by each author, which will be used later by the
ORDER BYclause to sort the list. -
Line 4 selects the
authortable to get data from and creates theaalias. -
Line 5 connects to the related
booktable through aJOINto theauthor_idand creates thebalias for thebooktable. -
Line 6 generates the aggregated author and total number of books data by using the
GROUP BYkata kunci.GROUP BYis what groups eachauthor_nameand controls what books are tallied byCOUNT()for that author. -
Line 7 sorts the output first by number of books in descending order, then by the author’s last name in ascending alphabetical order.
-
Lines 8 to 14 are the output of the SQL query.
In the above example, you take advantage of SQL to perform aggregation calculations and sort the results into a useful order. Having the database perform calculations based on its built-in data organization ability is usually faster than performing the same kinds of calculations on raw data sets in Python. SQL offers the advantages of using set theory embedded in RDBMS databases.
Entity Relationship Diagrams
An entity-relationship diagram (ERD) is a visual depiction of an entity-relationship model for a database or part of a database. The author_book_publisher.db SQLite database is small enough that the entire database can be visualized by the diagram shown below:
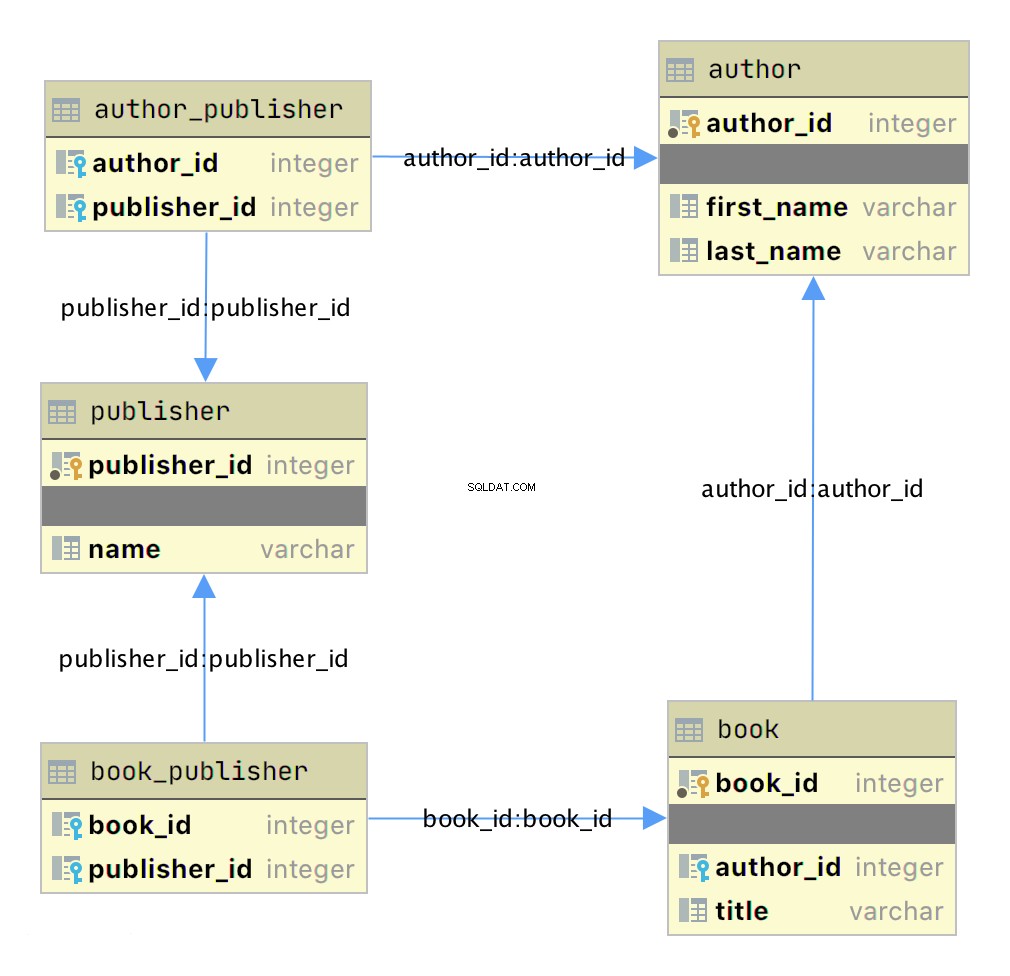
This diagram presents the table structures in the database and the relationships between them. Each box represents a table and contains the fields defined in the table, with the primary key indicated first if it exists.
The arrows show the relationships between the tables connecting a foreign key field in one table to a field, often the primary key, in another table. The table book_publisher has two arrows, one connecting it to the book table and another connecting it to the publisher meja. The arrow indicates the many-to-many relationship between the book and publisher tables. The author_publisher table provides the same relationship between author and publisher .
Working With SQLAlchemy and Python Objects
SQLAlchemy is a powerful database access tool kit for Python, with its object-relational mapper (ORM) being one of its most famous components, and the one discussed and used here.
When you’re working in an object-oriented language like Python, it’s often useful to think in terms of objects. It’s possible to map the results returned by SQL queries to objects, but doing so works against the grain of how the database works. Sticking with the scalar results provided by SQL works against the grain of how Python developers work. This problem is known as object-relational impedance mismatch.
The ORM provided by SQLAlchemy sits between the SQLite database and your Python program and transforms the data flow between the database engine and Python objects. SQLAlchemy allows you to think in terms of objects and still retain the powerful features of a database engine.
The Model
One of the fundamental elements to enable connecting SQLAlchemy to a database is creating a model . The model is a Python class defining the data mapping between the Python objects returned as a result of a database query and the underlying database tables.
The entity-relationship diagram displayed earlier shows boxes connected with arrows. The boxes are the tables built with the SQL commands and are what the Python classes will model. The arrows are the relationships between the tables.
The models are Python classes inheriting from an SQLAlchemy Base kelas. The Base class provides the interface operations between instances of the model and the database table.
Below is the models.py file that creates the models to represent the author_book_publisher.db database:
 1from sqlalchemy import Column, Integer, String, ForeignKey, Table
 2from sqlalchemy.orm import relationship, backref
 3from sqlalchemy.ext.declarative import declarative_base
 4
 5Base = declarative_base()
 6
 7author_publisher = Table(
 8    "author_publisher",
 9    Base.metadata,
10    Column("author_id", Integer, ForeignKey("author.author_id")),
11    Column("publisher_id", Integer, ForeignKey("publisher.publisher_id")),
12)
13
14book_publisher = Table(
15    "book_publisher",
16    Base.metadata,
17    Column("book_id", Integer, ForeignKey("book.book_id")),
18    Column("publisher_id", Integer, ForeignKey("publisher.publisher_id")),
19)
20
21class Author(Base):
22    __tablename__ = "author"
23    author_id = Column(Integer, primary_key=True)
24    first_name = Column(String)
25    last_name = Column(String)
26    books = relationship("Book", backref=backref("author"))
27    publishers = relationship(
28        "Publisher", secondary=author_publisher, back_populates="authors"
29    )
30
31class Book(Base):
32    __tablename__ = "book"
33    book_id = Column(Integer, primary_key=True)
34    author_id = Column(Integer, ForeignKey("author.author_id"))
35    title = Column(String)
36    publishers = relationship(
37        "Publisher", secondary=book_publisher, back_populates="books"
38    )
39
40class Publisher(Base):
41    __tablename__ = "publisher"
42    publisher_id = Column(Integer, primary_key=True)
43    name = Column(String)
44    authors = relationship(
45        "Author", secondary=author_publisher, back_populates="publishers"
46    )
47    books = relationship(
48        "Book", secondary=book_publisher, back_populates="publishers"
49    )
Here’s what’s going on in this module:
-
Line 1 imports the
Column,Integer,String,ForeignKey, andTableclasses from SQLAlchemy, which are used to help define the model attributes. -
Line 2 imports the
relationship()andbackrefobjects, which are used to create the relationships between objects. -
Line 3 imports the
declarative_baseobject, which connects the database engine to the SQLAlchemy functionality of the models. -
Line 5 creates the
Baseclass, which is what all models inherit from and how they get SQLAlchemy ORM functionality. -
Lines 7 to 12 create the
author_publisherassociation table model. -
Lines 14 to 19 create the
book_publisherassociation table model. -
Lines 21 to 29 define the
Authorclass model to theauthordatabase table. -
Lines 31 to 38 define the
Bookclass model to thebookdatabase table. -
Lines 40 to 49 define the
Publisherclass model to thepublisherdatabase table.
The description above shows the mapping of the five tables in the author_book_publisher.db basis data. But it glosses over some SQLAlchemy ORM features, including Table , ForeignKey , relationship() , and backref . Let’s get into those now.
Table Creates Associations
author_publisher and book_publisher are both instances of the Table class that create the many-to-many association tables used between the author and publisher tables and the book and publisher tables, respectively.
The SQLAlchemy Table class creates a unique instance of an ORM mapped table within the database. The first parameter is the table name as defined in the database, and the second is Base.metadata , which provides the connection between the SQLAlchemy functionality and the database engine.
The rest of the parameters are instances of the Column class defining the table fields by name, their type, and in the example above, an instance of a ForeignKey .
ForeignKey Creates a Connection
The SQLAlchemy ForeignKey class defines a dependency between two Column fields in different tables. A ForeignKey is how you make SQLAlchemy aware of the relationships between tables. For example, this line from the author_publisher instance creation establishes a foreign key relationship:
Column("author_id", Integer, ForeignKey("author.author_id"))
The statement above tells SQLAlchemy that there’s a column in the author_publisher table named author_id . The type of that column is Integer , and author_id is a foreign key related to the primary key in the author table.
Having both author_id and publisher_id defined in the author_publisher Table instance creates the connection from the author table to the publisher table and vice versa, establishing a many-to-many relationship.
relationship() Establishes a Collection
Having a ForeignKey defines the existence of the relationship between tables but not the collection of books an author can have. Take a look at this line in the Author class definition:
books = relationship("Book", backref=backref("author"))
The code above defines a parent-child collection. The books attribute being plural (which is not a requirement, just a convention) is an indication that it’s a collection.
The first parameter to relationship() , the class name Book (which is not the table name book ), is the class to which the books attribute is related. The relationship informs SQLAlchemy that there’s a relationship between the Author and Book classes. SQLAlchemy will find the relationship in the Book class definition:
author_id = Column(Integer, ForeignKey("author.author_id"))
SQLAlchemy recognizes that this is the ForeignKey connection point between the two classes. You’ll get to the backref parameter in relationship() in a moment.
The other relationship in Author is to the Publisher kelas. This is created with the following statement in the Author class definition:
publishers = relationship(
    "Publisher", secondary=author_publisher, back_populates="authors"
)
Like books , the attribute publishers indicates a collection of publishers associated with an author. The first parameter, "Publisher" , informs SQLAlchemy what the related class is. The second and third parameters are secondary=author_publisher and back_populates="authors" :
-
secondarytells SQLAlchemy that the relationship to thePublisherclass is through a secondary table, which is theauthor_publisherassociation table created earlier inmodels.py. Thesecondaryparameter makes SQLAlchemy find thepublisher_idForeignKeydefined in theauthor_publisherassociation table. -
back_populatesis a convenience configuration telling SQLAlchemy that there’s a complementary collection in thePublisherclass calledauthors.
backref Mirrors Attributes
The backref parameter of the books collection relationship() creates an author attribute for each Book contoh. This attribute refers to the parent Author that the Book instance is related to.
For example, if you executed the following Python code, then a Book instance would be returned from the SQLAlchemy query. The Book instance has attributes that can be used to print out information about the book:
book = session.query(Book).filter_by(Book.title == "The Stand").one_or_none()
print(f"Authors name: {book.author.first_name} {book.author.last_name}")
The existence of the author attribute in the Book above is because of the backref definition. A backref can be very handy to have when you need to refer to the parent and all you have is a child instance.
Queries Answer Questions
You can make a basic query like SELECT * FROM author; in SQLAlchemy like this:
results = session.query(Author).all()
The session is an SQLAlchemy object used to communicate with SQLite in the Python example programs. Here, you tell the session you want to execute a query against the Author model and return all records.
At this point, the advantages of using SQLAlchemy instead of plain SQL might not be obvious, especially considering the setup required to create the models representing the database. The results returned by the query is where the magic happens. Instead of getting back a list of lists of scalar data, you’ll get back a list of instances of Author objects with attributes matching the column names you defined.
The books and publishers collections maintained by SQLAlchemy create a hierarchical list of authors and the books they’ve written as well as the publishers who’ve published them.
Behind the scenes, SQLAlchemy turns the object and method calls into SQL statements to execute against the SQLite database engine. SQLAlchemy transforms the data returned by SQL queries into Python objects.
With SQLAlchemy, you can perform the more complex aggregation query shown earlier for the list of authors and the number of books they’ve written like this:
author_book_totals = (
    session.query(
        Author.first_name,
        Author.last_name,
        func.count(Book.title).label("book_total")
    )
    .join(Book)
    .group_by(Author.last_name)
    .order_by(desc("book_total"))
    .all()
)
The query above gets the author’s first and last name, along with a count of the number of books that the author has written. The aggregating count used by the group_by clause is based on the author’s last name. Finally, the results are sorted in descending order based on the aggregated and aliased book_total .
Example Program
The example program examples/example_2/main.py has the same functionality as examples/example_1/main.py but uses SQLAlchemy exclusively to interface with the author_book_publisher.db SQLite database. The program is broken up into the main() function and the functions it calls:
 1def main():
 2    """Main entry point of program"""
 3    # Connect to the database using SQLAlchemy
 4    with resources.path(
 5        "project.data", "author_book_publisher.db"
 6    ) as sqlite_filepath:
 7        engine = create_engine(f"sqlite:///{sqlite_filepath}")
 8    Session = sessionmaker()
 9    Session.configure(bind=engine)
10    session = Session()
11
12    # Get the number of books printed by each publisher
13    books_by_publisher = get_books_by_publishers(session, ascending=False)
14    for row in books_by_publisher:
15        print(f"Publisher: {row.name}, total books: {row.total_books}")
16    print()
17
18    # Get the number of authors each publisher publishes
19    authors_by_publisher = get_authors_by_publishers(session)
20    for row in authors_by_publisher:
21        print(f"Publisher: {row.name}, total authors: {row.total_authors}")
22    print()
23
24    # Output hierarchical author data
25    authors = get_authors(session)
26    output_author_hierarchy(authors)
27
28    # Add a new book
29    add_new_book(
30        session,
31        author_name="Stephen King",
32        book_title="The Stand",
33        publisher_name="Random House",
34    )
35    # Output the updated hierarchical author data
36    authors = get_authors(session)
37    output_author_hierarchy(authors)
This program is a modified version of examples/example_1/main.py . Let’s go over the differences:
-
Lines 4 to 7 first initialize the
sqlite_filepathvariable to the database file path. Then they create theenginevariable to communicate with SQLite and theauthor_book_publisher.dbdatabase file, which is SQLAlchemy’s access point to the database. -
Line 8 creates the
Sessionclass from the SQLAlchemy’ssessionmaker(). -
Line 9 binds the
Sessionto the engine created in line 8. -
Line 10 creates the
sessioninstance, which is used by the program to communicate with SQLAlchemy.
The rest of the function is similar, except for the replacement of data with session as the first parameter to all the functions called by main() .
get_books_by_publisher() has been refactored to use SQLAlchemy and the models you defined earlier to get the data requested:
 1def get_books_by_publishers(session, ascending=True):
 2    """Get a list of publishers and the number of books they've published"""
 3    if not isinstance(ascending, bool):
 4        raise ValueError(f"Sorting value invalid: {ascending}")
 5
 6    direction = asc if ascending else desc
 7
 8    return (
 9        session.query(
10            Publisher.name, func.count(Book.title).label("total_books")
11        )
12        .join(Publisher.books)
13        .group_by(Publisher.name)
14        .order_by(direction("total_books"))
15    )
Here’s what the new function, get_books_by_publishers() , is doing:
-
Line 6 creates the
directionvariable and sets it equal to the SQLAlchemydescorascfunction depending on the value of theascendingparameter. -
Lines 9 to 11 query the
Publishertable for data to return, which in this case arePublisher.nameand the aggregate total ofBookobjects associated with an author, aliased tototal_books. -
Line 12 joins to the
Publisher.bookscollection. -
Line 13 aggregates the book counts by the
Publisher.nameattribute. -
Line 14 sorts the output by the book counts according to the operator defined by
direction. -
Line 15 closes the object, executes the query, and returns the results to the caller.
All the above code expresses what is wanted rather than how it’s to be retrieved. Now instead of using SQL to describe what’s wanted, you’re using Python objects and methods. What’s returned is a list of Python objects instead of a list of tuples of data.
get_authors_by_publisher() has also been modified to work exclusively with SQLAlchemy. Its functionality is very similar to the previous function, so a function description is omitted:
def get_authors_by_publishers(session, ascending=True):
    """Get a list of publishers and the number of authors they've published"""
    if not isinstance(ascending, bool):
        raise ValueError(f"Sorting value invalid: {ascending}")

    direction = asc if ascending else desc

    return (
        session.query(
            Publisher.name,
            func.count(Author.first_name).label("total_authors"),
        )
        .join(Publisher.authors)
        .group_by(Publisher.name)
        .order_by(direction("total_authors"))
    )
get_authors() has been added to get a list of authors sorted by their last names. The result of this query is a list of Author objects containing a collection of books. The Author objects already contain hierarchical data, so the results don’t have to be reformatted:
def get_authors(session):
    """Get a list of author objects sorted by last name"""
    return session.query(Author).order_by(Author.last_name).all()
Like its previous version, add_new_book() is relatively complex but straightforward to understand. It determines if a book with the same title, author, and publisher exists in the database already.
If the search query finds an exact match, then the function returns. If no book matches the exact search criteria, then it searches to see if the author has written a book using the passed in title. This code exists to prevent duplicate books from being created in the database.
If no matching book exists, and the author hasn’t written one with the same title, then a new book is created. The function then retrieves or creates an author and publisher. Once instances of the Book , Author and Publisher exist, the relationships between them are created, and the resulting information is saved to the database:
 1def add_new_book(session, author_name, book_title, publisher_name):
 2    """Adds a new book to the system"""
 3    # Get the author's first and last names
 4    first_name, _, last_name = author_name.partition(" ")
 5
 6    # Check if book exists
 7    book = (
 8        session.query(Book)
 9        .join(Author)
10        .filter(Book.title == book_title)
11        .filter(
12            and_(
13                Author.first_name == first_name, Author.last_name == last_name
14            )
15        )
16        .filter(Book.publishers.any(Publisher.name == publisher_name))
17        .one_or_none()
18    )
19    # Does the book by the author and publisher already exist?
20    if book is not None:
21        return
22
23    # Get the book by the author
24    book = (
25        session.query(Book)
26        .join(Author)
27        .filter(Book.title == book_title)
28        .filter(
29            and_(
30                Author.first_name == first_name, Author.last_name == last_name
31            )
32        )
33        .one_or_none()
34    )
35    # Create the new book if needed
36    if book is None:
37        book = Book(title=book_title)
38
39    # Get the author
40    author = (
41        session.query(Author)
42        .filter(
43            and_(
44                Author.first_name == first_name, Author.last_name == last_name
45            )
46        )
47        .one_or_none()
48    )
49    # Do we need to create the author?
50    if author is None:
51        author = Author(first_name=first_name, last_name=last_name)
52        session.add(author)
53
54    # Get the publisher
55    publisher = (
56        session.query(Publisher)
57        .filter(Publisher.name == publisher_name)
58        .one_or_none()
59    )
60    # Do we need to create the publisher?
61    if publisher is None:
62        publisher = Publisher(name=publisher_name)
63        session.add(publisher)
64
65    # Initialize the book relationships
66    book.author = author
67    book.publishers.append(publisher)
68    session.add(book)
69
70    # Commit to the database
71    session.commit()
The code above is relatively long. Let’s break the functionality down to manageable sections:
-
Lines 7 to 18 set the
bookvariable to an instance of aBookif a book with the same title, author, and publisher is found. Otherwise, they setbooktoNone. -
Lines 20 and 21 determine if the book already exists and return if it does.
-
Lines 24 to 37 set the
bookvariable to an instance of aBookif a book with the same title and author is found. Otherwise, they create a newBookcontoh. -
Lines 40 to 52 set the
authorvariable to an existing author, if found, or create a newAuthorinstance based on the passed-in author name. -
Lines 55 to 63 set the
publishervariable to an existing publisher, if found, or create a newPublisherinstance based on the passed-in publisher name. -
Line 66 sets the
book.authorinstance to theauthorcontoh. This creates the relationship between the author and the book, which SQLAlchemy will create in the database when the session is committed. -
Line 67 adds the
publisherinstance to thebook.publisherscollection. This creates the many-to-many relationship between thebookandpublishertables. SQLAlchemy will create references in the tables as well as in thebook_publisherassociation table that connects the two. -
Line 68 adds the
Bookinstance to the session, making it part of the session’s unit of work. -
Line 71 commits all the creations and updates to the database.
There are a few things to take note of here. First, there’s is no mention of the author_publisher or book_publisher association tables in either the queries or the creations and updates. Because of the work you did in models.py setting up the relationships, SQLAlchemy can handle connecting objects together and keeping those tables in sync during creations and updates.
Second, all the creations and updates happen within the context of the session object. None of that activity is touching the database. Only when the session.commit() statement executes does the session then go through its unit of work and commit that work to the database.
For example, if a new Book instance is created (as in line 37 above), then the book has its attributes initialized except for the book_id primary key and author_id foreign key. Because no database activity has happened yet, the book_id is unknown, and nothing was done in the instantiation of book to give it an author_id .
When session.commit() is executed, one of the things it will do is insert book into the database, at which point the database will create the book_id primary key. The session will then initialize the book.book_id value with the primary key value created by the database engine.
session.commit() is also aware of the insertion of the Book instance in the author.books collection. The author object’s author_id primary key will be added to the Book instance appended to the author.books collection as the author_id foreign key.
Providing Access to Multiple Users
To this point, you’ve seen how to use pandas, SQLite, and SQLAlchemy to access the same data in different ways. For the relatively straightforward use case of the author, book, and publisher data, it could still be a toss-up whether you should use a database.
One deciding factor when choosing between using a flat file or a database is data and relationship complexity. If the data for each entity is complicated and contains many relationships between the entities, then creating and maintaining it in a flat file might become more difficult.
Another factor to consider is whether you want to share the data between multiple users. The solution to this problem might be as simple as using a sneakernet to physically move data between users. Moving data files around this way has the advantage of ease of use, but the data can quickly get out of sync when changes are made.
The problem of keeping the data consistent for all users becomes even more difficult if the users are remote and want to access the data across networks. Even when you’re limited to a single language like Python and using pandas to access the data, network file locking isn’t sufficient to ensure the data doesn’t get corrupted.
Providing the data through a server application and a user interface alleviates this problem. The server is the only application that needs file-level access to the database. By using a database, the server can take advantage of SQL to access the data using a consistent interface no matter what programming language the server uses.
The last example program demonstrates this by providing a web application and user interface to the Chinook sample SQLite database. Peter Stark generously maintains the Chinook database as part of the SQLite Tutorial site. If you’d like to learn more about SQLite and SQL in general, then the site is a great resource.
The Chinook database provides artist, music, and playlist information along the lines of a simplified Spotify. The database is part of the example code project in the project/data folder.
Using Flask With Python, SQLite, and SQLAlchemy
The examples/example_3/chinook_server.py program creates a Flask application that you can interact with using a browser. The application makes use of the following technologies:
-
Flask Blueprint is part of Flask and provides a good way to follow the separation of concerns design principle and create distinct modules to contain functionality.
-
Flask SQLAlchemy is an extension for Flask that adds support for SQLAlchemy in your web applications.
-
Flask_Bootstrap4 packages the Bootstrap front-end tool kit, integrating it with your Flask web applications.
-
Flask_WTF extends Flask with WTForms, giving your web applications a useful way to generate and validate web forms.
-
python_dotenv is a Python module that an application uses to read environment variables from a file and keep sensitive information out of program code.
Though not necessary for this example, a .env file holds the environment variables for the application. The .env file exists to contain sensitive information like passwords, which you should keep out of your code files. However, the content of the project .env file is shown below since it doesn’t contain any sensitive data:
SECRET_KEY = "you-will-never-guess"
SQLALCHEMY_TRACK_MODIFICATIONS = False
SQLAlCHEMY_ECHO = False
DEBUG = True
The example application is fairly large, and only some of it is relevant to this tutorial. For this reason, examining and learning from the code is left as an exercise for the reader. That said, you can take a look at an animated screen capture of the application below, followed by the HTML that renders the home page and the Python Flask route that provides the dynamic data.
Here’s the application in action, navigating through various menus and features:
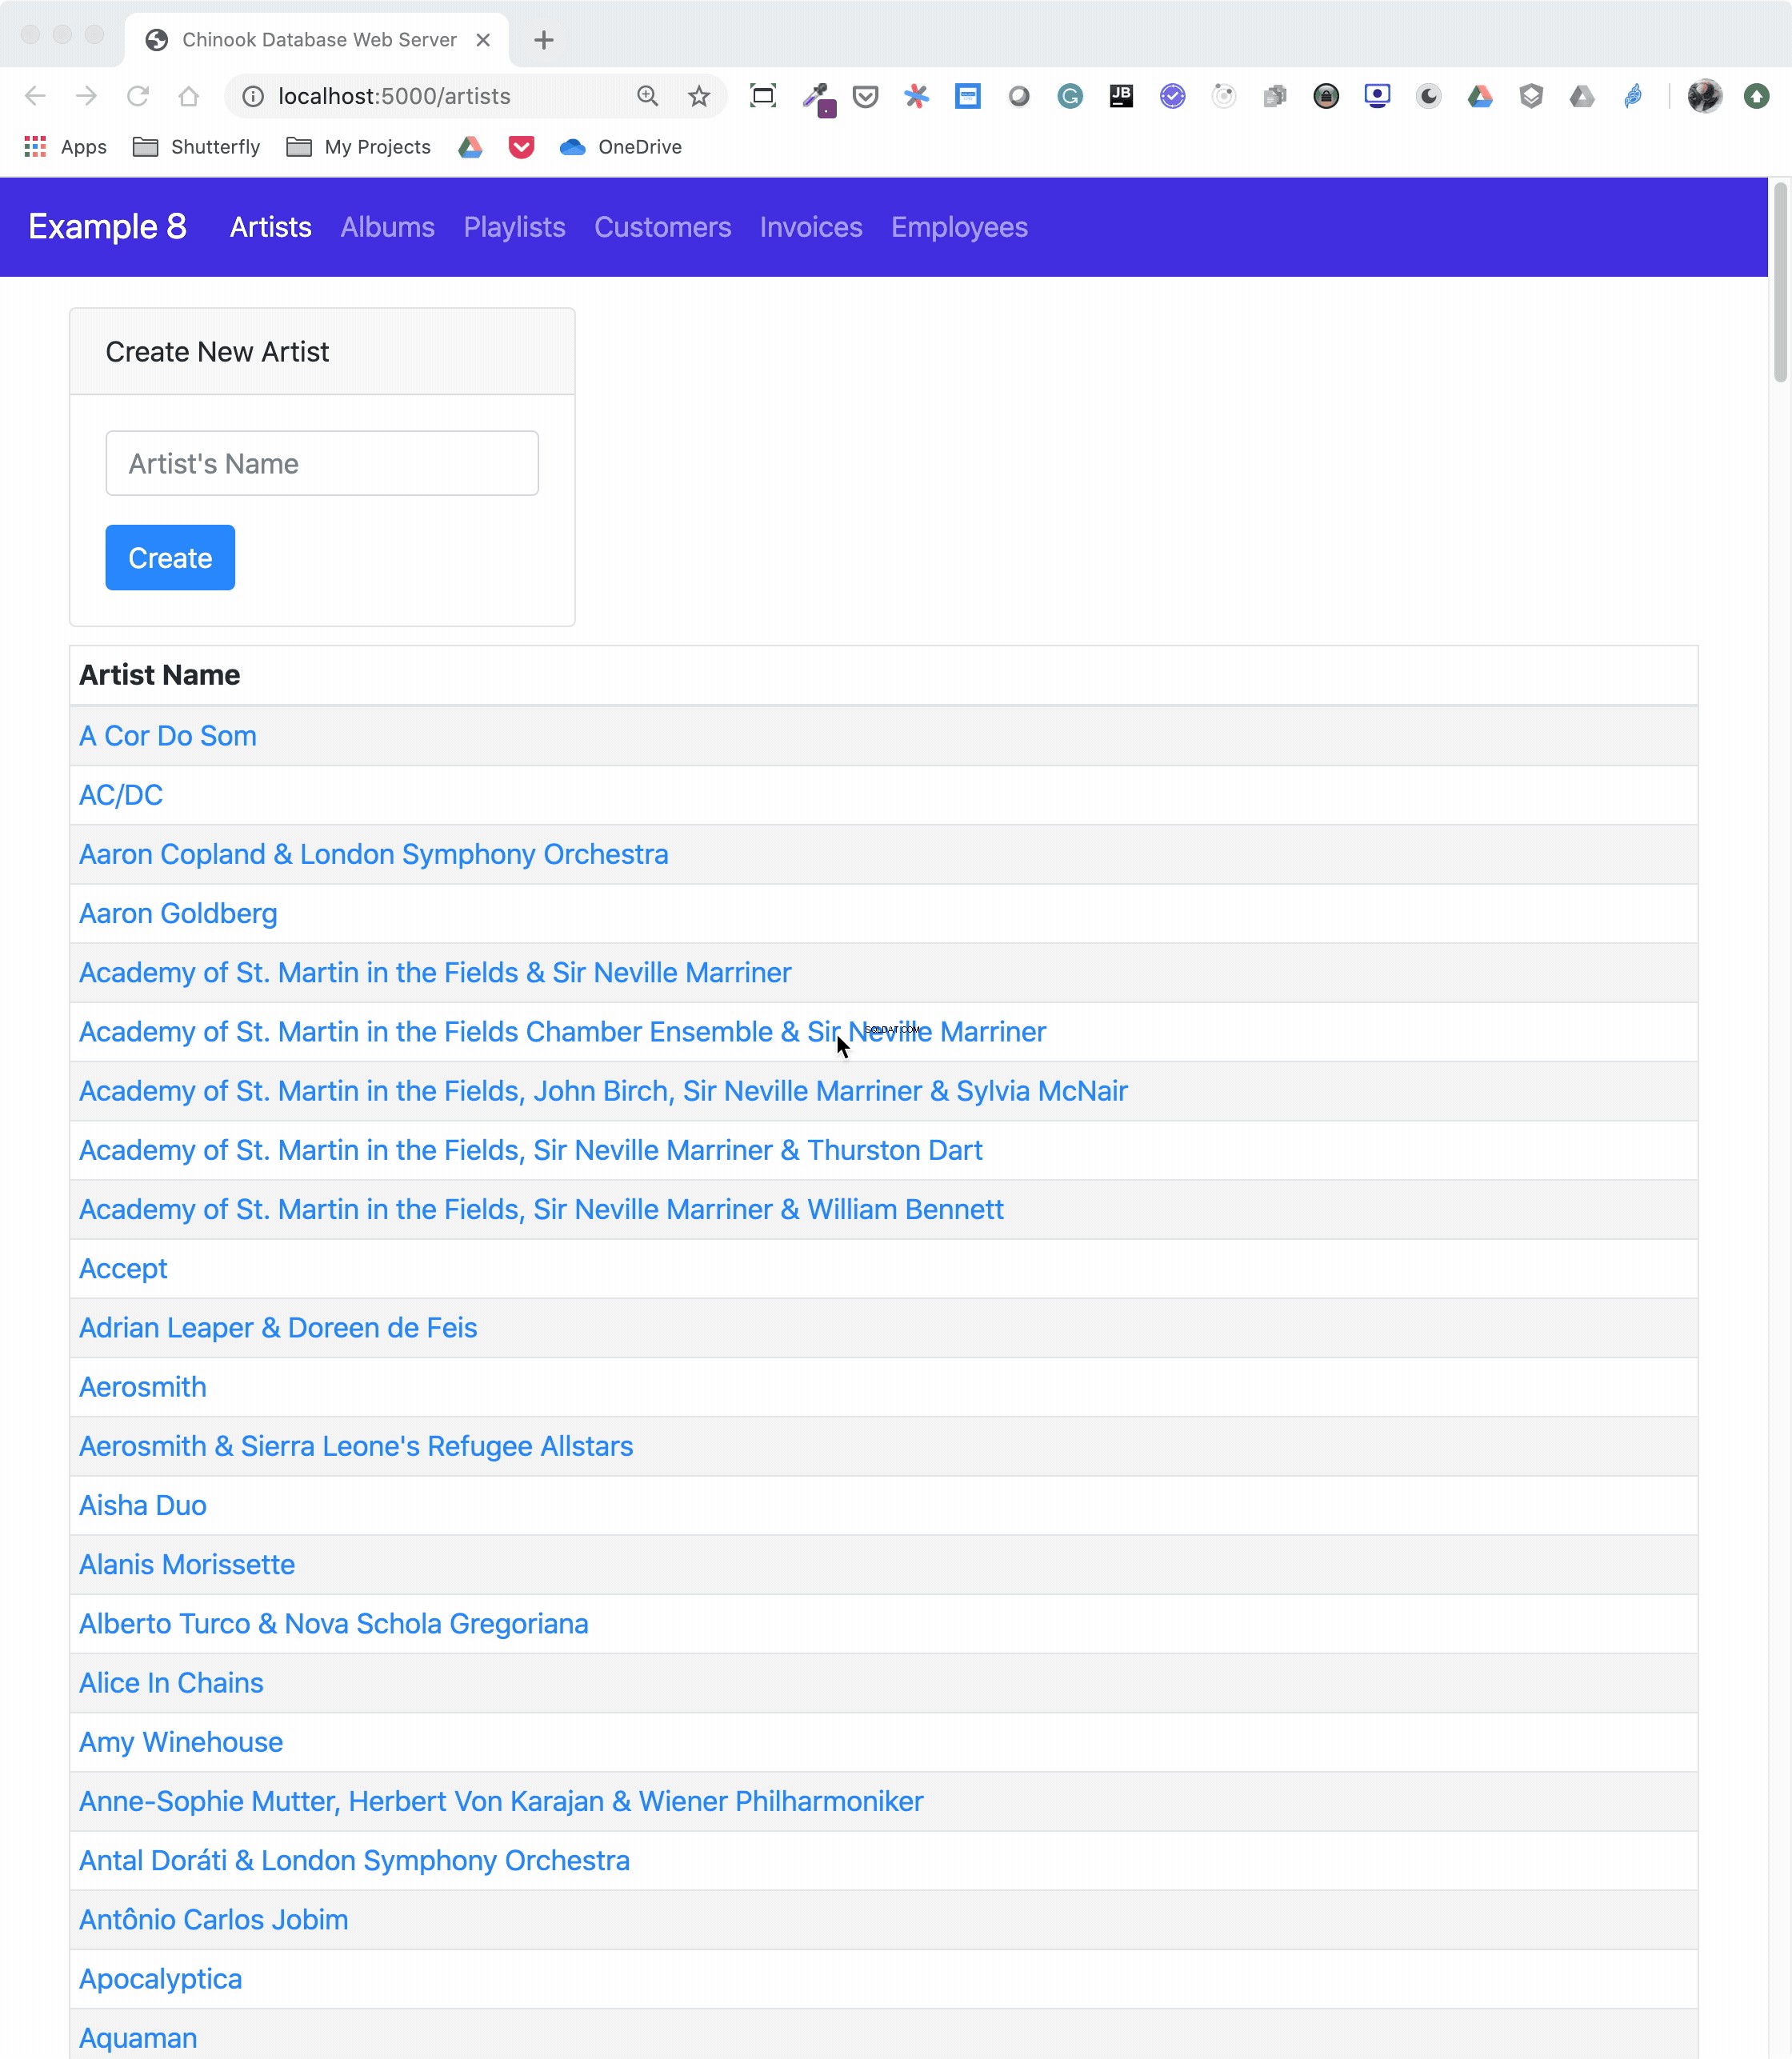
The animated screen capture starts on the application home page, styled using Bootstrap 4. The page displays the artists in the database, sorted in ascending order. The remainder of the screen capture presents the results of clicking on the displayed links or navigating around the application from the top-level menu.
Here’s the Jinja2 HTML template that generates the home page of the application:
 1{% extends "base.html" %}
 2
 3{% block content %}
 4<div class="container-fluid">
 5  <div class="m-4">
 6    <div class="card" style="width: 18rem;">
 7      <div class="card-header">Create New Artist</div>
 8      <div class="card-body">
 9        <form method="POST" action="{{url_for('artists_bp.artists')}}">
10          {{ form.csrf_token }}
11          {{ render_field(form.name, placeholder=form.name.label.text) }}
12          <button type="submit" class="btn btn-primary">Create</button>
13        </form>
14      </div>
15    </div>
16    <table class="table table-striped table-bordered table-hover table-sm">
17      <caption>List of Artists</caption>
18      <thead>
19        <tr>
20          <th>Artist Name</th>
21        </tr>
22      </thead>
23      <tbody>
24        {% for artist in artists %}
25        <tr>
26          <td>
27            <a href="{{url_for('albums_bp.albums', artist_id=artist.artist_id)}}">
28              {{ artist.name }}
29            </a>
30          </td>
31        </tr>
32        {% endfor %}
33      </tbody>
34    </table>
35  </div>
36</div>
37{% endblock %}
Here’s what’s going on in this Jinja2 template code:
-
Line 1 uses Jinja2 template inheritance to build this template from the
base.htmltemplate. Thebase.htmltemplate contains all the HTML5 boilerplate code as well as the Bootstrap navigation bar consistent across all pages of the site. -
Lines 3 to 37 contain the block content of the page, which is incorporated into the Jinja2 macro of the same name in the
base.htmlbase template. -
Lines 9 to 13 render the form to create a new artist. This uses the features of Flask-WTF to generate the form.
-
Lines 24 to 32 create a
forloop that renders the table of artist names. -
Lines 27 to 29 render the artist name as a link to the artist’s album page showing the songs associated with a particular artist.
Here’s the Python route that renders the page:
 1from flask import Blueprint, render_template, redirect, url_for
 2from flask_wtf import FlaskForm
 3from wtforms import StringField
 4from wtforms.validators import InputRequired, ValidationError
 5from app import db
 6from app.models import Artist
 7
 8# Set up the blueprint
 9artists_bp = Blueprint(
10    "artists_bp", __name__, template_folder="templates", static_folder="static"
11)
12
13def does_artist_exist(form, field):
14    artist = (
15        db.session.query(Artist)
16        .filter(Artist.name == field.data)
17        .one_or_none()
18    )
19    if artist is not None:
20        raise ValidationError("Artist already exists", field.data)
21
22class CreateArtistForm(FlaskForm):
23    name = StringField(
24        label="Artist's Name", validators=[InputRequired(), does_artist_exist]
25    )
26
27@artists_bp.route("/")
28@artists_bp.route("/artists", methods=["GET", "POST"])
29def artists():
30    form = CreateArtistForm()
31
32    # Is the form valid?
33    if form.validate_on_submit():
34        # Create new artist
35        artist = Artist(name=form.name.data)
36        db.session.add(artist)
37        db.session.commit()
38        return redirect(url_for("artists_bp.artists"))
39
40    artists = db.session.query(Artist).order_by(Artist.name).all()
41    return render_template("artists.html", artists=artists, form=form,)
Let’s go over what the above code is doing:
-
Lines 1 to 6 import all the modules necessary to render the page and initialize forms with data from the database.
-
Lines 9 to 11 create the blueprint for the artists page.
-
Lines 13 to 20 create a custom validator function for the Flask-WTF forms to make sure a request to create a new artist doesn’t conflict with an already existing artist.
-
Lines 22 to 25 create the form class to handle the artist form rendered in the browser and provide validation of the form field inputs.
-
Lines 27 to 28 connect two routes to the
artists()function they decorate. -
Line 30 creates an instance of the
CreateArtistForm()class. -
Line 33 determines if the page was requested through the HTTP methods GET or POST (submit). If it was a POST, then it also validates the fields of the form and informs the user if the fields are invalid.
-
Lines 35 to 37 create a new artist object, add it to the SQLAlchemy session, and commit the artist object to the database, persisting it.
-
Line 38 redirects back to the artists page, which will be rerendered with the newly created artist.
-
Line 40 runs an SQLAlchemy query to get all the artists in the database and sort them by
Artist.name. -
Line 41 renders the artists page if the HTTP request method was a GET.
You can see that a great deal of functionality is created by a reasonably small amount of code.
Creating a REST API Server
You can also create a web server providing a REST API. This kind of server offers URL endpoints responding with data, often in JSON format. A server providing REST API endpoints can be used by JavaScript single-page web applications through the use of AJAX HTTP requests.
Flask is an excellent tool for creating REST applications. For a multi-part series of tutorials about using Flask, Connexion, and SQLAlchemy to create REST applications, check out Python REST APIs With Flask, Connexion, and SQLAlchemy.
If you’re a fan of Django and are interested in creating REST APIs, then check out Django Rest Framework – An Introduction and Create a Super Basic REST API with Django Tastypie.
Catatan: It’s reasonable to ask if SQLite is the right choice as the database backend to a web application. The SQLite website states that SQLite is a good choice for sites that serve around 100,000 hits per day. If your site gets more daily hits, the first thing to say is congratulations!
Beyond that, if you’ve implemented your website with SQLAlchemy, then it’s possible to move the data from SQLite to another database such as MySQL or PostgreSQL. For a comparison of SQLite, MySQL, and PostgreSQL that will help you make decisions about which one will serve your application best, check out Introduction to Python SQL Libraries.
It’s well worth considering SQLite for your Python application, no matter what it is. Using a database gives your application versatility, and it might create surprising opportunities to add additional features.
Conclusion
You’ve covered a lot of ground in this tutorial about databases, SQLite, SQL, and SQLAlchemy! You’ve used these tools to move data contained in flat files to an SQLite database, access the data with SQL and SQLAlchemy, and provide that data through a web server.
In this tutorial, you’ve learned:
- Why an SQLite database can be a compelling alternative to flat-file data storage
- How to normalize data to reduce data redundancy and increase data integrity
- How to use SQLAlchemy to work with databases in an object-oriented manner
- How to build a web application to serve a database to multiple users
Working with databases is a powerful abstraction for working with data that adds significant functionality to your Python programs and allows you to ask interesting questions of your data.
You can get all of the code and data you saw in this tutorial at the link below:
Download the sample code: Click here to get the code you’ll use to learn about data management with SQLite and SQLAlchemy in this tutorial.
Further Reading
This tutorial is an introduction to using databases, SQL, and SQLAlchemy, but there’s much more to learn about these subjects. These are powerful, sophisticated tools that no single tutorial can cover adequately. Here are some resources for additional information to expand your skills:
-
If your application will expose the database to users, then avoiding SQL injection attacks is an important skill. For more information, check out Preventing SQL Injection Attacks With Python.
-
Providing web access to a database is common in web-based single-page applications. To learn how, check out Python REST APIs With Flask, Connexion, and SQLAlchemy – Part 2.
-
Preparing for data engineering job interviews gives you a leg up in your career. To get started, check out Data Engineer Interview Questions With Python.
-
Migrating data and being able to roll back using Flask with Postgres and SQLAlchemy is an integral part of the Software Development Life Cycle (SDLC). You can learn more about it by checking out Flask by Example – Setting up Postgres, SQLAlchemy, and Alembic.