Membangun proyek bisa dibilang salah satu cara yang lebih mudah didekati dan efektif untuk belajar memprogram. Proyek nyata mengharuskan Anda untuk menerapkan keterampilan pengkodean yang berbeda dan bervariasi. Mereka juga mendorong Anda untuk meneliti topik yang muncul saat Anda memecahkan masalah dalam proses pengembangan. Dalam tutorial ini, Anda akan membuat aplikasi buku kontak dengan Python, PyQt, dan SQLite.
Dalam tutorial ini, Anda akan mempelajari cara:
- Buat antarmuka pengguna grafis (GUI) untuk aplikasi buku kontak Anda menggunakan Python dan PyQt
- Hubungkan aplikasi ke database SQLite menggunakan dukungan SQL PyQt
- Kelola data kontak menggunakan arsitektur Model-View PyQt
Di akhir proyek ini, Anda akan memiliki aplikasi buku kontak fungsional yang memungkinkan Anda menyimpan dan mengelola informasi kontak Anda.
Untuk mendapatkan kode sumber lengkap untuk aplikasi serta kode untuk setiap langkah yang akan Anda lalui dalam tutorial ini, klik tautan di bawah ini:
Dapatkan Kode Sumber: Klik di sini untuk mendapatkan kode sumber yang akan Anda gunakan untuk membuat buku kontak dengan Python, PyQt, dan SQLite dalam tutorial ini.
Demo:Buku Kontak Dengan Python
Buku kontak adalah jenis aplikasi yang berguna dan banyak digunakan. Mereka ada di mana-mana. Anda mungkin memiliki buku kontak di ponsel dan komputer Anda. Dengan buku kontak, Anda dapat menyimpan dan mengelola informasi kontak untuk anggota keluarga, teman, rekan kerja, dan sebagainya.
Dalam tutorial ini, Anda akan membuat kode aplikasi GUI buku kontak dengan Python, SQLite, dan PyQt. Berikut demo bagaimana buku kontak Anda akan terlihat dan berfungsi setelah Anda mengikuti langkah-langkah dalam tutorial ini:
Buku kontak Anda akan menyediakan serangkaian fitur minimal yang diperlukan untuk aplikasi semacam ini. Anda akan dapat menampilkan, membuat, memperbarui, dan menghapus informasi di daftar kontak Anda.
Ikhtisar Proyek
Untuk membangun aplikasi buku kontak Anda, Anda perlu mengatur kode ke dalam modul dan paket dan memberikan proyek Anda struktur yang koheren. Dalam tutorial ini, Anda akan menggunakan direktori dan struktur file berikut:
rpcontacts_project/
│
├── rpcontacts/
│   ├── __init__.py
│   ├── views.py
│   ├── database.py
│   ├── main.py
│   └── model.py
│
├── requirements.txt
├── README.md
└── rpcontacts.py
Berikut ringkasan singkat dari isi direktori proyek Anda:
rpcontacts_project/adalah direktori root proyek. Ini akan berisi file-file berikut:requirements.txtmenyediakan daftar persyaratan proyek.README.mdmemberikan informasi umum tentang proyek.rpcontacts.pymenyediakan skrip titik masuk untuk menjalankan aplikasi.
rpcontacts/adalah subdirektori yang menyediakan paket utama aplikasi. Ini menyediakan modul berikut:__init__.pyviews.pydatabase.pymain.pymodel.py
Anda akan membahas setiap file ini langkah demi langkah dalam tutorial ini. Nama setiap file memberikan gambaran tentang perannya dalam aplikasi. Misalnya, views.py akan berisi kode untuk menghasilkan GUI jendela dan dialog, database.py akan berisi kode untuk bekerja dengan database, dan main.py akan meng-host aplikasi itu sendiri. Terakhir, model.py akan mengimplementasikan model untuk mengelola data dalam database aplikasi.
Secara umum, aplikasi akan memiliki jendela utama untuk menampilkan, menambah, menghapus, dan memperbarui kontak. Itu juga akan memiliki dialog untuk menambahkan kontak baru ke database.
Prasyarat
Untuk mendapatkan hasil maksimal dari proyek ini, beberapa pengetahuan sebelumnya tentang pemrograman GUI dengan Python dan PyQt akan membantu. Dalam hal ini, Anda perlu mengetahui dasar-dasar tentang cara:
- Membuat aplikasi GUI dengan PyQt dan Python
- Bangun dan tata letak GUI dengan PyQt
- Mengelola database SQL dengan Python dan PyQt
- Bekerja dengan database SQLite
Untuk memoles topik ini, Anda dapat melihat sumber daya berikut:
- Python dan PyQt:Membangun Kalkulator Desktop GUI
- Python dan PyQt:Membuat Menu, Bilah Alat, dan Bilah Status
- Tata Letak PyQt:Membuat Aplikasi GUI yang Terlihat Profesional
- Menangani Basis Data SQL Dengan PyQt:Dasar-dasarnya
- Pengantar Pustaka Python SQL
- Manajemen Data Dengan Python, SQLite, dan SQLAlchemy
Jangan khawatir jika Anda bukan ahli dalam bidang ini sebelum memulai tutorial ini. Anda akan belajar melalui proses membuat tangan Anda kotor pada proyek nyata. Jika Anda buntu, luangkan waktu Anda dan tinjau sumber daya yang ditautkan di atas. Kemudian kembali ke kode.
Aplikasi buku kontak yang akan Anda buat dalam tutorial ini memiliki ketergantungan eksternal tunggal:PyQt.
Catatan: Dalam tutorial ini, Anda akan menggunakan PyQt versi 5.15.2 untuk membangun aplikasi buku kontak Anda. Versi 5.15.2 diperlukan agar proyek dapat bekerja di macOS Big Sur.
PyQt versi 6.0 dirilis pada 4 Januari 2021. Ini adalah rilis pertama dari library yang mengikat Qt versi 6. Namun, proyek dalam tutorial ini belum diuji dengan PyQt 6.0.
Jika Anda merasa perlu menjalankan proyek dengan versi baru PyQt ini, cobalah. Sebagai petunjuk, Anda harus pip install PyQt6 lalu perbarui impor untuk menggunakan PyQt6 bukannya PyQt5 .
Untuk mengikuti praktik terbaik dalam proses pengembangan, Anda dapat memulai dengan membuat lingkungan virtual, lalu menginstal PyQt menggunakan pip . Setelah Anda menginstal PyQt, Anda siap untuk mulai coding!
Langkah 1:Membuat Aplikasi Kerangka Buku Kontak Dengan PyQt
Pada langkah pertama ini, Anda akan membuat aplikasi GUI PyQt yang minimal namun fungsional untuk memberikan dasar di mana Anda akan mulai membangun buku kontak. Anda juga akan membuat struktur proyek minimal yang diperlukan, termasuk paket utama proyek dan skrip titik masuk untuk menjalankan aplikasi.
Semua kode dan file yang akan Anda tambahkan ke proyek buku kontak di bagian ini dikumpulkan di bawah source_code_step_1/ direktori. Anda dapat mengunduhnya dengan mengklik tautan di bawah ini:
Dapatkan Kode Sumber: Klik di sini untuk mendapatkan kode sumber yang akan Anda gunakan untuk membuat buku kontak dengan Python, PyQt, dan SQLite dalam tutorial ini.
Pada akhir bagian ini, Anda akan dapat menjalankan aplikasi GUI kerangka untuk buku kontak Anda untuk pertama kalinya.
Menyusun Proyek Buku Kontak
Untuk memulai pengkodean aplikasi, lanjutkan dan buat direktori baru bernama rpcontacts_project/ . Ini akan menjadi direktori root proyek. Sekarang buat subdirektori baru bernama rpcontacts/ di dalam rpcontacts_project/ . Subdirektori ini akan menampung paket utama aplikasi. Terakhir, jalankan editor kode atau IDE Anda di dalam direktori root.
Untuk mengubah direktori menjadi sebuah paket, Python membutuhkan __init__.py modul untuk menginisialisasi paket. Buat file ini di dalam rpcontacts/ dan tambahkan kode berikut ke dalamnya:
# -*- coding: utf-8 -*-

"""This module provides the rpcontacts package."""

__version__ = "0.1.0"
File ini memberi tahu Python bahwa rpcontacts adalah sebuah paket. Kode dalam file berjalan saat Anda mengimpor paket atau beberapa modulnya.
Anda tidak perlu memasukkan kode apa pun ke dalam __init__.py file untuk menginisialisasi paket. __init__.py yang kosong file akan melakukan pekerjaan itu. Namun, dalam kasus ini, Anda mendefinisikan konstanta tingkat modul yang disebut __version__ untuk menyimpan nomor versi aplikasi Anda.
Membuat Jendela Utama Aplikasi
Sekarang saatnya membuat jendela utama buku kontak Anda. Untuk melakukannya, buat modul bernama views.py di rpcontacts kemasan. Kemudian tambahkan kode berikut ke modul dan simpan:
# -*- coding: utf-8 -*-

"""This module provides views to manage the contacts table."""

from PyQt5.QtWidgets import (
    QHBoxLayout,
    QMainWindow,
    QWidget,
)

class Window(QMainWindow):
    """Main Window."""
    def __init__(self, parent=None):
        """Initializer."""
        super().__init__(parent)
        self.setWindowTitle("RP Contacts")
        self.resize(550, 250)
        self.centralWidget = QWidget()
        self.setCentralWidget(self.centralWidget)
        self.layout = QHBoxLayout()
        self.centralWidget.setLayout(self.layout)
Pertama, Anda mengimpor kelas yang diperlukan dari PyQt5.QtWidgets . Kemudian Anda membuat Window . Kelas ini mewarisi dari QMainWindow dan menyediakan kode untuk menghasilkan jendela utama aplikasi. Dalam metode penginisialisasi, Anda mengatur judul jendela ke "RP Contacts" , ubah ukuran jendela menjadi 550 oleh 250 piksel, tentukan dan atur widget pusat menggunakan QWidget , dan terakhir tentukan tata letak untuk widget pusat menggunakan tata letak kotak horizontal.
Mengkode dan Menjalankan Aplikasi
Karena Anda sudah memiliki jendela utama untuk buku kontak, saatnya menulis kode untuk membuat aplikasi PyQt yang fungsional menggunakan QApplication . Untuk melakukannya, buat modul baru bernama main.py di rpcontacts paket dan tambahkan kode berikut ke dalamnya:
# -*- coding: utf-8 -*-
# rpcontacts/main.py

"""This module provides RP Contacts application."""

import sys

from PyQt5.QtWidgets import QApplication

from .views import Window

def main():
    """RP Contacts main function."""
    # Create the application
    app = QApplication(sys.argv)
    # Create the main window
    win = Window()
    win.show()
    # Run the event loop
    sys.exit(app.exec())
Dalam modul ini, Anda mengimpor sys untuk mendapatkan akses ke exit() , yang memungkinkan Anda keluar dari aplikasi dengan bersih saat pengguna menutup jendela utama. Kemudian Anda mengimpor QApplication dari PyQt5.QtWidgets dan Window dari views . Langkah terakhir adalah mendefinisikan main() sebagai fungsi utama aplikasi Anda.
Di dalam main() , Anda membuat instance QApplication dan Window . Kemudian Anda memanggil .show() di Window , dan akhirnya Anda menjalankan main loop application aplikasi , atau perulangan peristiwa , menggunakan .exec() .
Sekarang pindah ke direktori root proyek rpcontacts_project/ dan buat file bernama rpcontacts.py . File ini menyediakan skrip titik masuk untuk menjalankan aplikasi. Tambahkan kode berikut ke file dan simpan:
#!/usr/bin/env python3
# -*- coding: utf-8 -*-
# rpcontacts_project/rpcontacts.py

"""This module provides RP Contacts entry point script."""

from rpcontacts.main import main

if __name__ == "__main__":
    main()
File ini mengimpor main() dari main.py . Anda modul. Kemudian Anda mengimplementasikan pernyataan kondisional tradisional yang memanggil main() jika pengguna menjalankan modul ini sebagai skrip Python. Sekarang luncurkan aplikasi dengan menjalankan perintah python rpcontacts.py di lingkungan Python Anda. Anda akan mendapatkan jendela berikut di layar Anda:
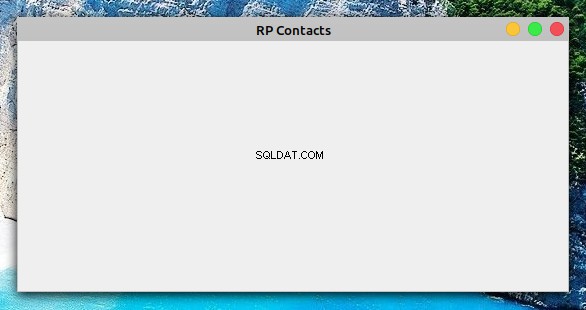
Itu dia! Anda telah membuat aplikasi GUI PyQt yang minimal namun fungsional yang dapat Anda gunakan sebagai titik awal untuk membangun buku kontak Anda. Pada titik ini, proyek Anda harus memiliki struktur berikut:
./rpcontacts_project/
│
├── rpcontacts/
│   ├── __init__.py
│   ├── views.py
│   └── main.py
│
└── rpcontacts.py
Di bagian ini, Anda telah membuat struktur minimal yang diperlukan untuk proyek buku kontak Anda menggunakan modul dan paket Python. Anda telah membangun jendela utama aplikasi dan menyusun kode boilerplate untuk membuat aplikasi GUI PyQt. Anda juga baru pertama kali menjalankan aplikasi. Selanjutnya, Anda akan mulai menambahkan fitur ke GUI Anda.
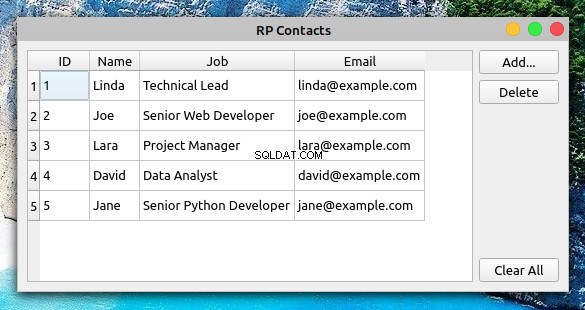
Langkah 2:Membangun GUI Buku Kontak Dengan Python
Sekarang setelah Anda membangun kerangka aplikasi buku kontak Anda, Anda dapat mulai mengkodekan GUI jendela utama. Di akhir bagian ini, Anda telah menyelesaikan langkah-langkah yang diperlukan untuk membuat GUI buku kontak Anda menggunakan Python dan PyQt. GUI akan terlihat seperti ini:
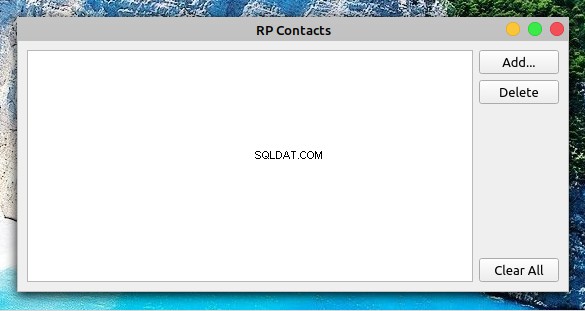
Di tengah jendela, Anda memiliki tampilan tabel untuk menampilkan daftar kontak Anda. Di sisi kanan formulir, Anda memiliki tiga tombol:
- Tambahkan untuk menambahkan kontak baru ke daftar
- Hapus untuk menghapus kontak yang dipilih dari daftar
- Hapus Semua untuk menghapus semua kontak dari daftar
Semua kode dan file yang akan Anda tambahkan atau ubah di bagian ini dikumpulkan di bawah source_code_step_2/ direktori. Anda dapat mengunduhnya dengan mengklik tautan di bawah ini:
Dapatkan Kode Sumber: Klik di sini untuk mendapatkan kode sumber yang akan Anda gunakan untuk membuat buku kontak dengan Python, PyQt, dan SQLite dalam tutorial ini.
Kembali ke views.py modul dan perbarui kode Window untuk menghasilkan GUI di atas:
 1# -*- coding: utf-8 -*-
 2# rpcontacts/views.py
 3
 4"""This module provides views to manage the contacts table."""
 5
 6from PyQt5.QtWidgets import (
 7    QAbstractItemView,
 8    QHBoxLayout,
 9    QMainWindow,
10    QPushButton,
11    QTableView,
12    QVBoxLayout,
13    QWidget,
14)
15
16class Window(QMainWindow):
17    """Main Window."""
18    def __init__(self, parent=None):
19        """Initializer."""
20        # Snip...
21
22        self.setupUI()
23
24    def setupUI(self):
25        """Setup the main window's GUI."""
26        # Create the table view widget
27        self.table = QTableView()
28        self.table.setSelectionBehavior(QAbstractItemView.SelectRows)
29        self.table.resizeColumnsToContents()
30        # Create buttons
31        self.addButton = QPushButton("Add...")
32        self.deleteButton = QPushButton("Delete")
33        self.clearAllButton = QPushButton("Clear All")
34        # Lay out the GUI
35        layout = QVBoxLayout()
36        layout.addWidget(self.addButton)
37        layout.addWidget(self.deleteButton)
38        layout.addStretch()
39        layout.addWidget(self.clearAllButton)
40        self.layout.addWidget(self.table)
41        self.layout.addLayout(layout)
Anda terlebih dahulu mengimpor beberapa kelas PyQt tambahan untuk digunakan di GUI. Berikut adalah beberapa yang lebih relevan:
QPushButtonuntuk membuat Tambah , Hapus , dan Hapus Semua tombolQTableViewuntuk memberikan tampilan seperti tabel yang menampilkan daftar kontakQAbstractItemViewuntuk memberikan akses ke kebijakan perilaku pemilihan tampilan tabel
Dalam kode ini, penambahan pertama ke Window adalah panggilan ke .setupUI() di akhir __init__() . Panggilan ini menghasilkan GUI jendela utama saat Anda menjalankan aplikasi.
Berikut kode yang ada di dalam .setupUI() melakukan:
- Baris 27 membuat
QTableViewcontoh untuk menampilkan daftar kontak. - Baris 28 menyetel
.selectionBehaviorproperti keQAbstractItemView.SelectRows. Ini memastikan bahwa ketika pengguna mengklik sel mana pun dari tampilan tabel, baris lengkap akan dipilih. Baris dalam tampilan tabel menyimpan semua informasi yang terkait dengan satu kontak dalam daftar kontak. - Baris 31 hingga 33 tambahkan tiga tombol ke GUI:Tambah , Hapus , dan Hapus Semua . Tombol ini belum melakukan tindakan apa pun.
- Baris 35 sampai 41 buat dan atur tata letak yang koheren untuk semua widget di GUI.
Dengan tambahan ini pada Window , Anda dapat menjalankan aplikasi lagi. Jendela di layar Anda akan terlihat seperti jendela yang Anda lihat di awal bagian.
Catatan: Nomor baris dalam kode di atas dan contoh kode lainnya dalam tutorial ini dimaksudkan untuk memudahkan penjelasan. Mereka tidak cocok dengan urutan baris dalam modul atau skrip terakhir.
Di bagian ini, Anda telah menjalankan semua langkah yang diperlukan untuk membuat GUI jendela utama buku kontak Anda. Sekarang Anda siap untuk mulai mengerjakan bagaimana aplikasi Anda akan mengelola dan menyimpan data kontak Anda.
Langkah 3:Menyiapkan Database Buku Kontak
Pada titik ini, Anda telah membuat aplikasi PyQt dan GUI jendela utamanya untuk membangun proyek buku kontak Anda. Di bagian ini, Anda akan menulis kode untuk menentukan bagaimana aplikasi terhubung ke database kontak. Untuk menyelesaikan langkah ini, Anda akan menggunakan SQLite untuk menangani database dan dukungan SQL PyQt untuk menghubungkan aplikasi ke database dan untuk bekerja dengan data kontak Anda.
Kode sumber dan file yang akan Anda tambahkan atau ubah di bagian ini disimpan di bawah source_code_step_3/ direktori. Anda dapat mengunduhnya dengan mengklik tautan di bawah ini:
Dapatkan Kode Sumber: Klik di sini untuk mendapatkan kode sumber yang akan Anda gunakan untuk membuat buku kontak dengan Python, PyQt, dan SQLite dalam tutorial ini.
Pertama, kembali ke main.py di rpcontacts/ direktori dan perbarui kode untuk membuat koneksi ke database:
# -*- coding: utf-8 -*-
# rpcontacts/main.py

"""This module provides RP Contacts application."""

import sys

from PyQt5.QtWidgets import QApplication

from .database import createConnection
from .views import Window

def main():
    """RP Contacts main function."""
    # Create the application
    app = QApplication(sys.argv)
    # Connect to the database before creating any window
    if not createConnection("contacts.sqlite"):
        sys.exit(1)
    # Create the main window if the connection succeeded
    win = Window()
    win.show()
    # Run the event loop
    sys.exit(app.exec_())
Dalam hal ini, Anda terlebih dahulu mengimpor createConnection() dari database.py . Fungsi ini akan berisi kode untuk membuat dan membuka koneksi ke database kontak. Anda akan membuat database.py dan tulis createConnection() di bagian berikutnya.
Di dalam main() , baris pertama yang disorot adalah upaya untuk membuat koneksi ke database menggunakan createConnection() . Jika karena alasan tertentu aplikasi tidak dapat membuat koneksi, maka panggil ke sys.exit(1) akan menutup aplikasi tanpa membuat elemen grafis dan akan menunjukkan bahwa telah terjadi kesalahan.
Anda harus menangani koneksi dengan cara ini karena aplikasi bergantung pada database untuk bekerja dengan baik. Jika Anda tidak memiliki koneksi fungsional, maka aplikasi Anda tidak akan berfungsi sama sekali.
Praktik ini memungkinkan Anda untuk menangani kesalahan dan menutup aplikasi dengan rapi jika terjadi masalah. Anda juga dapat memberikan informasi yang relevan kepada pengguna tentang kesalahan yang dialami aplikasi saat mencoba menyambung ke database.
Dengan tambahan ini, saatnya untuk menyelami kode createConnection() .
Menghubungkan ke Database Dengan PyQt dan SQLite
Menghubungkan aplikasi buku kontak Anda ke database yang terkait adalah langkah mendasar dalam mengembangkan aplikasi. Untuk melakukan ini, Anda akan membuat kode fungsi yang disebut createConnection() , yang akan membuat dan membuka koneksi ke database. Jika koneksi berhasil, maka fungsi akan mengembalikan True . Jika tidak, itu akan memberikan informasi tentang penyebab kegagalan koneksi.
Kembali ke rpcontacts/ direktori dan buat modul baru bernama database.py didalamnya. Kemudian tambahkan kode berikut ke modul itu:
 1# -*- coding: utf-8 -*-
 2# rpcontacts/database.py
 3
 4"""This module provides a database connection."""
 5
 6from PyQt5.QtWidgets import QMessageBox
 7from PyQt5.QtSql import QSqlDatabase
 8
 9def createConnection(databaseName):
10    """Create and open a database connection."""
11    connection = QSqlDatabase.addDatabase("QSQLITE")
12    connection.setDatabaseName(databaseName)
13
14    if not connection.open():
15        QMessageBox.warning(
16            None,
17            "RP Contact",
18            f"Database Error: {connection.lastError().text()}",
19        )
20        return False
21
22    return True
Di sini, Anda terlebih dahulu mengimpor beberapa kelas PyQt yang diperlukan. Kemudian Anda mendefinisikan createConnection() . Fungsi ini membutuhkan satu argumen:databaseName menyimpan nama atau jalur ke file database SQLite fisik di sistem file Anda.
Ini kode di dalam createConnection() melakukan:
- Baris 11 membuat koneksi database menggunakan
QSQLITEpengemudi. - Baris 12 menyetel nama file atau jalur ke database.
- Baris 14 mencoba membuka koneksi. Jika terjadi masalah selama panggilan ke
.open(), makaifblok kode menunjukkan pesan kesalahan dan kemudian mengembalikanFalseuntuk menunjukkan bahwa upaya koneksi gagal. - Baris 22 mengembalikan
Truejika upaya koneksi berhasil.
Anda sudah membuat kode createConnection() . Sekarang Anda dapat menulis kode untuk membuat contacts tabel dalam database.
Membuat contacts Tabel
Dengan fungsi yang membuat dan membuka koneksi ke database, Anda dapat melanjutkan ke kode fungsi pembantu untuk membuat contacts meja. Anda akan menggunakan tabel ini untuk menyimpan informasi tentang kontak Anda.
Berikut kode yang mengimplementasikan _createContactsTable() :
# -*- coding: utf-8 -*-
# rpcontacts/database.py

# Snip...
from PyQt5.QtSql import QSqlDatabase, QSqlQuery

def _createContactsTable():
    """Create the contacts table in the database."""
    createTableQuery = QSqlQuery()
    return createTableQuery.exec(
        """
        CREATE TABLE IF NOT EXISTS contacts (
            id INTEGER PRIMARY KEY AUTOINCREMENT UNIQUE NOT NULL,
            name VARCHAR(40) NOT NULL,
            job VARCHAR(50),
            email VARCHAR(40) NOT NULL
        )
        """
    )

def createConnection(databaseName):
    # Snip...
    _createContactsTable()
    return True
Di sini, Anda terlebih dahulu menambahkan impor baru. Anda mengimpor QSqlQuery untuk mengeksekusi dan memanipulasi pernyataan SQL.
Di dalam _createContactsTable() , Anda membuat QSqlQuery contoh. Kemudian Anda memanggil .exec() pada objek kueri dengan CREATE TABLE SQL berbasis string pernyataan sebagai argumen. Pernyataan ini membuat tabel baru yang disebut contacts dalam basis data Anda. Tabel memiliki kolom berikut:
| Kolom | Konten |
|---|---|
id | Integer dengan kunci utama tabel |
name | String dengan nama kontak |
job | Sebuah string dengan jabatan pekerjaan dari sebuah kontak |
email | Sebuah string dengan email kontak |
contacts tabel di database Anda akan menyimpan informasi yang relevan tentang kontak Anda.
Langkah terakhir untuk menyelesaikan coding database.py adalah menambahkan panggilan ke _createContactsTable() dari dalam createConnection() , tepat sebelum return terakhir penyataan. Ini memastikan bahwa aplikasi membuat contacts tabel sebelum melakukan operasi apa pun pada database.
Setelah Anda membuat contacts tabel, Anda dapat menjalankan beberapa pengujian pada database dan juga menambahkan beberapa data sampel untuk pengujian lebih lanjut.
Menguji Basis Data Buku Kontak
Sejauh ini, Anda telah selesai menulis kode yang diperlukan untuk menangani koneksi ke database buku kontak. Di bagian ini, Anda akan melakukan beberapa tes untuk memastikan bahwa kode ini dan database itu sendiri berfungsi dengan baik. Anda juga akan menambahkan beberapa data sampel ke database untuk melakukan pengujian lebih lanjut nanti dalam tutorial ini.
Sekarang buka terminal atau baris perintah dan pindah ke direktori root proyek, rpcontacts_project/ . Sesampai di sana, luncurkan sesi interaktif Python dan ketik kode berikut:
>>> from rpcontacts.database import createConnection

>>> # Create a connection
>>> createConnection("contacts.sqlite")
True

>>> # Confirm that contacts table exists
>>> from PyQt5.QtSql import QSqlDatabase
>>> db = QSqlDatabase.database()
>>> db.tables()
['contacts', 'sqlite_sequence']
Di sini, pertama-tama Anda mengimpor createConnection() dari database.py modul. Kemudian Anda memanggil fungsi ini untuk membuat dan membuka koneksi ke database kontak. Nama file database adalah contacts.sqlite . Karena file ini tidak ada di direktori root proyek, SQLite membuatnya untuk Anda. Anda dapat memeriksanya dengan melihat direktori Anda saat ini.
Selanjutnya, Anda mengonfirmasi bahwa database berisi tabel bernama contacts . Untuk melakukannya, Anda memanggil .database() di QSqlDatabase . Metode kelas ini mengembalikan pointer ke koneksi database saat ini. Dengan referensi koneksi ini, Anda dapat memanggil .tables() untuk mendapatkan daftar tabel dalam database. Perhatikan bahwa tabel pertama dalam daftar adalah contacts , jadi sekarang Anda yakin semuanya berfungsi dengan baik.
Sekarang Anda dapat menyiapkan kueri SQL untuk memasukkan data sampel ke dalam contacts tabel:
>>> # Prepare a query to insert sample data
>>> from PyQt5.QtSql import QSqlQuery

>>> insertDataQuery = QSqlQuery()
>>> insertDataQuery.prepare(
...     """
...     INSERT INTO contacts (
...         name,
...         job,
...         email
...     )
...     VALUES (?, ?, ?)
...     """
... )
True
Kueri di atas memungkinkan Anda untuk memasukkan nilai tertentu ke dalam name , job , dan email atribut dan untuk menyimpan nilai tersebut ke database. Di bawah ini adalah contoh cara melakukannya:
>>> # Sample data
>>> data = [
...     ("Linda", "Technical Lead", "linda@example.com"),
...     ("Joe", "Senior Web Developer", "joe@example.com"),
...     ("Lara", "Project Manager", "lara@example.com"),
...     ("David", "Data Analyst", "david@example.com"),
...     ("Jane", "Senior Python Developer", "jane@example.com"),
... ]

>>> # Insert sample data
>>> for name, job, email in data:
...     insertDataQuery.addBindValue(name)
...     insertDataQuery.addBindValue(job)
...     insertDataQuery.addBindValue(email)
...     insertDataQuery.exec()
...
True
True
True
True
True
Di bagian kode ini, pertama-tama Anda mendefinisikan data untuk menyimpan informasi kontak dari daftar orang. Selanjutnya, Anda menggunakan for loop untuk menyisipkan data dengan memanggil .addBindValue() . Kemudian Anda memanggil .exec() pada objek kueri untuk menjalankan kueri SQL pada database secara efektif.
Karena semua panggilan ke .exec() kembalikan True , Anda dapat menyimpulkan bahwa data berhasil dimasukkan ke dalam database. Jika Anda ingin mengonfirmasi ini, jalankan kode berikut:
>>> query = QSqlQuery()
>>> query.exec("SELECT name, job, email FROM contacts")
True

>>> while query.next():
...     print(query.value(0), query.value(1), query.value(2))
...
Linda Technical Lead linda@example.com
Joe Senior Web Developer joe@example.com
Lara Project Manager lara@example.com
David Data Analyst david@example.com
Jane Senior Python Developer jane@example.com
Itu dia! Basis data Anda berfungsi dengan baik! Sekarang Anda memiliki beberapa contoh data untuk menguji aplikasi, dan Anda dapat fokus pada cara memuat dan menampilkan informasi kontak di jendela utama buku kontak Anda.
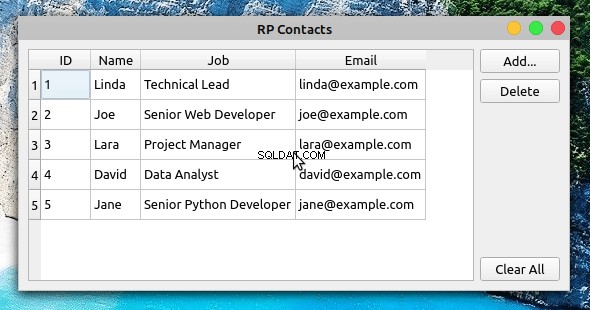
Langkah 4:Menampilkan dan Memperbarui Kontak yang Ada
Untuk menampilkan data kontak Anda di jendela utama aplikasi, Anda dapat menggunakan QTableView . Kelas ini adalah bagian dari arsitektur Model-View PyQt dan menyediakan cara yang kuat dan efisien untuk menampilkan item dari objek model PyQt.
File dan kode yang akan Anda tambahkan atau ubah di bagian ini disimpan di bawah source_code_step_4/ direktori. Untuk mengunduhnya, klik tautan di bawah ini:
Dapatkan Kode Sumber: Klik di sini untuk mendapatkan kode sumber yang akan Anda gunakan untuk membuat buku kontak dengan Python, PyQt, dan SQLite dalam tutorial ini.
Setelah Anda menyelesaikan langkah ini, buku kontak Anda akan terlihat seperti ini:
Objek tampilan tabel di jendela utama menyediakan fungsionalitas yang diperlukan untuk memungkinkan Anda mengubah dan memperbarui informasi kontak dengan cepat.
Misalnya, untuk memperbarui nama kontak, Anda dapat mengklik dua kali sel yang berisi nama tersebut, memperbarui nama, lalu tekan Enter untuk secara otomatis menyimpan perubahan ke database. Namun sebelum Anda dapat melakukannya, Anda perlu membuat model dan menghubungkannya ke tampilan tabel.
Membuat Model untuk Menangani Data Kontak
PyQt menyediakan kumpulan kelas yang kaya untuk bekerja dengan database SQL. Untuk aplikasi buku kontak Anda, Anda akan menggunakan QSqlTableModel , yang menyediakan model data yang dapat diedit untuk satu tabel database. Ini sempurna untuk pekerjaan itu karena database Anda memiliki satu tabel, contacts .
Kembali ke editor kode Anda dan buat modul baru bernama model.py di dalam rpcontacts/ direktori. Tambahkan kode berikut ke file dan simpan:
 1# -*- coding: utf-8 -*-
 2# rpcontacts/model.py
 3
 4"""This module provides a model to manage the contacts table."""
 5
 6from PyQt5.QtCore import Qt
 7from PyQt5.QtSql import QSqlTableModel
 8
 9class ContactsModel:
10    def __init__(self):
11        self.model = self._createModel()
12
13    @staticmethod
14    def _createModel():
15        """Create and set up the model."""
16        tableModel = QSqlTableModel()
17        tableModel.setTable("contacts")
18        tableModel.setEditStrategy(QSqlTableModel.OnFieldChange)
19        tableModel.select()
20        headers = ("ID", "Name", "Job", "Email")
21        for columnIndex, header in enumerate(headers):
22            tableModel.setHeaderData(columnIndex, Qt.Horizontal, header)
23        return tableModel
Dalam kode ini, pertama-tama Anda melakukan beberapa impor yang diperlukan, lalu Anda membuat ContactsModel . Di penginisialisasi kelas, Anda mendefinisikan atribut instance yang disebut .model untuk menampung model data.
Selanjutnya, Anda menambahkan metode statis untuk membuat dan mengatur objek model. Here’s what the code in ._createModel() does:
- Line 16 creates an instance of
QSqlTableModel()calledtableModel. - Line 17 associates the model object with the
contactstable in your database. - Line 18 sets the
.editStrategyproperty of the model toQSqlTableModel.OnFieldChange. With this, you ensure that the changes on the model get saved into the database immediately. - Line 19 loads the table into the model by calling
.select(). - Lines 20 to 22 define and set user-friendly headers for the
contactstable’s columns. - Line 23 returns the newly created model.
At this point, you have your data model ready to use. Now you need to connect the table view widget to the model so you can present your users with the contact information.
Connecting the Model to the View
To display contact data in your contact book’s main window, you need to connect the table view with the data model. To perform this connection, you need to call .setModel() on the table view object and pass the model as an argument:
# -*- coding: utf-8 -*-
# rpcontacts/views.py

# Snip...
from .model import ContactsModel

class Window(QMainWindow):
    """Main Window."""
    def __init__(self, parent=None):
        # Snip...
        self.contactsModel = ContactsModel()
        self.setupUI()

    def setupUI(self):
        """Setup the main window's GUI."""
        # Create the table view widget
        self.table = QTableView()
        self.table.setModel(self.contactsModel.model)
        self.table.setSelectionBehavior(QAbstractItemView.SelectRows)
        # Snip...
In this code, you first import ContactsModel from model.py . This class provides the model that manages the data in your contact database.
In the initializer of Window , you create an instance of ContactsModel . Then inside .setupUI() , you call .setModel() on .table to connect the model with the table view. If you run the application after this update, then you’ll get the window you saw at the beginning of step 4.
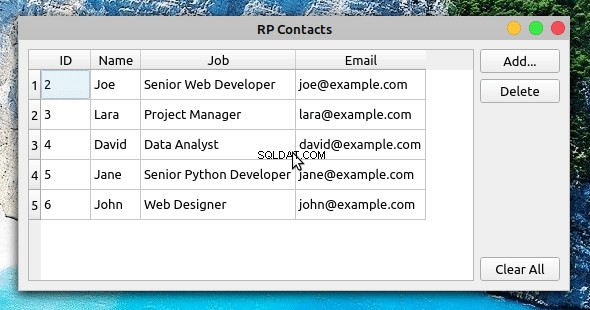
Displaying and Updating Contacts
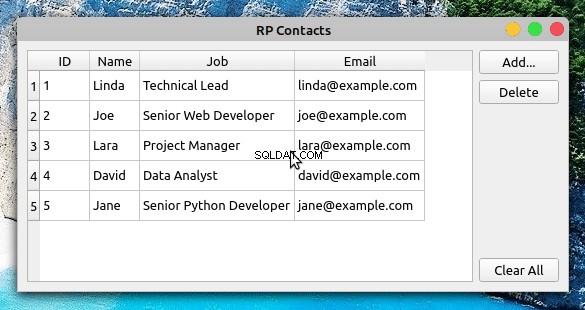
PyQt’s Model-View architecture provides a robust and user-friendly way to create GUI applications that manage databases. Models communicate with and access the data in the database. Any change in a model updates the database immediately. Views are responsible for displaying the data to the user and also for providing editable widgets to allow the user to modify the data directly in the view.
If the user modifies the data through the view, then the view internally communicates with and updates the model, which saves the changes to the physical database:
In this example, you double-click Joe’s Job bidang. This gives you access to an editable widget that allows you to modify the value in the cell. Then you update the job description from Senior Web Developer to Web Developer . When you hit Enter , the table view communicates the change to the model, and the model saves the change to the database immediately.
To confirm that the changes were successfully saved into the database, you can close the application and run it again. The table view should reflect your updates.
Step 5:Creating New Contacts
At this step, your contact book application provides functionality to load, display, and update the information about your contacts. Even though you’re able to modify and update the contact information, you can neither add nor remove contacts from the list.
All the files and the code you’ll add or modify in this section are collected in the source_code_step_5/ direktori. To download them, click the link below:
Get the Source Code: Click here to get the source code you’ll use to build a contact book with Python, PyQt, and SQLite in this tutorial.
In this section, you’ll provide the required functionality to add new contacts to the database, using a pop-up dialog to enter the new information. The first step is to create the Add Contact dialog.
Creating the Add Contact Dialog
Dialogs are small windows that you can use to communicate with your users. In this section, you’ll code the contact book’s Add Contact dialog to allow your users add new contacts to their current list of contacts.
To code the Add Contact dialog, you’ll subclass QDialog . This class provides a blueprint to build dialogs for your GUI applications.
Now open the views.py module and update the import section like this:
# -*- coding: utf-8 -*-
# rpcontacts/views.py

# Snip...
from PyQt5.QtCore import Qt
from PyQt5.QtWidgets import (
    QAbstractItemView,
    QDialog,
    QDialogButtonBox,
    QFormLayout,
    QHBoxLayout,
    QLineEdit,
    QMainWindow,
    QMessageBox,
    QPushButton,
    QTableView,
    QVBoxLayout,
    QWidget,
)
The highlighted lines in the above code import the required classes to build the Add Contact dialog. With these classes in your namespace, add the following class at the end of views.py :
 1# -*- coding: utf-8 -*-
 2# rpcontacts/views.py
 3
 4# Snip...
 5class AddDialog(QDialog):
 6    """Add Contact dialog."""
 7    def __init__(self, parent=None):
 8        """Initializer."""
 9        super().__init__(parent=parent)
10        self.setWindowTitle("Add Contact")
11        self.layout = QVBoxLayout()
12        self.setLayout(self.layout)
13        self.data = None
14
15        self.setupUI()
16
17    def setupUI(self):
18        """Setup the Add Contact dialog's GUI."""
19        # Create line edits for data fields
20        self.nameField = QLineEdit()
21        self.nameField.setObjectName("Name")
22        self.jobField = QLineEdit()
23        self.jobField.setObjectName("Job")
24        self.emailField = QLineEdit()
25        self.emailField.setObjectName("Email")
26        # Lay out the data fields
27        layout = QFormLayout()
28        layout.addRow("Name:", self.nameField)
29        layout.addRow("Job:", self.jobField)
30        layout.addRow("Email:", self.emailField)
31        self.layout.addLayout(layout)
32        # Add standard buttons to the dialog and connect them
33        self.buttonsBox = QDialogButtonBox(self)
34        self.buttonsBox.setOrientation(Qt.Horizontal)
35        self.buttonsBox.setStandardButtons(
36            QDialogButtonBox.Ok | QDialogButtonBox.Cancel
37        )
38        self.buttonsBox.accepted.connect(self.accept)
39        self.buttonsBox.rejected.connect(self.reject)
40        self.layout.addWidget(self.buttonsBox)
There are a lot of things happening in this code. Here’s a summary:
- Line 5 defines a new class that inherits from
QDialog. - Lines 7 to 15 define the class initializer. In this case, the most relevant addition is
.data, which is an instance attribute that you’ll use to hold the data your users provide.
In .setupUI() , you define the dialog’s GUI:
- Lines 20 to 25 add three
QLineEditobjects:name,job, andemail. You’ll use these line edits to take the user’s input for the name, job description, and email of the contact to add. They represent the corresponding fields in the database. - Lines 27 to 30 create a
QFormLayoutinstance that arranges the line edits in a form. This layout manager also provides user-friendly labels for each line edit or field. - Lines 33 to 37 add a
QDialogButtonBoxobject that provides two standard buttons:OK and Cancel . The OK button accepts the user’s input and the Cancel button rejects it. - Lines 38 and 39 connect the dialog’s built-in
.accepted()and.rejected()signals with the.accept()andreject()slots, respectively. In this case, you’ll rely on the dialog’s built-in.reject()slot, which closes the dialog without processing the input. Other than that, you just need to code the.accept()slot.
To code the dialog’s .accept() slot, you need to consider that any user input needs validation to make sure that it’s correct and safe. This is especially true when you’re working with SQL databases because of the risk of an SQL injection attack.
In this example, you’ll add a minimal validation rule just to make sure that the user provides data for each input field in the dialog. However, adding your own, more robust validation rules would be a good exercise.
Without further ado, get back to AddDialog and add the following code for its .accept() slot:
 1# -*- coding: utf-8 -*-
 2# rpcontacts/views.py
 3
 4# Snip...
 5class AddDialog(QDialog):
 6    def __init__(self, parent=None):
 7        # Snip...
 8
 9    def setupUI(self):
10        # Snip...
11
12    def accept(self):
13        """Accept the data provided through the dialog."""
14        self.data = []
15        for field in (self.nameField, self.jobField, self.emailField):
16            if not field.text():
17                QMessageBox.critical(
18                    self,
19                    "Error!",
20                    f"You must provide a contact's {field.objectName()}",
21                )
22                self.data = None  # Reset .data
23                return
24
25            self.data.append(field.text())
26
27        if not self.data:
28            return
29
30        super().accept()
The code within .accept() does the following:
- Line 14 initializes
.datato an empty list ([]). This list will store the user’s input data. - Line 15 defines a
forloop that iterates over the three line edits, or fields, in the dialog. - Lines 16 to 23 define a conditional statement that checks if the user has provided data for each field in the dialog. If not, then the dialog shows an error message that warns the user about the missing data.
- Line 25 adds the user’s input for each field to
.data. - Line 30 calls the superclass’s
.accept()slot to provide the standard behavior that closes the dialog after the user clicks OK .
With this code, you’re ready to add a new slot to the contact book’s main window. This slot will launch the dialog, and if the user provides valid input, then the slot will use the model to save the newly added contact to the database.
Launching the Add Contact Dialog
Now that you’ve coded the Add Contact dialog, it’s time to add a new slot to Window so you can launch the dialog by clicking Add and process the user’s input once they click OK .
Go to the definition of Window and add the following code:
 1# -*- coding: utf-8 -*-
 2# rpcontacts/views.py
 3
 4# Snip...
 5class Window(QMainWindow):
 6    # Snip...
 7
 8    def setupUI(self):
 9        # Snip...
10        self.addButton = QPushButton("Add...")
11        self.addButton.clicked.connect(self.openAddDialog)
12        # Snip...
13
14    def openAddDialog(self):
15        """Open the Add Contact dialog."""
16        dialog = AddDialog(self)
17        if dialog.exec() == QDialog.Accepted:
18            self.contactsModel.addContact(dialog.data)
19            self.table.resizeColumnsToContents()
Here’s a summary of what’s happening in the above code:
- Line 11 connects the
.clicked()signal of the Add button to the newly created slot,.openAddDialog(). This way, a click on the button will automatically call the slot. - Line 14 defines the
.openAddDialog()slot. - Line 16 creates an instance of
AddDialog. - Lines 17 to 19 define a conditional statement to check if the dialog was accepted. If so, then line 14 calls
.addContact()on the data model with the dialog’s.dataattribute as an argument. The final statement in theifcode block resizes the table view to fit the size of its updated content.
Now that you have a way to launch the Add Contact dialog and to process its data, you need to provide the code for .addContact() in your data model. That’s a topic for the next section.
Processing the Add Dialog’s Data in the Model
In this section, you’ll add a method called .addContact() to your data model, ContactsModel . Open model.py in your code editor, go to the definition of ContactsModel , and add the following code:
 1# -*- coding: utf-8 -*-
 2# rpcontacts/model.py
 3
 4# Snip...
 5class ContactsModel:
 6    # Snip...
 7
 8    def addContact(self, data):
 9        """Add a contact to the database."""
10        rows = self.model.rowCount()
11        self.model.insertRows(rows, 1)
12        for column, field in enumerate(data):
13            self.model.setData(self.model.index(rows, column + 1), field)
14        self.model.submitAll()
15        self.model.select()
Inside .addContact() , the code does the following:
- Line 10 gets the current number of rows in the data model.
- Line 11 inserts a new row at the end of the data model.
- Lines 12 and 13 run a
forloop that inserts every item indatainto the corresponding cell in the data model. To do this, line 9 calls.setData()on the model, with the index of the cell and the current datafieldas arguments. - Line 14 submits the changes to the database by calling
.submitAll()on the model. - Line 15 reloads the data from the database into the model.
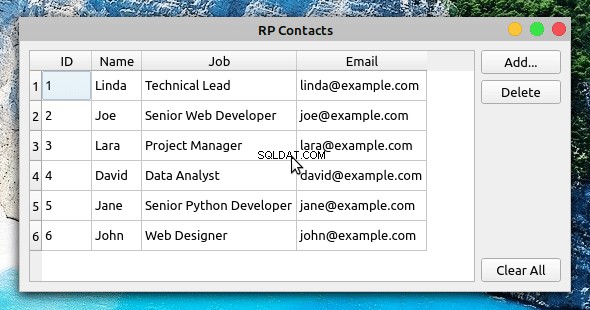
If you run the application with these new additions, then you’ll get the following behavior:
Now when you click Add , the Add Contact dialog appears on your screen. You can use the dialog to provide the required information for a new contact and to add the contact to the database by clicking OK .
Step 6:Deleting Existing Contacts
The final feature you’ll add to the contact book application is the ability to remove contacts from the database using the GUI.
Again, you’ll find all the files and the code added or modified in this section under the source_code_step_6/ direktori. You can download them by clicking the link below:
Get the Source Code: Click here to get the source code you’ll use to build a contact book with Python, PyQt, and SQLite in this tutorial.
In this section, you’ll first add the capability to delete a single contact at a time. Then you’ll add code to remove all the contacts from the database.
Deleting Selected Contacts
To remove a single contact from the contact database, you need to select the desired contact in the table view on the contact book’s main window. Once you’ve selected the contact, you can click Delete to perform the operation on the database.
Go to the model.py module and add the following code to implement .deleteContact() inside ContactsModel :
# -*- coding: utf-8 -*-
# rpcontacts/model.py

# Snip...
class ContactsModel:
    # Snip...

    def deleteContact(self, row):
        """Remove a contact from the database."""
        self.model.removeRow(row)
        self.model.submitAll()
        self.model.select()
This method has three lines of code. The first line removes the selected row . The second line submits the change to the database. Finally, the third line reloads the data into the model.
Next, get back to the views.py module and add the code behind the Delete button in Window :
# -*- coding: utf-8 -*-
# rpcontacts/views.py

# Snip...
class Window(QMainWindow):
    # Snip...

    def setupUI(self):
        """Setup the main window's GUI."""
        # Snip...
        self.deleteButton = QPushButton("Delete")
        self.deleteButton.clicked.connect(self.deleteContact)
        # Snip...

    def deleteContact(self):
        """Delete the selected contact from the database."""
        row = self.table.currentIndex().row()
        if row < 0:
            return

        messageBox = QMessageBox.warning(
            self,
            "Warning!",
            "Do you want to remove the selected contact?",
            QMessageBox.Ok | QMessageBox.Cancel,
        )

        if messageBox == QMessageBox.Ok:
            self.contactsModel.deleteContact(row)
In the first highlighted line, you connect the .clicked() signal of the Delete button to the .deleteContact() slot. This connection triggers a call to .deleteContact() every time the user clicks the button.
In .deleteContact() , you first get the index of the currently selected row in the table view. The if statement checks if the index is lower than 0 , which would mean that there are no contacts in the table view. If so, then the method returns immediately without performing any further actions.
Then the method shows a warning message confirming that the user wants to delete the selected contact. If the user accepts the operation, then .deleteContact(row) gets called. In this case, row represents the index of the currently selected row in the table.
After these additions, you can run the application again to get the following behavior:
Now when you select a contact from the table view and click Delete , you’re presented with a warning message. If you click the message dialog’s OK button, then the application removes the selected contact from the database, updating the table view accordingly.
Clearing the Contact Database
To remove all the contacts from the database, you’ll start by adding a method called .clearContacts() to ContactsModel . Open your model.py module and add the following method at the end of the class:
 1# -*- coding: utf-8 -*-
 2# rpcontacts/model.py
 3
 4# Snip...
 5class ContactsModel:
 6    # Snip...
 7
 8    def clearContacts(self):
 9        """Remove all contacts in the database."""
10        self.model.setEditStrategy(QSqlTableModel.OnManualSubmit)
11        self.model.removeRows(0, self.model.rowCount())
12        self.model.submitAll()
13        self.model.setEditStrategy(QSqlTableModel.OnFieldChange)
14        self.model.select()
Here’s what each line of code does:
- Line 10 sets the data model’s
.editStrategyproperty toQSqlTableModel.OnManualSubmit. This allows you to cache all the changes until you call.submitAll()later on. You need to do this because you’re changing several rows at the same time. - Line 11 removes all the rows from the model.
- Line 12 saves changes to the database.
- Line 13 resets the model’s
.editStrategyproperty to its original value,QSqlTableModel.OnFieldChange. If you don’t reset this property to its original value, then you won’t be able to update the contacts directly in the table view. - Line 14 reloads the data into the model.
Once you’ve coded .clearContacts() , you can get back to the views.py file and update Window with the following code:
# -*- coding: utf-8 -*-
# rpcontacts/views.py

# Snip...
class Window(QMainWindow):
    # Snip...

    def setupUI(self):
        """Setup the main window's GUI."""
        # Snip...
        self.clearAllButton = QPushButton("Clear All")
        self.clearAllButton.clicked.connect(self.clearContacts)
        # Snip...

    def clearContacts(self):
        """Remove all contacts from the database."""
        messageBox = QMessageBox.warning(
            self,
            "Warning!",
            "Do you want to remove all your contacts?",
            QMessageBox.Ok | QMessageBox.Cancel,
        )

        if messageBox == QMessageBox.Ok:
            self.contactsModel.clearContacts()
The first highlighted line in this code connects the .clicked() signal of the Clear All button to the .clearContacts() slot below.
In .clearContacts() , you first create a message dialog, messageBox , to ask the user to confirm the removing operation. If the user confirms the operation by clicking OK , then .clearContacts() gets called on the model to remove all the contacts from the database:
Itu dia! With this last piece of code, your contact book application is complete. The application provides features that allow your users to display, add, update, and remove contacts from the database.
Conclusion
Building a contact book GUI application with Python, PyQt, and SQLite is an excellent exercise for you to expand your skills with these tools and as a developer in general. Coding projects like this allows you to apply the knowledge and skills you already have and also pushes you to research and learn about new topics every time you encounter a new programming problem.
In this tutorial, you learned how to:
- Build the GUI for a contact book application using PyQt
- Use PyQt’s SQL support to connect the application to an SQLite database
- Use PyQt’s Model-View architecture to work with the application’s database
You can download the complete source code for the contact book application and also the code to complete each step in this tutorial by clicking the link below:
Get the Source Code: Click here to get the source code you’ll use to build a contact book with Python, PyQt, and SQLite in this tutorial.
Next Steps
At this point, you’ve completed a fully functional contact book project. The application provides minimal functionality, but it’s a good starting point to continue adding features and take your Python and PyQt skills to the next level. Here are some next step ideas that you can implement:
-
Add new data fields: Adding new data fields to store more information about your contacts would be great. For example, you can add the contact’s photo, phone number, web page, Twitter handle, and so on. To do this, you might need to create new tables and set up relations between them. PyQt provides the
QSqlRelationalTableModel, which defines an editable data model for a single table and provides foreign key support. -
Provide search capability: Giving your users a way to search for a contact in the database is arguably a must-have feature in this kind of application. To implement it, you can use PyQt’s
QSqlQueryandQSqlQueryModel. -
Add back-up capability: Providing a way of backing up contact information is another interesting feature. Users might face problems with their computers and lose their data. You can provide options to upload the data to a cloud service or to back it up to an external disk.
These are just a few ideas for how you can continue adding features to your contact book. Take the challenge and build something amazing on top of this!